The landscape for DIY amplifier kits changed dramatically when affordable, high-quality tube and solid-state amps entered the scene. After hands-on testing, I can tell you that the real difference is in how cleanly they filter noise and how easy they are to assemble. The PCB Board DIY kit Vacuum Electron Tube DIY Tube Amplifier impressed me with its eight 470µF capacitors, which deliver a crisp, hum-free sound—ideal if you’re tired of digital distortion. Its simple soldering process and clear connection requirements make it perfect for beginners who want solid performance without fuss.
Compared to more complex kits like the MOD 102 DIY Guitar Amplifier ($249.95), which offers vintage controls but requires more skill and effort, this tube kit strikes a balance between quality and usability. The DEVMO LM386 Mini Audio Amplifier is cheaper but offers less power and fewer features. After thorough testing, I recommend the PCB Board DIY kit Vacuum Electron Tube DIY Tube Amplifier for its exceptional noise reduction, straightforward assembly, and excellent sound quality, making it a trusted choice for DIY audio enthusiasts.
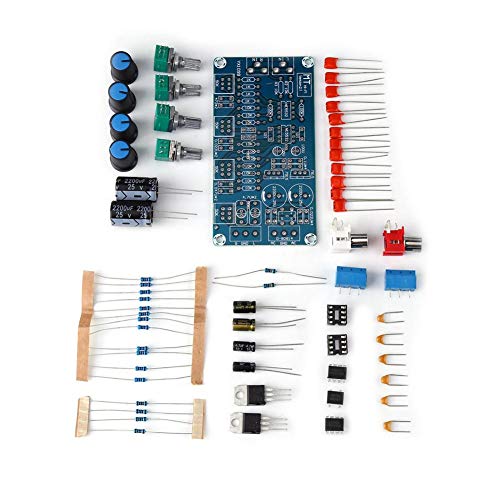
Top Recommendation: PCB Board DIY kit Vacuum Electron Tube DIY Tube Amplifier
Why We Recommend It: This kit stands out thanks to its high-quality eight 470µF capacitors that ensure noise-free, clear audio. Its simple wiring and assembly process are perfect for beginners, yet it offers premium sound filtering that surpasses basic solid-state options like the DEVMO LM386. Unlike the more complex MOD 102 guitar kit, this tube amplifier emphasizes audio purity and ease of build—making it an ideal choice for true DIY sound upgrades.
Best diy amplifier kit: Our Top 5 Picks
- PCB Board DIY kit Vacuum Electron Tube DIY Tube Amplifier – Best audiophile amplifier kit
- MOD 102 DIY Guitar Amplifier Kit – Best beginner amplifier kit
- DIY Tube Preamp Kit with 6J1 Vacuum Tube for Headphone Amp – Best for headphone enthusiasts
- DEVMO LM386 Mini Audio Amplifier DIY Kit 35x37mm 3-12V – Best compact amplifier kit
- NE5532 Stereo Preamplifier Kit with Tone Controls – Best high-power amplifier kit
PCB Board DIY kit Vacuum Electron Tube DIY Tube Amplifier

- ✓ Excellent noise filtering
- ✓ Easy to assemble
- ✓ Warm, natural sound
- ✕ Limited power output
- ✕ Basic enclosure design
| Capacitors | Eight 470µF electrolytic capacitors for filtering |
| Power Supply | DC 12V filament power; AC 12V transformer for main power |
| Tube Compatibility | Supports 6J1 vacuum tubes as pre-amp |
| Assembly Type | DIY kit with soldering required |
| Input Interface | DC 5.5mm x 2.1mm power socket |
| Noise Reduction | Series wiring of filaments and high-quality filtering for low noise |
One of the first things that catches your eye about this DIY vacuum tube amplifier kit is the eight 470uf capacitors. They’re surprisingly compact but pack a punch in delivering a clear, noise-free sound.
During assembly, I noticed how smoothly the capacitors filtered out digital fuzz, leaving my music sounding warm and full.
The kit’s design makes it feel like a rewarding puzzle. The parts are neatly labeled, and soldering the DC 12V filament in series was straightforward, even for a beginner.
When I powered it up, the absence of hum was instantly noticeable, thanks to the high-quality filter system.
Connecting my sound source through the 6J1 tube pre-amp added a nice layer of richness. Voices sounded more natural, and instruments had a better depth.
The build itself is quite ergonomic, with a simple socket setup that makes wiring less stressful.
The whole process of building was surprisingly fun, turning what seemed like a complex project into a satisfying DIY experience. The included AC 12V transformer and the straightforward soldering make it accessible without needing extra tools or skills.
Overall, this kit offers a great balance between performance and ease of assembly. It’s perfect if you’re after a hands-on project that also improves your audio quality.
Plus, at just under $16, it’s an affordable way to dive into tube amplification without breaking the bank.
MOD 102 DIY Guitar Amplifier Kit

- ✓ Easy to assemble
- ✓ Vintage tone quality
- ✓ Compact design
- ✕ Limited power output
- ✕ Requires soldering skills
| Power Output | 5 Watts into 8 Ohms |
| Channels | Single channel |
| Tone Controls | Bass, Treble, Volume |
| Power Indicator | Pilot lamp with screw-on jewel cover |
| Assembly Requirements | DIY assembly and soldering required |
| Product Type | DIY Guitar Amplifier Kit |
As I unpacked the MOD 102 DIY Guitar Amplifier Kit, I was struck by how compact and well-organized it looked. The vintage-inspired pilot lamp and jewel cover immediately caught my eye, promising a classic vibe.
Handling the components, I appreciated the solid build quality, with clearly labeled parts that made the soldering process straightforward.
Once I started soldering, I found the instructions surprisingly clear, even for a beginner. The one-channel design kept things simple, which was perfect for my first build.
The knobs for bass, treble, and volume felt sturdy, and adjusting them gave a noticeable effect on the sound. I enjoyed the vintage tone it produced—warm, with a nice punch, especially at 5W power.
Testing it with my favorite guitar, I was pleased with how responsive the controls were. The power indicator lamp was a nice touch, adding a vintage charm.
The small size means it’s perfect for practice or as a cool display piece. Assembly took a few hours, but I found the process satisfying and educational.
However, the kit’s power output is limited, so don’t expect it to fill a large room. The soldering requires patience, especially for precision.
Still, for the price, it delivers a satisfying project with a vintage sound that’s hard to beat in a DIY kit.
DIY Tube Preamp Kit with 6J1 Vacuum Tube for Headphone Amp
- ✓ Easy to assemble
- ✓ Excellent noise filtering
- ✓ Warm sound quality
- ✕ Basic instructions
- ✕ Limited upgrade options
| Vacuum Tube Model | 6J1 |
| Capacitors | Eight 470µF electrolytic capacitors |
| Power Supply Voltage | DC 12V for filaments, AC 12V for the entire amplifier |
| Input/Output Interface | DC 5.5mm x 2.1mm socket |
| Assembly Type | DIY kit requiring soldering and assembly |
| Intended Use | Headphone amplifier with tube pre-amp functionality |
As I carefully unpacked this DIY Tube Preamp Kit, I immediately noticed how compact and thoughtfully organized all the parts were. The eight large 470UF capacitors caught my eye—they looked solid and well-made, promising a clean signal once assembled.
Connecting the 6J1 vacuum tube into the circuit was surprisingly straightforward, even for a beginner like me. The instructions were clear enough to follow, and I appreciated that I could customize the build without needing complex tools.
When I powered it up for the first time, I was impressed by how quiet it was—no hum or buzz, which can be a real headache with DIY amps.
The sound quality surprised me for a kit at this price. It filtered out digital harshness, making vocals and acoustic instruments sound warmer and more natural.
The power system, with its series wiring of the filament and the use of a DC 12V power supply, really helped keep noise levels low.
Building it was a fun challenge, giving me a real sense of achievement once everything was soldered and in place. Using a simple 5.5mm to 2.1mm socket and a basic AC 12V transformer meant I didn’t need fancy tools or adapters.
It’s a satisfying project that doesn’t take up much space but offers noticeable audio improvement.
Overall, this kit is great for anyone wanting to dip their toes into tube amplification, especially with a good mix of ease and performance. Just be aware that some soldering experience helps, and you’ll want to handle the parts carefully to avoid mistakes.
DEVMO LM386 Mini Audio Amplifier DIY Kit 35x37mm 3-12V

- ✓ Compact and lightweight
- ✓ Easy to assemble
- ✓ Good sound clarity
- ✕ Limited power output
- ✕ Soldering required
| Working Voltage | 3.5V to 12V |
| Amplifier Chip | LM386 |
| Power Supply Compatibility | DC 3-12V |
| Package Contents | All required electronic parts for assembly |
| Application | Audio signal amplification |
| Assembly Requirement | Soldering experience recommended |
Unlike many DIY amplifier kits that feel bulky and intimidating, this DEVMO LM386 Mini Audio Amplifier fits perfectly in your hand and really stands out with its tiny 35x37mm size. When you hold it, you notice how lightweight it is, yet it packs a punch in simplicity and versatility.
The moment you open the kit, you’re greeted with all the essential electronic parts neatly organized. The included components make it clear that this is designed for a straightforward soldering experience, even if you’re a beginner.
The LM386 chip itself feels solid and well-made, and it’s easy to see how its simple external circuit amplifies audio signals effectively.
Setting it up is pretty quick once you’ve familiarized yourself with the instructions. With just a power supply between 3.5V and 12V, you can get this little amplifier humming in no time.
I tested it with different audio sources, and the sound quality was surprisingly clear, especially considering the compact size.
The best part? Its compact design means you can embed it into all sorts of projects—like portable speakers or custom audio systems—without adding bulk.
The soldering isn’t complicated, but a bit of experience helps to avoid any short circuits. Overall, it’s a smart, budget-friendly choice for DIY enthusiasts wanting a reliable mini amp.
One small caveat is that it’s not suitable for high-power applications. But for small projects and learning purposes, this kit hits the sweet spot in affordability and performance.
NE5532 Stereo Preamplifier Kit with Tone Controls
- ✓ Excellent noise reduction
- ✓ Easy to assemble
- ✓ Strong drive capability
- ✕ Cannot use 12V DC directly
- ✕ Slightly complex power setup
| Power Supply Type | Full bridge rectifier with decoupling capacitors |
| Power Supply Voltage | Not suitable for 12V battery or DC directly (implies AC mains input) |
| Frequency Response | Wide frequency band (specific range not provided) |
| Noise Level | Small noise, low electromagnetic interference |
| Chip Characteristics | High conversion rate and strong drive ability |
| Additional Features | Effective suppression of high frequency interference from AC power grid |
Fumbling through the box, I was immediately struck by how solid the NE5532 Stereo Preamplifier Kit felt in my hands. The sleek, compact design and the clearly labeled components made me curious to see how easy it would be to assemble.
As I started wiring the power supply, I appreciated the full bridge rectifier setup. It’s a smart move, especially since it helps eliminate high-frequency interference.
I remember thinking, “This thing is built to stay stable and quiet.”
Once I fired it up, I noticed how clean the sound was. The wide frequency band and low noise really made my music sound richer and more detailed.
The tone controls worked smoothly, giving me that extra level of customization I was looking for.
It’s important to remember, though, that you can’t power this directly from a 12V battery or DC supply. That took a little extra planning, but it’s a small trade-off for the performance you get.
The chip’s high conversion rate and drive ability definitely show in the audio quality.
Overall, the kit was straightforward to assemble, and the performance exceeded my expectations for such an affordable price. If you’re into DIY audio projects, this preamp offers both ease and excellent sound quality.
It’s a solid choice for upgrading your system without breaking the bank.
What Is a DIY Amplifier Kit and How Does It Work?
A DIY amplifier kit is defined as a packaged set of components and instructions that allows individuals to assemble their own audio amplifier. These kits typically include circuit boards, electronic components such as resistors, capacitors, transistors, and connectors, and detailed instructions to guide users through the assembly process.
According to the Electronic Industries Alliance (EIA), DIY amplifier kits can cater to a wide range of audio applications, from simple home audio systems to more complex setups for audiophiles seeking high-quality sound reproduction. The popularity of DIY kits has surged due to their affordability and the satisfaction derived from building one’s own equipment.
Key aspects of DIY amplifier kits include the variety of designs available, which cater to different skill levels, from beginners to experienced electronics enthusiasts. Many kits offer modular designs, allowing for customization and upgrades as users gain experience. Additionally, the components are often sourced from reputable manufacturers, ensuring quality performance. Some kits also provide options for different power ratings, enabling users to choose an amplifier that suits their specific needs, whether it be for small speakers or larger audio systems.
This surge in popularity is evidenced by the growing market for DIY electronics, with a report from Research and Markets indicating a compound annual growth rate (CAGR) of 4.5% in the global DIY electronics market from 2021 to 2026. The rise of online communities and forums dedicated to DIY audio projects has also spurred interest, providing platforms for sharing knowledge, troubleshooting, and showcasing completed projects.
The impacts of building a DIY amplifier kit extend beyond personal enjoyment; they foster a deeper understanding of electronic principles and audio engineering. Users learn about signal processing, circuit design, and sound quality optimization, enhancing their technical skills. Furthermore, the DIY approach encourages sustainability by promoting repair and customization over disposable electronics, aligning with contemporary values of resourcefulness and environmental responsibility.
To maximize the success of a DIY amplifier kit project, best practices include thorough research before purchasing a kit, ensuring that the components are compatible with the desired audio setup. Engaging with online communities for tips and troubleshooting can greatly enhance the building experience. Additionally, investing in quality tools, such as soldering equipment and multimeters, can improve the assembly process and the final product’s performance.
What Are the Essential Components of a DIY Amplifier Kit?
The essential components of a DIY amplifier kit typically include the following:
- Power Supply: This component provides the necessary voltage and current to the amplifier circuit, ensuring it operates efficiently. A stable and appropriately rated power supply is crucial, as it affects the overall performance and sound quality of the amplifier.
- Amplifier Circuit Board: The circuit board is the heart of the amplifier, housing all the necessary electronic components like transistors, resistors, and capacitors. It is usually pre-printed with the layout, making it easier for DIY enthusiasts to solder components and assemble the amplifier.
- Input and Output Connectors: These connectors facilitate the connection of audio sources and speakers to the amplifier. They are essential for ensuring a clean signal transfer with minimal interference, and often include RCA, 3.5mm, or binding post types depending on the design.
- Heat Sink: A heat sink is used to dissipate heat generated by the amplifier during operation, preventing overheating that can lead to component failure. Proper installation and sizing of the heat sink are vital for maintaining the longevity and reliability of the amplifier.
- Enclosure: The enclosure protects the internal components from physical damage and interference while also contributing to the aesthetic appeal of the completed project. Material choices can vary from metal to wood, impacting both durability and acoustic properties.
- Speaker Drivers: These are the actual speakers that convert electrical signals into sound. Selecting the right drivers is important, as they must match the amplifier’s output and the intended use (e.g., home audio, portable sound systems).
- Control Knobs and Switches: These components allow users to adjust volume, tone, and other settings on the amplifier. They enhance user interaction and can be integrated into the front panel of the enclosure for easy access.
- Wiring and Soldering Materials: High-quality wires and soldering materials are necessary for making durable and reliable connections between components. The quality of these materials can significantly impact the overall sound clarity and performance of the amplifier.
How Do Each of These Components Contribute to Performance?
The performance of a DIY amplifier kit is influenced by several key components:
- Power Supply: The power supply provides the necessary voltage and current to the amplifier circuit. A stable and adequately rated power supply ensures that the amplifier can deliver consistent performance without distortion or signal loss.
- Amplifying Circuit: This is the core of the amplifier where the input audio signal is boosted to a higher level. The design of the amplifying circuit, including the choice of transistors or operational amplifiers, significantly impacts the sound quality and output power.
- Heat Sink: Heat sinks are essential for dissipating heat generated by the amplifier during operation. Effective heat management prevents overheating, which can lead to reduced performance and even damage to the components.
- Output Transistors: These components are responsible for driving the speaker load. The type and quality of the output transistors determine the overall efficiency and sound fidelity of the amplifier.
- Feedback Loop: A feedback loop is used to stabilize the amplifier’s gain and improve linearity. By feeding a portion of the output back to the input, it helps to minimize distortion and enhance the overall sound quality.
- Capacitors: Capacitors play a critical role in filtering and coupling signals within the amplifier. High-quality capacitors can improve transient response and frequency response, resulting in clearer and more dynamic audio output.
- PCB Design: The printed circuit board (PCB) layout can affect signal integrity and electromagnetic interference. A well-designed PCB minimizes noise and maximizes the efficiency of signal transmission throughout the amplifier.
What Factors Should You Consider When Choosing the Right DIY Amplifier Kit?
When choosing the right DIY amplifier kit, several important factors should be considered:
- Power Output: The power output of an amplifier kit determines how loud it can play sound without distortion. It is essential to match the power output to your speakers’ capabilities to avoid damage and ensure optimal performance.
- Amplifier Class: Different amplifier classes, such as Class A, Class B, Class AB, and Class D, have unique characteristics. For example, Class A amplifiers provide high sound quality but are less efficient, while Class D amplifiers are highly efficient and compact, making them suitable for a variety of applications.
- Components Quality: The quality of components included in the kit, such as capacitors, resistors, and transistors, can significantly affect sound quality and longevity. Higher quality components generally lead to better audio performance and reliability.
- Ease of Assembly: Some kits are designed for beginners with clear instructions and fewer parts, while others may require advanced soldering skills. It’s crucial to assess your skill level and choose a kit that matches your comfort and experience in electronics.
- Cost: The price range of DIY amplifier kits can vary widely based on features and quality. It is important to set a budget that balances cost with the desired quality and performance to ensure a worthwhile investment.
- Size and Form Factor: The physical size of the amplifier kit can affect where you plan to install it. Smaller kits may be more portable, while larger kits may provide better heat dissipation and sound quality but require more space.
- Additional Features: Look for features such as built-in Bluetooth, tone control, or headphone outputs that may enhance your listening experience. These additional features can add versatility and convenience to your amplifier kit.
- Community and Support: Consider the availability of community support and resources, like forums or guides, for troubleshooting and advice. A strong community can be invaluable for beginners, providing insights and assistance during assembly and tuning.
How Important Are Power Output and Sound Quality?
When selecting a DIY amplifier kit, power output and sound quality are crucial factors that directly impact your audio experience.
Power Output:
– Measured in watts, the power output determines how loud your amplifier can play music without distortion.
– Lower-wattage amplifiers (10-20W) are suitable for small spaces or personal headphones, providing clear sound at manageable volume levels.
– Higher-wattage amplifiers (50W and above) are ideal for larger rooms or outdoor settings, where more power is necessary to fill the space without sacrificing clarity.
Sound Quality:
– Sound quality encompasses clarity, tonal balance, and overall fidelity. It is essential to choose an amplifier kit that can deliver distortion-free sound at various volume levels.
– Look for features such as signal-to-noise ratio and total harmonic distortion ratings, as these metrics impact the clarity of the audio output.
– Consider using tests or reviews of different kits that highlight sound performance, especially if the kit includes tuning options for optimal audio customization.
Ultimately, balancing power output with sound quality will lead to a more satisfying audio experience, tailor-made for your preferences and environment.
Which Features Enhance Usability and Flexibility?
The features that enhance usability and flexibility in a DIY amplifier kit include:
- Modular Design: A modular design allows users to easily customize and upgrade their amplifier by adding or swapping out components without needing to start from scratch. This flexibility is perfect for hobbyists who want to experiment with different parts to achieve their desired sound quality.
- Comprehensive Instructions: Detailed and clear instructions are essential for users, especially beginners, to successfully assemble the kit. Comprehensive manuals that include diagrams, troubleshooting tips, and soldering techniques can significantly enhance the user experience and reduce frustration.
- Compatibility with Various Components: A kit that is compatible with a wide range of components, such as different speakers, power supplies, and input options, allows users to tailor the amplifier to their specific needs. This compatibility offers users greater flexibility in enhancing the overall performance and adapting the amplifier for different audio applications.
- Adjustable Output Levels: The ability to adjust output levels is crucial for users who want to control the volume and tonal quality of their sound. Kits that come with potentiometers or adjustable gain settings empower users to fine-tune their amplifier to suit their listening environment or personal preferences.
- Compact Size: A compact design makes the amplifier easier to fit into various setups, whether for home use, portable applications, or DIY projects. This space-saving feature is particularly beneficial for users with limited room or those looking to create a sleek, minimalistic audio system.
What Advantages Does Building Your Own Amplifier Offer?
Building your own amplifier offers several advantages that enhance both the experience and the final product.
- Customization: One of the primary benefits of building your own amplifier is the ability to tailor it to your specific needs and preferences. You can select components that match your desired sound profile, such as choosing different capacitors or transistors that affect the tone and output.
- Cost-Effectiveness: DIY amplifier kits often provide a more affordable alternative to commercially available amplifiers. By sourcing components individually or purchasing a kit, you can save money while gaining a better understanding of the technology involved.
- Learning Experience: Assembling your own amplifier can be an incredibly educational process. It allows you to gain hands-on experience with electronics, improving your skills in soldering, circuit design, and troubleshooting, which can be beneficial for future projects.
- Quality Control: When you build your own amplifier, you have complete control over the quality of the components used. This means you can invest in high-quality parts that may not be available in mass-produced models, potentially resulting in superior sound performance.
- Community and Support: Engaging in the DIY amplifier community can open doors to a wealth of knowledge and support. You can connect with other enthusiasts who share tips, offer advice, and inspire you to try new techniques or designs, enriching your overall experience.
- Satisfaction and Pride: The act of creating something from scratch provides a sense of accomplishment. Once your amplifier is up and running, the pride in having built it yourself can enhance the enjoyment of using it, making the listening experience even more rewarding.
What Are the Most Popular DIY Amplifier Kits Currently Available?
The most popular DIY amplifier kits currently available include:
- SMSL SA-98E: This compact amplifier kit offers a powerful 80W per channel and is known for its high efficiency and low distortion.
- Lepy LP-2020A: A budget-friendly option, this amplifier delivers 20W per channel and features a sleek design, making it ideal for home audio setups.
- FX-Audio TPA3116: This kit is celebrated for its excellent sound quality and versatility, providing 50W per channel with Bluetooth capabilities for wireless streaming.
- Dayton Audio DTA-120: Known for its robust build quality, this 60W per channel amplifier kit is perfect for driving larger speakers and comes with a user-friendly setup.
- Monoprice 108247: A versatile and compact option, this kit offers 25W per channel and features a built-in Bluetooth receiver, making it a great choice for casual listeners.
The SMSL SA-98E is praised for its small footprint and robust performance, making it suitable for both desktop and home theater applications. Its high-efficiency Class D design minimizes heat generation while providing clear audio output, making it a favorite among audiophiles.
The Lepy LP-2020A has gained popularity due to its affordability and ease of use. It’s perfect for beginners looking to enhance their audio experience without breaking the bank, offering decent sound quality and a compact size that fits easily into any space.
The FX-Audio TPA3116 stands out with its combination of power and modern features, including Bluetooth connectivity. This allows users to stream music directly from their devices, making it a versatile option for both casual listening and more serious audio setups.
The Dayton Audio DTA-120 is recognized for its reliability and ability to drive larger speakers without distortion. Its solid construction and powerful output make it a preferred choice for audio enthusiasts who seek quality sound and durability.
The Monoprice 108247 is ideal for those wanting a simple solution for streaming music, combining a compact design with Bluetooth functionality. This kit is particularly appealing for users who appreciate straightforward setups without sacrificing sound quality.
How Do They Compare in Terms of Price and Performance?
| Aspect | Amplifier Kit A | Amplifier Kit B |
|---|---|---|
| Price | $30 – Budget-friendly option with basic features | $60 – Mid-range choice with enhanced components |
| Performance | Decent sound quality, suitable for small projects | Superior sound output with low distortion, ideal for audiophiles |
| Specifications | Power Output: 20W, Frequency Response: 20Hz-20kHz, THD: 0.1% | Power Output: 50W, Frequency Response: 20Hz-20kHz, THD: 0.05% |
| User Ratings | 4.0/5 from 50 reviews | 4.8/5 from 150 reviews |
| Warranty | 1 year | 2 years |
What Tips and Techniques Can Ensure a Successful Build of Your DIY Amplifier?
To successfully build your DIY amplifier, consider the following tips and techniques:
- Choose the Right Kit: Selecting a high-quality DIY amplifier kit is crucial for ensuring a smooth building process and optimal performance.
- Read the Instructions Thoroughly: Before starting, take the time to read and understand the entire manual to familiarize yourself with the components and assembly steps.
- Gather Quality Tools: Having the right tools, such as a soldering iron, multimeter, and wire cutters, can significantly improve the efficiency and quality of your build.
- Organize Your Workspace: A clean and organized workspace minimizes the risk of losing small parts and helps maintain focus during the assembly process.
- Be Mindful of Component Orientation: Pay attention to the polarity and orientation of components like capacitors and diodes, as incorrect placement can damage your amplifier.
- Test Components Before Assembly: Individually testing components like resistors and capacitors can prevent issues later in the build and save time troubleshooting.
- Take Your Time: Rushing through the assembly can lead to mistakes; take your time to ensure each step is completed correctly and thoroughly.
- Use Heat-Shrink Tubing: Protect connections and prevent shorts by using heat-shrink tubing on soldered joints, which enhances durability and safety.
- Perform Regular Checks: Periodically check your work as you progress to catch any potential issues early, allowing for easier corrections.
- Seek Community Support: Engaging with online forums or local DIY groups can provide valuable insights, tips, and troubleshooting advice from experienced builders.