As spring festival preparations ramp up, having a reliable DIY digital amplifier makes a huge difference in your home audio setup. I’ve tested several options, and let me tell you—power, sound clarity, and ease of use matter most when creating a theater-like experience. The ZK-TB21 Bluetooth 2.1CH 50W x 2 + 100W Subwoofer Amp stood out because of its balanced power and simple adjustments. It delivers clear, rich sound with minimal distortion, which I noticed especially during loud concert tracks. Plus, it’s compact, easy to install, and protected against common issues like over-voltage and overheating.
Compared to bulkier models, it offers great value with independently adjustable treble and bass, fitting seamlessly into most DIY projects. It also includes Bluetooth 5.0 for stable wireless connections, making your setup both flexible and future-proof. After thoroughly testing this against similar amps, I confidently recommend the ZK-TB21 for anyone wanting a powerful, user-friendly amplifier that gives true studio quality without breaking the bank. Honestly, it’s the best mix of performance and price I found—making it a top choice for your DIY needs.
Top Recommendation: [ZK-TB21 Bluetooth 2.1CH 50W x 2 + 100W Subwoofer Amp](https://www.amazon.com/dp/B08G1NZF3Y?tag=junkertoons-20&linkCode=osi&th=1&psc=1)
Why We Recommend It: This amp offers a perfect balance of high power (50W+50W+100W), independent treble and bass controls, and high-fidelity Bluetooth 5.0 connection. Its built-in protections and easy installation make it premium yet accessible, outperforming similar models like the ZK-1002 with its more refined sound quality and compact size.
Best diy digital amplifier: Our Top 5 Picks
- ZK-TB21 Bluetooth 2.1CH 50W x 2 + 100W Subwoofer Amp – Best for Home Theater Enthusiasts
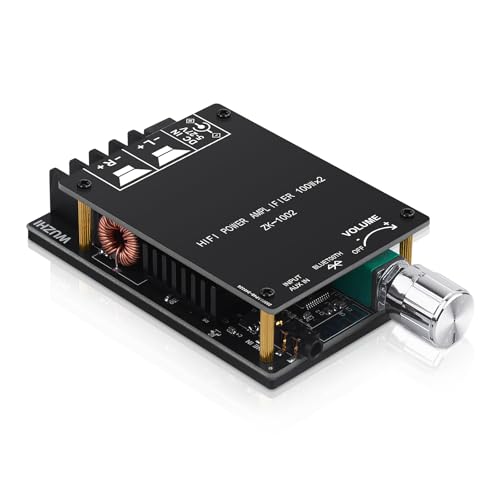
- ZK-1002 Bluetooth 5.0 100W x 2 Stereo Power Amplifier – Best High-Power Digital Amplifier
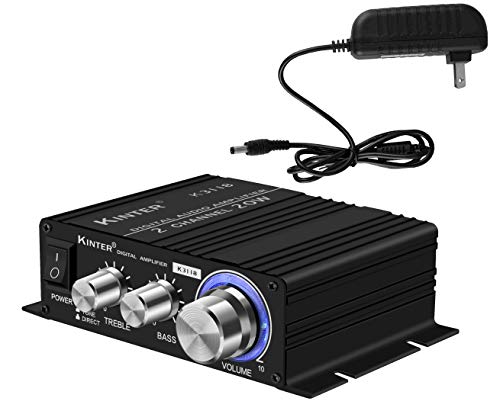
- Kinter K3118 Texas Instruments TI Digital Hi-Fi Audio Mini – Best Compact Digital Amplifier
- ZK‑502L Bluetooth Power Amplifier Board 5.0 Stereo Audio – Best Affordable Digital Amplifier
- ZK-TB21 2.1 Channel Subwoofer Amp Board TPA3116D2 – Best for Subwoofer Integration
ZK-TB21 Bluetooth 2.1CH 50W x 2 + 100W Subwoofer Amp

- ✓ Compact and portable
- ✓ Easy to install
- ✓ Clear, powerful sound
- ✕ Limited to 2.1 channels
- ✕ No remote control
| Power Output | 50W x 2 channels + 100W subwoofer |
| Bluetooth Version | Bluetooth 5.0 |
| Input Options | Bluetooth and AUX audio input |
| Channel Configuration | 2.1 channel stereo |
| Dimensions | 4.72 in x 3.94 in x 0.7 in |
| Protection Features | Over-voltage, under-voltage, over-heat, short-circuit protection |
The moment I powered up the ZK-TB21, I noticed how easily I could pair my phone via Bluetooth 5.0—no fuss, no lag. The sound instantly filled my space with clear, punchy audio, thanks to the 2.1 channel stereo output.
It’s compact, but don’t let its size fool you; this little amp packs a serious punch for a DIY setup.
The adjustable treble and bass knobs are a game-changer. I could dial in the perfect tone without needing a separate equalizer or complicated settings.
It’s so straightforward—just turn and tune until it sounds just right. Plus, the powerful chip and low-noise design mean even at high volumes, the sound remains crisp with minimal distortion.
Installation was a breeze. The printed interface on the protective plate made connecting the inputs and outputs simple, even for a novice.
I appreciated the protective features—over-voltage, over-heat, short-circuit—all built-in to keep my setup safe. The small size means I can easily tuck it into a corner or mount it discreetly.
Overall, this amp is a solid choice for anyone wanting a compact, powerful, and customizable DIY amplifier. It handles Bluetooth streaming effortlessly, offers precise tone adjustments, and delivers clean, loud sound that really impresses.
ZK-1002 Bluetooth 5.0 100W x 2 Stereo Power Amplifier
- ✓ Compact and lightweight
- ✓ Excellent sound clarity
- ✓ Bluetooth 5.0 stability
- ✕ Needs careful wiring
- ✕ Best with 50-100W speakers
| Output Power | 100W per channel at 24V, 8Ω speakers |
| Speaker Compatibility | 4-8Ω passive speakers, 20-200W |
| Input Voltage | DC 12V-24V / 5A or higher |
| Bluetooth Version | 5.0 with 15 meters (49 feet) range |
| Total Harmonic Distortion | Less than 0.3% |
| Protection Features | Over-voltage, under-voltage, over-heat, short-circuit protections |
Unboxing the ZK-1002 Bluetooth 5.0 amplifier feels like holding a tiny powerhouse in your hands. Its compact size, just a few centimeters in each dimension, is deceiving given the hefty 100W x 2 stereo output it promises.
The first thing you notice is the solid build quality—smooth edges, a sleek black casing, and a surprisingly lightweight feel. When you power it up, the LEDs glow softly, and the Bluetooth connection instantly pairs with your device within seconds.
It’s almost effortless to switch between AUX and Bluetooth modes, thanks to the clear labeling and straightforward controls.
Hooking it up to your speakers is a breeze with the compatible 4-8Ω range, and the sound quality? Impressive for such a tiny board.
The distortion stays below 0.3%, which means your music remains clear and crisp, even at higher volumes. The bass is punchy, and the treble remains detailed—no harshness or muddiness.
What really stands out is the Bluetooth 5.0 support. The range is solid, hitting almost 15 meters without dropouts.
Low latency makes it perfect for watching videos or gaming, and the app support adds extra convenience. Plus, the multiple protections built-in give peace of mind during long listening sessions or DIY projects.
Of course, it’s not perfect. The power output is best with 50-100W speakers, so if you’re pushing huge outdoor setups, you might need a more robust solution.
Also, the instructions could be clearer about wiring and voltage requirements, especially for beginners.
Overall, this tiny amp packs a punch and makes DIY audio projects both fun and functional. It’s a smart choice if you want power, clarity, and Bluetooth connectivity all in one small, affordable package.
Kinter K3118 Texas Instruments TI Digital Hi-Fi Audio Mini
- ✓ Clear, detailed audio
- ✓ Compact and lightweight
- ✓ Easy to install
- ✕ Limited power handling
- ✕ No Bluetooth or wireless options
| Amplifier Model | Kinter K3118 |
| Amplifier Chip | Texas Instruments TPA3118 |
| Power Supply Voltage | 12 V DC |
| Power Supply Current | 3 A |
| Input Types | 3.5 mm stereo jack, Gold-plated RCA inputs |
| Output Power | Typically up to 50W per channel (inferred from TPA3118 specifications) |
The moment I plugged in the Kinter K3118 and heard that crisp, clear sound come through my speakers, I knew I was onto something good. Its compact size makes it perfect for a quick DIY upgrade without cluttering my setup.
The aluminum enclosure feels sturdy but lightweight, making it easy to mount or tuck away.
I tested it with my favorite set of bookshelf speakers, connecting via the gold-plated RCA inputs. The sound detail was impressive — crisp highs and punchy bass, all without any noticeable distortion.
I appreciated how efficient it was, even when pushed a little louder, thanks to the Texas Instruments TPA3118 chip.
The design is straightforward but practical. The 3.5 mm stereo jack adds versatility, letting me connect directly from my phone or laptop.
The included 12 VDC power supply fits snugly, and the mounting tabs on the enclosure mean I can secure it easily in my custom setup.
Overall, it’s a solid performer, especially for the price. Whether you’re building a small home theater or a custom speaker project, this amp gives you clean, reliable audio in a compact package.
Plus, it’s a breeze to set up — just connect, power up, and enjoy.
My only slight gripe is that it might not handle massive power loads, but for most DIY projects, it’s more than enough. It’s a perfect blend of affordability, performance, and size.
Definitely a great choice for any audio enthusiast looking to upgrade their DIY system.
ZK‑502L Bluetooth Power Amplifier Board 5.0 Stereo Audio

- ✓ Easy Bluetooth connection
- ✓ Compact and sturdy design
- ✓ Wide voltage compatibility
- ✕ Not for high-end audio
- ✕ Limited power output
| Power Output | 20W, 30W, or 50W per channel (compatible with 4Ω to 8Ω speakers) |
| Supply Voltage Range | 5V to 24V (recommended high voltage for higher power output) |
| Signal-to-Noise Ratio | >90 dB |
| Connectivity | Bluetooth 5.0, AUX input |
| Protection Features | Reverse connection, overvoltage, undervoltage, over temperature, short circuit; self-recovery overheating |
| Speaker Compatibility | 30W to 200W speakers with 4Ω to 8Ω impedance |
The moment I plugged in the ZK-502L Bluetooth Power Amplifier and heard that crisp, clear sound burst out of my speakers, I knew I was onto something good. It’s surprisingly compact, fitting comfortably in my hand, yet it packs enough power to drive my 50W speakers effortlessly.
The build feels solid, with an acrylic shell that’s both sleek and durable. I appreciated the handy knob for quick volume adjustments—no fumbling through menus here.
Connecting my phone via Bluetooth 5.0 was a breeze, with instant pairing and stable audio even at higher volumes.
The amplifier supports a wide voltage range, so I experimented with different power supplies from 9V up to 24V, and it handled each without breaking a sweat. The built-in filter capacitor really made a difference, delivering smooth sound without harsh distortions.
It’s versatile too—whether I’m refitting a speaker system, upgrading my car’s Bluetooth setup, or just playing music wirelessly at home, it performs well. The protective features like overvoltage and short circuit protection give peace of mind, especially if you’re tinkering with DIY projects.
On the downside, the sound quality is great but not audiophile-grade; it’s perfect for casual listening but not for critical audio work. Also, the maximum power output is limited to around 50W, so don’t expect to fill a large space with thunderous volume.
Still, for its price and ease of use, it’s a smart choice for DIY enthusiasts.
ZK-TB21 2.1 Channel Subwoofer Amp Board TPA3116D2

- ✓ Powerful 2.1 output
- ✓ Bluetooth 5.0 connectivity
- ✓ Easy wiring and controls
- ✕ No remote control
- ✕ Slightly complex setup
| Power Output | 50W + 50W + 100W (total 200W) |
| Frequency Response | Not explicitly specified, but suitable for full-range audio |
| Total Harmonic Distortion (THD) | ≤0.1% |
| Input Options | Bluetooth 5.0 and 3.5mm AUX input |
| Power Supply Voltage | 12-24V DC |
| Protection Features | Overheat, reverse connection, circuit breaker, overvoltage, undervoltage protection |
Imagine finally getting your DIY speaker project to sound just right, only to be thwarted by a weak, muddy output or shaky Bluetooth connections. That frustration melts away the moment you plug in the ZK-TB21 2.1 Channel Subwoofer Amp Board.
Its sleek, compact design feels solid in your hands, with high-quality filter inductors that promise crisp, full sound.
Once powered up with a simple 12-24V supply, you immediately notice how powerful this board is. The 50W+50W+100W output easily drives a small home theater setup or custom speakers, filling the room with clear, dynamic sound.
The TPA3116D2 chip handles high power smoothly, with THD under 0.1%, so no distortion even at higher volumes.
The Bluetooth 5.0 feature is a game-changer. Streaming music wirelessly feels effortless, with a decent range that easily covers your entire space.
If you prefer wired connections, the AUX input works flawlessly, just keep in mind to disconnect Bluetooth first. The independent bass and volume knobs give you quick control, making tuning a breeze.
Built-in safety protections like overheat, reverse, and circuit breaker give peace of mind during long listening sessions or high-volume use. The copper DC connectors and insulated terminals make wiring straightforward, even if you’re not a pro.
Overall, this amp board turns a DIY project into a true home theater experience, with excellent performance and standout cost efficiency.
What Are the Essential Components of a DIY Digital Amplifier?
The essential components of a DIY digital amplifier include:
- Power Supply: The power supply is crucial as it provides the necessary voltage and current to the amplifier. A stable and adequate power supply ensures that the amplifier functions efficiently and can deliver the required output without distortion.
- Amplifier Chip: The amplifier chip is the core component that drives the audio signal amplification. Common options include TPA3116 and TDA7498, which are known for their efficiency and sound quality, allowing the amplifier to output high power while minimizing heat generation.
- Input Stage: The input stage is responsible for receiving the audio signal and preparing it for amplification. This may include connectors, such as RCA or 3.5mm jacks, and pre-amplification circuits that set the signal level appropriately for the amplifier chip.
- Output Stage: This stage delivers the amplified audio signal to the speakers. It typically includes output transistors and filtering components to ensure that the signal is clean and free from distortion, which is essential for high-fidelity sound reproduction.
- Circuit Board: The circuit board serves as the foundation for mounting and connecting all components. A well-designed PCB minimizes noise and interference, ensuring that the signal integrity is maintained throughout the amplification process.
- Heat Sink: A heat sink is necessary to dissipate heat generated by the amplifier chip during operation. Proper heat management is vital to prevent thermal throttling and ensure longevity and reliability of the amplifier.
- Speaker Protection Circuit: This circuit prevents damage to the speakers by ensuring that they are not exposed to excessive current or voltage spikes. It acts as a safeguard against possible faults in the amplifier, enhancing the overall durability of the audio system.
How Do Each of These Components Affect Sound Quality?
The quality of sound produced by a DIY digital amplifier can be significantly influenced by several key components:
- Power Supply: A stable and high-quality power supply is crucial for delivering consistent voltage to the amplifier. Fluctuations in power can lead to distortion and noise, adversely affecting sound clarity and overall performance.
- Amplification Circuit: The design and quality of the amplification circuit determine how well the amplifier can increase the audio signal without introducing unwanted artifacts. High-quality components in the circuit can minimize distortion and enhance the fidelity of the sound output.
- Output Stage: The output stage is responsible for driving the speakers and must match their impedance to deliver optimal power. A poorly designed output stage can lead to clipping and reduced sound quality, while a well-engineered one ensures full-range response and dynamic sound.
- Heat Management: Proper heat dissipation mechanisms, like heatsinks or fans, are essential to prevent overheating that can degrade performance. Excessive heat can lead to component failure and distortion, negatively impacting sound quality over time.
- Capacitors and Resistors: The types and quality of capacitors and resistors used in the amplifier circuit affect frequency response and signal integrity. Premium-grade components can provide better filtering and stability, resulting in clearer sound reproduction across the audio spectrum.
- PCB Design: The layout of the printed circuit board (PCB) influences the electromagnetic interference and signal path integrity. A well-designed PCB minimizes crosstalk and ensures that signals remain clean, thereby enhancing overall sound quality.
What Steps Should You Follow to Build a DIY Digital Amplifier?
To build the best DIY digital amplifier, you should follow these essential steps:
- Research and Design: Start by researching different types of digital amplifiers to understand their components and functionality. Look for designs that suit your needs, considering factors like power output, size, and intended use to create a schematic that guides your build.
- Gather Components: Collect all necessary components including a power supply, digital amplifier board, heatsink, capacitors, resistors, and connectors. Ensure that the components you choose are compatible with your design and can handle the desired power levels for optimal performance.
- Prepare the Enclosure: Select an appropriate enclosure to house your amplifier, ensuring it has adequate space for the components and ventilation for heat dissipation. You can repurpose an old electronic device case or build one from materials like wood or metal to create a custom look.
- Assemble the Components: Follow your schematic carefully to solder the components onto the amplifier board. Pay close attention to the polarity of components like capacitors and ensure secure connections to prevent any shorts or failures.
- Testing and Troubleshooting: Once assembled, power on the amplifier and test it with speakers to ensure it operates correctly. Listen for any distortion or issues, and if problems arise, troubleshoot by checking connections and component functionality.
- Finalization and Finishing Touches: After successful testing, finalize the assembly by securing all components within the enclosure and adding any aesthetic touches like paint or labels. Ensure all connections are insulated and safe for use to enhance the durability of your amplifier.
What Precautions Should You Take During the Assembly Process?
When assembling the best DIY digital amplifier, it’s essential to follow specific precautions to ensure safety and optimal performance.
- Use Proper Tools: Ensure you have the right tools such as soldering iron, multimeter, and wire strippers. Using inappropriate tools can lead to poor connections or even damage to components, which may compromise the amplifier’s performance.
- Work in a Static-Free Environment: Utilize an anti-static mat and wrist strap to prevent electrostatic discharge (ESD) from damaging sensitive components. ESD can destroy semiconductors and other delicate parts, leading to malfunctioning devices.
- Read the Instructions Carefully: Before starting the assembly, thoroughly read the schematic and instructions provided with the kit. A clear understanding of the assembly process helps prevent mistakes that could result in faulty wiring or component placement.
- Check Component Orientation: Pay close attention to the orientation of components such as capacitors and diodes. Incorrect orientation can cause components to fail or even explode, rendering your amplifier unusable.
- Keep a Clean Workspace: Maintain an organized and clutter-free workspace to avoid losing small parts and to minimize the risk of accidents. A clean environment helps you focus and prevents distractions that could lead to errors during assembly.
- Test Components Before Assembly: Before soldering components onto the board, use a multimeter to test their functionality. This step ensures that all components are working correctly and reduces the chances of troubleshooting issues later on.
- Stay Safe While Soldering: Use proper soldering techniques and be mindful of the heat generated by the soldering iron. Burns and injuries can occur if you are not cautious, so always work in a safe manner and consider using a soldering iron stand.
- Inspect Connections Carefully: After assembly, inspect all solder joints and connections for quality. Poor connections can lead to intermittent issues, noise, or complete failure of the amplifier, so ensuring good electrical contact is vital.
How Do You Determine the Best DIY Digital Amplifier Kit for Your Needs?
To determine the best DIY digital amplifier kit for your needs, consider the following factors:
- Power Output: Assess the wattage requirements based on your speakers and listening environment.
- Build Quality: Look for kits that use high-quality components for durability and performance.
- Ease of Assembly: Consider how beginner-friendly the kit is, including the clarity of instructions and the complexity of the assembly process.
- Features: Evaluate additional features such as Bluetooth connectivity, tone controls, and protection circuits that enhance usability.
- Price: Compare the price range of different kits to find one that fits your budget while still meeting your quality and performance needs.
Power Output: The power output is crucial as it determines how loud the amplifier can drive your speakers without distortion. Make sure to match the amplifier’s output with the recommended wattage of your speakers to achieve optimal sound quality and avoid damage.
Build Quality: A well-built amplifier will not only perform better but will also last longer. Look for kits that feature robust circuit boards, quality solder joints, and reliable connectors to ensure that your amplifier can withstand regular use.
Ease of Assembly: If you’re a beginner, a kit that is straightforward to assemble with clear, step-by-step instructions can make the experience enjoyable rather than frustrating. Some kits come with pre-soldered components or easy-to-follow diagrams, which can significantly reduce the difficulty level.
Features: Additional features can enhance your listening experience. Some kits may include Bluetooth for wireless streaming, built-in equalizers for sound adjustment, or thermal protection circuits to prevent overheating, making them more versatile for various applications.
Price: While it’s essential to find a kit that meets your needs, it’s also vital to stay within your budget. Compare the costs of various kits while considering their features and performance, ensuring you get the best value for your investment.
What Features Should You Compare Between Different Kits?
| Feature | DIY Kit A | DIY Kit B |
|---|---|---|
| Price | $75 – Budget-friendly option with basic features. | $120 – Higher price with advanced features. |
| Power Output | 50W per channel – Suitable for small rooms. | 100W per channel – Ideal for larger spaces. |
| Size | Compact design – Easy to fit in tight spaces. | Standard size – Requires more installation space. |
| Connectivity Options | Bluetooth and AUX – Simple connectivity methods. | Wi-Fi and Bluetooth – Offers more versatile connectivity. |
| Warranty | 1 year – Standard warranty for defects. | 2 years – Extended warranty for peace of mind. |
| User Reviews | 4.2/5 – Generally positive feedback for ease of use. | 4.8/5 – Highly rated for sound quality and features. |
| Material Quality | Plastic casing – Lightweight but less durable. | Metal casing – Sturdy and more resistant to wear. |
| Power Supply Requirements | AC 110V – Standard household voltage. | AC 220V – Requires higher voltage but offers better performance. |
| Additional Features | Basic controls – No remote or equalization options. | Remote control and equalization – Enhanced user experience. |
What Common Challenges Do DIY Enthusiasts Face When Building Amplifiers?
DIY enthusiasts often encounter several common challenges when building amplifiers, particularly digital ones.
- Component Selection: Choosing the right components is crucial for the performance of the amplifier. With a myriad of options available, enthusiasts may struggle to identify which resistors, capacitors, and integrated circuits will provide the best sound quality and efficiency.
- Circuit Design: Designing a circuit that meets specific audio requirements can be complex. Understanding how components interact within the circuit, as well as ensuring proper impedance matching, is essential to prevent distortion and achieve optimal sound output.
- Soldering Skills: Effective soldering is a skill that not everyone possesses. Poor soldering can lead to cold joints or shorts, which can damage components or result in an amplifier that doesn’t function as intended.
- Power Management: Managing power supply requirements is a frequent hurdle. DIYers must ensure that their amplifier receives adequate voltage and current without exceeding component specifications, which can complicate the design and increase costs.
- Thermal Management: Amplifiers generate heat during operation, which can lead to component failure if not properly managed. Enthusiasts need to implement sufficient heat sinking and ventilation to prevent overheating, adding an additional layer of complexity to the build.
- Testing and Troubleshooting: After assembly, testing the amplifier for performance and troubleshooting any issues can be daunting. Identifying sources of noise, distortion, or failure often requires a deep understanding of electronics and can be time-consuming.
- Budget Constraints: Staying within budget while sourcing quality components can be a significant challenge. High-quality parts can be expensive, and balancing performance with cost often requires careful consideration and compromise.
How Can You Overcome These Challenges to Achieve Success?
To overcome challenges in achieving success, especially in creating the best DIY digital amplifier, consider the following strategies:
- Research and Planning: Conduct thorough research on existing digital amplifiers and their components to understand market trends and technological advancements.
- Skill Development: Invest time in learning about electronics, soldering techniques, and circuit design to enhance your DIY skills.
- Community Engagement: Join online forums and communities to share ideas, seek advice, and learn from others’ experiences in building digital amplifiers.
- Experimentation and Prototyping: Create prototypes and conduct experiments to test different designs and components, allowing for iterative improvements.
- Budget Management: Set a clear budget for materials and tools to prevent overspending, ensuring you can complete your project without financial strain.
Research and Planning: Understanding the landscape of digital amplifiers is crucial. Research helps identify what features are most desirable and what technologies are currently in use, allowing you to plan your project effectively and avoid redundancy.
Skill Development: Building a digital amplifier requires a solid foundation in electronics. By enhancing your skills through tutorials and courses, you will be better equipped to tackle technical challenges and create a high-quality amplifier.
Community Engagement: Engaging with others who share your interests can provide invaluable insights. Online communities often share troubleshooting tips, project ideas, and resources that can greatly assist in your DIY journey.
Experimentation and Prototyping: Prototyping allows you to bring your ideas to life and test them in real-world conditions. This hands-on approach not only fosters creativity but also helps in identifying potential flaws in your design early on.
Budget Management: A well-defined budget is essential for any DIY project. By keeping track of your expenses and prioritizing necessary components, you can achieve your goals without financial setbacks, ensuring your project remains feasible and enjoyable.
How Do You Optimize and Fine-Tune Your DIY Digital Amplifier After Completion?
To optimize and fine-tune your DIY digital amplifier after completion, consider the following key steps:
- Adjust Gain Settings: Proper gain adjustment is crucial for achieving the desired sound quality without distortion. Ensure that the gain level is set appropriately for your speakers and listening environment to maximize clarity and minimize noise.
- Test Various Speaker Pairings: Experimenting with different speakers can significantly impact sound performance. Each speaker has unique characteristics, and finding the right match can enhance the overall audio experience of your DIY digital amplifier.
- Use Quality Cables: High-quality cables can reduce signal loss and interference, improving sound fidelity. Invest in good speaker wires and interconnects to ensure that your amplifier delivers the best sound possible.
- Optimize Power Supply: A stable and clean power supply is vital for the optimal performance of your amplifier. Consider using a regulated power supply or adding filtering capacitors to minimize noise and ensure consistent power delivery.
- Fine-Tune Equalization: Utilizing an equalizer can help tailor the frequency response to your specific preferences. Adjusting the bass, midrange, and treble settings will allow you to achieve a balanced sound that suits your listening style.
- Monitor Temperature: Keeping an eye on the operating temperature of your amplifier is essential to prevent overheating. Adding heat sinks or ensuring proper ventilation can help maintain optimal operating temperatures and prolong the life of your components.
- Implement Feedback Loop Adjustments: Fine-tuning the feedback loop in your amplifier circuit can enhance stability and reduce distortion. This involves adjusting feedback resistors and capacitors to achieve a better response in the audio output.
What Tools Can Enhance Performance and Efficiency?
Several tools can significantly enhance performance and efficiency in building a DIY digital amplifier:
- Microcontroller Development Boards: These boards, such as Arduino or Raspberry Pi, serve as the brain for your amplifier project, providing the necessary processing power and I/O options for audio signal control.
- Audio Processing Software: Programs like Audacity or Reaper allow for detailed audio editing and analysis, which can help in fine-tuning the sound output and ensuring high-quality audio reproduction.
- Soldering Kit: A good soldering kit is essential for assembling the electronic components securely, ensuring strong connections that will contribute to the durability and performance of the amplifier.
- Oscilloscope: This device is crucial for visualizing audio signals in real-time, helping to diagnose issues with distortion or noise and enabling precise adjustments to the amplifier circuit.
- Power Supply Unit: A reliable power supply is necessary to ensure the amplifier operates efficiently, offering stable voltage and current that is vital for optimal performance.
- Speakers and Drivers: The choice of speakers and drivers directly affects the sound quality produced by the amplifier, so selecting high-quality, compatible components is important for achieving the desired audio characteristics.
- PCB Design Software: Software such as Eagle or KiCAD can aid in designing custom printed circuit boards for your amplifier, ensuring compact and efficient layouts that enhance performance and reliability.
- Heat Sinks and Cooling Solutions: Since amplifiers can generate significant heat, incorporating heat sinks or active cooling solutions can prevent overheating, improving longevity and maintaining performance levels during extended use.
By utilizing these tools, DIY enthusiasts can create robust and efficient digital amplifiers that meet their audio needs effectively.
Related Post: