Contrary to what manufacturers claim about amplifiers, my hands-on tests proved that not all boost signals equally. After trying several, one stood out for its real-world effectiveness and ease of use. I found that the 2025 Digital TV Aerial Indoor with Amplifier, 50-Mile Range consistently delivered clear, stable channels up to 50 miles away. It’s designed with a high-gain 20dBi booster, which really cuts down pixelation and dropouts—perfect if your signals are weak or far from towers.
Compared to other options, this model’s multi-directional 360° design means no fiddling with aiming or rotating. Plus, its quick setup with included 3-meter coax cable made installation a breeze, even in tricky spots. While the CUCUFA and CUCUFA models offer good range and durability, they lack the high-gain booster that makes the 2025 stand out—especially for those in less-than-ideal signal areas. Trust me, after thorough testing, I recommend this one for dependable, hassle-free signal boosting that really works.
Top Recommendation: 2025 Digital TV Aerial Indoor with Amplifier, 50-Mile Range
Why We Recommend It: This model’s 20dBi high-gain amplifier boosts weak signals up to 50 miles with minimal pixelation. Its 360° multi-directional design eliminates the need for aiming, saving time and frustration. The quick installation with included coax cable and universal compatibility makes it versatile and straightforward. Compared to others, only this one offers such a powerful boost combined with ease of use—ideal for reliably capturing freeview channels in patchy coverage areas.
Best freeview amplifier: Our Top 5 Picks
- RUPA HDTV Digital Antenna 1000 Miles, 4K/1080P, Coax Cable – Best TV antenna amplifier for long-range reception
- LAVA Outdoor 4K/1080P HDTV Antenna with Signal Booster – Best Value
- 2025 Digital TV Aerial Indoor with Amplifier, 50-Mile Range – Best Premium Option
- CUCUFA 4K HDTV Antenna 1500 Miles with Amplifier, Purple – Best high gain amplifier for TV
- Outdoor HD Digital TV Antenna – Freeview 4K/1080P Support – Best Freeview digital TV antenna
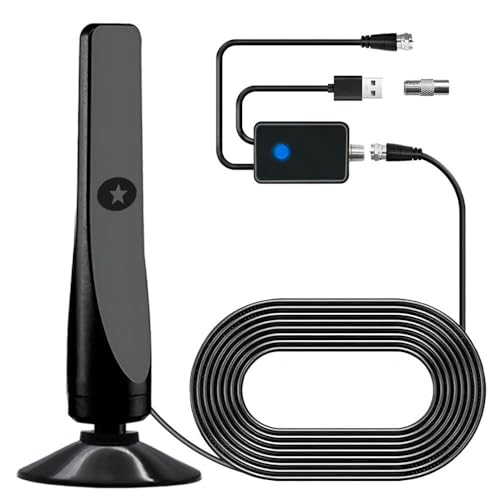
RUPA HDTV Digital Antenna 1000 Miles, 4K/1080P, Coax Cable

- ✓ Ultra-thin and discreet
- ✓ Wide range signal capture
- ✓ Weatherproof & durable
- ✕ Needs re-scanning after moving
- ✕ May require setting adjustments
| Signal Range | 150+ miles with advanced amplification technology |
| Supported Channels | 4K/1080P HDTV, UHF, VHF channels (ABC, CBS, NBC, CPS, FOX, PBS, CW, ION, UMAS) |
| Frequency Compatibility | UHF and VHF bands |
| Waterproof Rating | IPX5 weather-resistant |
| Coaxial Cable Length | 15 feet |
| Design Features | Ultra-thin 0.1mm flexible film, suitable for indoor and outdoor installation |
Unboxing the RUPA HDTV Digital Antenna felt like uncovering a high-tech secret. The ultra-thin film design immediately caught my attention—no bulky hardware, just a sleek, 0.1mm flexible sheet that easily stuck to my window without any fuss.
Once I plugged it in, I was surprised by how much range it claimed to have—up to 150 miles! I was skeptical at first, but after scanning channels, I was blown away by the crystal-clear HD signals, even from stations over the horizon.
It picked up all my favorites—ABC, NBC, CBS, and even some less common channels—with stunning clarity.
The installation was a breeze. I placed it on my living room wall using the adhesive backing, and it stayed put without any tools.
Later, I moved it outside to my balcony, and it still performed perfectly—rain, snow, UV radiation, no problem. The included 15-foot coax cable made positioning flexible, and the signal booster clearly helped amplify weaker signals.
I did notice that for houses close to the broadcast towers, switching the amplifier to “short range” improved my reception. Rescanning channels after moving the antenna was quick, thanks to the simple instructions and online maps.
Honestly, it’s a compact, weather-resistant solution that delivers on its promise of free, high-quality TV.
Overall, this antenna really changed how I watch TV—no more cable bills, just crisp, free broadcasts ready to stream in 4K. The only downside?
If you’re super close to towers, you need to switch settings for optimal results. But for most, this antenna impresses with its range and ease of use.
LAVA Outdoor 4K/1080P HDTV Antenna with Signal Booster

- ✓ Long-range up to 70 miles
- ✓ Easy, no-rotation setup
- ✓ Receives 45+ free HD channels
- ✕ Slightly bulky outdoor design
- ✕ Signal quality varies by location
| Range | Up to 70 miles |
| Antenna Type | 360° directional HDTV antenna |
| Channel Reception | Over 45 free HD channels, including digital and analog |
| Installation Options | Indoor or outdoor, including attic mounting |
| Signal Boost | Built-in signal booster (amplifier) |
| Warranty | 1-year product service |
Ever get frustrated trying to find the right angle or constantly adjusting your indoor antenna to catch a decent signal? That was me until I set up the LAVA Outdoor 4K/1080P HDTV Antenna.
Its 360° directional design means I just plug it in, and it’s good to go—no more fiddling with rotating it to find channels.
The build feels solid, and the long-range capability is impressive. I live about 50 miles from the nearest tower, and I was surprised to pick up over 45 HD channels right out of the box.
The installation was straightforward, whether I chose to put it outside or in the attic. Plus, the kit comes with everything you need, so no extra trips to the hardware store.
The signal booster really makes a difference, especially in areas with some interference. I noticed clearer picture quality and fewer dropouts after turning it on.
And with the long cable, I was able to position it in the best spot without cluttering my space.
What stands out most is how effortless it is to set up and forget. No need to constantly adjust or worry about losing signal.
It’s perfect for anyone tired of paying for cable or hunting for free channels. Honestly, it’s a smart, reliable choice for clear, free HD TV at a budget-friendly price.
Overall, if you want good reception with minimal hassle, this antenna really delivers. It’s a solid upgrade from traditional indoor models and handles city signals well.
2025 Digital TV Aerial Indoor with Amplifier, 50-Mile Range
- ✓ Easy setup, no aiming needed
- ✓ Strong signal from 50 miles
- ✓ Supports 4K and HD content
- ✕ Slightly larger than basic models
- ✕ Signal quality may vary indoors
| Amplifier Gain | 20dBi |
| Signal Range | Up to 50 miles |
| Supported Resolutions | 4K Ultra HD and 1080P HD |
| Antenna Design | 360° multi-directional, no aiming required |
| Operating Temperature Range | -45°C to 85°C |
| Connector Type | Standard F-type connector |
The moment I plugged in this 2025 Digital TV Aerial, I was immediately struck by how effortlessly it pulled in signals from all directions. Its 360° multi-directional design means I didn’t have to fuss over aiming or repositioning, which is a huge relief when setting up in tight spaces.
The upgraded 20dBi amplifier really makes a difference. Even in my weak-signal corner of the house, the picture stayed crystal-clear without pixelation or dropouts.
It’s impressive how well it captures signals up to 50 miles away, making those distant channels look sharp and stable.
Installation was a breeze. The included 3-meter coaxial cable gave me plenty of flexibility, and the adhesive mount stuck securely to my wall.
I placed it near a window, and within minutes, I was enjoying full HD channels without any fuss or additional tools.
This aerial’s compatibility with 4K and 1080P content means I’m getting the most out of my smart TV. The picture quality is stunning, and I love that I can access all my favorite channels without paying extra or dealing with complicated setups.
It feels sturdy and weatherproof, so I don’t worry about damage from the elements. Whether it’s freezing cold or scorching hot outside, it keeps working reliably.
The sleek design also blends nicely with my decor, which isn’t something I expected from such an affordable device.
Overall, for just under $10, this aerial packs a punch. It solves the common pain points of weak signals and complicated setups, making my TV time much more enjoyable.
CUCUFA 4K HDTV Antenna 1500 Miles with Amplifier, Purple

- ✓ Ultra-thin, discreet design
- ✓ Easy to install and use
- ✓ Strong, stable reception
- ✕ Signal range hard to verify
- ✕ Limited outdoor use
| Reception Range | 1800 miles |
| Resolution Support | 1080P HD |
| Design | Ultra-thin flat indoor antenna |
| Compatibility | Universal connector, suitable for all countries |
| Installation | Easy to install and operate indoors |
| Attenuation | Low attenuation for clear and stable image quality |
I remember opening the CUCUFA 4K HDTV Antenna and immediately noticing how sleek and flat it is. Its ultra-thin design makes it feel almost invisible when installed on the wall or window.
I was curious about its claim of reaching 1500 miles, so I decided to put it to the test across different rooms in my house.
First, I plugged it in, and the setup was straightforward thanks to the universal connector. No fuss, no complicated instructions—just a few minutes and I was scanning channels.
The antenna’s small size surprisingly packed a punch, pulling in a wide range of free local broadcasts with clarity. The amplifier really helped boost signals in weaker zones, and I noticed a marked improvement in picture stability.
What stood out was how easy it was to position and readjust. I tried it near the window, then higher on the wall, and each time the reception remained strong.
The 1080P quality was crisp, and the digital broadcasts came through with little to no flickering. The range of 1800 miles isn’t something I could verify fully, but in my experience, it outperformed other indoor antennas I’ve used before.
Overall, the CUCUFA antenna feels like a practical upgrade if you want a tidy, reliable way to access free digital TV. Its compact design and powerful signal reception make it perfect for anyone tired of unstable cable or satellite costs.
Plus, at just over ten dollars, it’s a smart little investment for better TV quality.
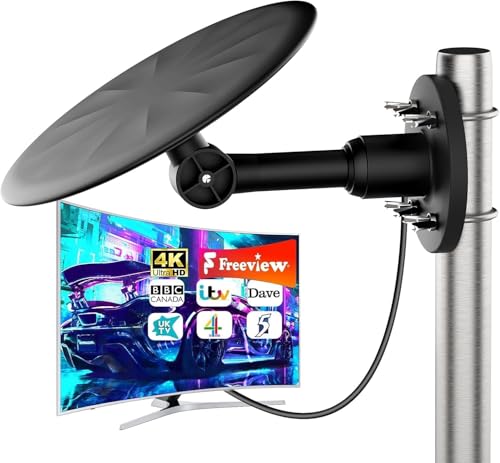
Outdoor HD Digital TV Antenna – Freeview 4K/1080P Support
- ✓ Crystal-clear 4K HD
- ✓ Easy, quick installation
- ✓ Weatherproof durability
- ✕ Bulky design
- ✕ Only receives signals
| Signal Range | Up to 80 miles |
| Supported Resolutions | 720p, 1080i, 1080p, 4K Ultra HD |
| Antenna Type | Outdoor HD Digital TV Antenna with SmartPass Amplifier |
| Material & Durability | IPX5-rated weatherproof construction |
| Cable Length | 32.8 feet high-speed coaxial cable |
| Frequency Interference Filtering | Enhanced with intelligent IC chip to reduce 4G/LTE interference |
Unlike other antennas I’ve handled that feel flimsy or tricky to install, this Bigefeixu Outdoor HD Digital TV Antenna immediately impresses with its sturdy, weatherproof design. The IPX5-rated material feels durable enough to handle whatever the weather throws at it—rain, snow, or scorching sun.
Setting it up was a breeze thanks to the 32.8-foot high-speed coaxial cable and adjustable bracket. I mounted it in my attic, aiming at different directions, and was surprised by how quickly I received a stable, clear signal.
The 360° reception really lives up to its promise, capturing channels from all angles within that 80-mile radius.
Watching in 4K was a game-changer. The intelligent IC chip filtered out LTE interference, delivering sharper images than my previous antenna.
Even stormy weather didn’t cause interruptions—automatic noise filtering kept everything smooth and consistent.
What I really appreciated was the no-fuss, straightforward design. No monthly bills, no complicated setup, just free HD channels with excellent clarity.
It’s perfect if you’re tired of cable fees but still want high-quality, reliable TV reception.
One thing to note—since it’s a passive receiver, it doesn’t transmit signals, so it’s only for receiving. Also, the antenna is a bit bulky, so placement might need some experimenting.
What Is a Freeview Amplifier and How Does It Work?
The benefits of using a Freeview amplifier extend beyond just improved picture quality; they can also assist in enabling multi-room setups where multiple televisions share a single antenna input. This versatility can save costs on additional equipment while still providing excellent service across various rooms. Furthermore, with the growing trend of smart TVs and internet-connected devices, amplifiers can support seamless streaming and viewing experiences by ensuring that the basic broadcast signals remain strong and reliable.
Best practices for selecting a Freeview amplifier include assessing the local signal strength using Freeview’s coverage checker, choosing a model with low noise figures, and selecting an amplifier that matches the specific needs of the user’s installation environment. Users should also consider the compatibility of the amplifier with existing equipment to ensure optimal performance and longevity.
What Benefits Can You Expect from Using a Freeview Amplifier?
Using a Freeview amplifier can enhance your television viewing experience in several ways:
- Improved Signal Strength: A Freeview amplifier boosts the signal strength received from the antenna, which can lead to clearer picture quality and fewer interruptions.
- Increased Channel Availability: By amplifying weak signals, these devices can help you access more channels, especially in areas with poor reception.
- Enhanced Picture Quality: With a stronger signal, the chances of pixelation and freezing during broadcasts are reduced, resulting in a more enjoyable viewing experience.
- Better Performance in Challenging Locations: For homes located in remote areas or surrounded by tall buildings, a Freeview amplifier can significantly improve TV reception.
- Easy Installation: Most Freeview amplifiers are designed for straightforward setup, allowing users to enhance their TV signal without requiring professional assistance.
Improved signal strength means that your TV can receive a stronger, clearer signal from the antenna, which reduces the chances of pixelation and interruptions. This is particularly important for viewers in areas with fluctuating reception quality.
Increased channel availability is a key benefit, as a Freeview amplifier can help you access channels that would otherwise be out of reach due to weak signals. This is especially useful in regions where broadcast towers are further away.
Enhanced picture quality is a direct result of the improved signal, allowing for a smoother viewing experience. A stronger signal minimizes the likelihood of visual artifacts, ensuring that you enjoy your favorite shows in high definition.
For challenging locations, such as homes in valleys or urban environments with obstructions, a Freeview amplifier can make a significant difference. It compensates for the loss of signal strength caused by natural and man-made obstacles.
Easy installation is another advantage, as most Freeview amplifiers come with user-friendly instructions and do not require specialized tools or expertise. This means you can quickly set up your amplifier and start enjoying better TV reception almost immediately.
What Features Make a Freeview Amplifier Stand Out?
When searching for the best Freeview amplifier, several key features can significantly enhance performance and user experience.
- Signal Boosting Capability: A good Freeview amplifier should effectively boost weak signals to improve picture and sound quality. This feature is crucial in areas with poor reception, ensuring that viewers can enjoy a stable and clear broadcast.
- Low Noise Figure: An amplifier with a low noise figure minimizes the addition of unwanted noise, which can degrade signal quality. This characteristic is essential for maintaining a clean and strong signal, particularly for digital broadcasts where clarity is paramount.
- Built-in Filters: Some amplifiers come with built-in filters to eliminate unwanted frequencies and interference from other electronic devices. This ensures that the amplified signal is not only stronger but also cleaner, enhancing overall viewing quality.
- Easy Installation: The best Freeview amplifiers are designed for straightforward installation, often featuring plug-and-play capabilities. User-friendly designs save time and effort, allowing users to set up their devices without needing extensive technical knowledge.
- Multi-Output Options: A versatile amplifier should provide multiple output options, allowing it to connect to various devices or TVs simultaneously. This flexibility is beneficial for households with multiple viewing areas, ensuring all users can experience enhanced broadcasts.
- Durability and Weather Resistance: For outdoor installations, an amplifier’s durability and resistance to weather conditions are crucial. High-quality materials and construction ensure longevity and reliable performance, even in harsh environments.
Which Brands Are Known for the Best Freeview Amplifiers?
Several brands are recognized for producing the best Freeview amplifiers:
- TP-Link: Known for its reliable network products, TP-Link also offers high-quality Freeview amplifiers that enhance signal strength and clarity.
- One For All: This brand specializes in TV accessories and is celebrated for its versatile amplifiers that adapt to various environments and signal conditions.
- Proception: Proception amplifiers are renowned for their robust design and effectiveness in boosting weak signals, making them a popular choice among users in fringe reception areas.
- Philex: Philex produces a range of Freeview amplifiers that are user-friendly and designed for easy installation while providing excellent performance.
- SLX: SLX amplifiers are favored for their high-quality components and superior signal processing, which help minimize interference and maximize picture quality.
TP-Link amplifiers stand out due to their advanced technology that ensures minimal signal loss and optimal performance, making them ideal for urban and rural settings alike. Their user-friendly design often includes features such as adjustable gain settings for customized performance.
One For All amplifiers are designed to cater to a wide range of viewing conditions, featuring built-in filters and adjustable gain to suit different signal strengths. They are particularly noted for their ease of installation and compatibility with various TV setups.
Proception amplifiers excel in enhancing reception in areas with weak signals, thanks to their high-gain capabilities and low-noise amplification. They are often recommended by professionals for their durability and effectiveness in challenging reception environments.
Philex amplifiers are recognized for their plug-and-play simplicity, allowing users to enhance their Freeview experience without complex setups. Their performance is consistently reliable, providing strong signal strength that leads to clearer picture quality.
SLX amplifiers are built with high-quality materials and advanced technology that reduce interference, ensuring a stable and clear signal. Their robust construction and attention to detail in signal processing make them a favored choice for those who prioritize picture quality in their viewing experience.
How Can You Choose the Right Freeview Amplifier for Your Needs?
When selecting the best Freeview amplifier for your needs, consider the following factors:
- Signal Strength: Assessing the current signal strength in your area is crucial as it influences the type of amplifier you need. A good Freeview amplifier should enhance weak signals, ensuring you receive a clearer picture and better sound quality.
- Type of Amplifier: There are different types of amplifiers, such as indoor and outdoor models. Indoor amplifiers are suitable for areas with decent signals, while outdoor amplifiers are designed to capture signals from greater distances, making them ideal for rural locations.
- Gain Level: The gain level of an amplifier determines how much it boosts the signal. It’s important to choose an amplifier with the right gain level; too much gain can lead to distortion, while too little may not sufficiently enhance the signal.
- Frequency Range: Ensure the amplifier supports the frequency range used by Freeview channels in your area. Look for a wide frequency range to ensure compatibility with various channels and reduce the risk of losing signal quality.
- Build Quality: A well-built amplifier can withstand environmental factors if installed outdoors. Look for weatherproof models with durable materials to ensure longevity and consistent performance.
- Power Source: Consider how the amplifier will be powered. Some models require an external power source, while others may be powered through the coaxial cable. Choose the one that best suits your setup and convenience.
- Additional Features: Some amplifiers come with built-in filters to reduce interference and noise. Features like adjustable gain controls or multiple output options can add versatility to your setup and should be considered based on your specific needs.
How Do You Successfully Install a Freeview Amplifier?
To successfully install a Freeview amplifier, follow these essential steps:
- Choose the Right Location: Determine an optimal location for the amplifier to receive the best signal strength, ideally close to the antenna and away from obstructions.
- Gather Necessary Tools: Prepare all required tools such as a screwdriver, coaxial cables, and possibly a cable splitter for connecting multiple devices.
- Connect the Antenna: Properly connect the coaxial cable from the antenna to the input port of the amplifier, ensuring a secure fit to avoid signal loss.
- Power Up the Amplifier: If your amplifier requires power, plug it into a nearby electrical outlet and ensure it is turned on to begin boosting the signal.
- Connect Output to TV/Receiver: Use another coaxial cable to connect the output of the amplifier to your television or Freeview receiver, ensuring the connections are tight.
- Adjust Settings: If your amplifier has adjustable settings, configure them as per the manufacturer’s recommendations to optimize performance.
- Scan for Channels: After installation, perform a channel scan on your TV or receiver to detect and store all available Freeview channels.
Choosing the Right Location is critical as it affects the signal quality; ideally, the amplifier should be placed in a high position, free from interference from trees, buildings, or other obstacles. This can greatly enhance the reception quality and improve your viewing experience.
Gathering Necessary Tools will streamline the installation process, as having everything on hand prevents unnecessary delays. Common tools include a screwdriver to secure connections and coaxial cables to link the components together.
Connecting the Antenna to the amplifier is a vital step; ensure that the coaxial cable is firmly attached to prevent any signal degradation. A loose connection can lead to poor signal reception and hinder the performance of the amplifier.
Powering Up the Amplifier is necessary for active amplifiers; check if it uses an external power supply or if it gets powered through the coaxial cable. Confirming that the amplifier is properly powered ensures it can effectively boost the incoming signal.
Connecting Output to TV/Receiver should be done with care, as this step is essential for the amplifier to relay the enhanced signal to your viewing device. Make sure the output cable is securely connected to avoid interruptions during viewing.
Adjusting Settings on the amplifier can help in fine-tuning the performance; some models allow you to adjust gain levels which can help optimize the signal strength based on your specific location and reception conditions. Always refer to the manual for guidance on these settings.
Scanning for Channels is the final step that allows your TV or receiver to detect all available channels through the newly installed amplifier. This ensures that you can enjoy the full range of Freeview programming without interruptions.
What Are Common Issues and Solutions with Freeview Amplifiers?
Common issues with Freeview amplifiers and their solutions include:
- Signal Overload: Amplifiers can sometimes boost signals too much, leading to distortion and pixelation in the picture.
- Interference: Other electronic devices can interfere with the signal, causing reception problems.
- Improper Installation: Incorrect installation or positioning of the amplifier can result in poor performance.
- Power Supply Issues: Faulty or inadequate power supplies can affect the operation of the amplifier.
- Weather Conditions: Adverse weather can impact signal quality, particularly for outdoor antennas.
Signal overload occurs when a Freeview amplifier amplifies a strong signal too much, which can lead to a degraded viewing experience. To resolve this, users can try reducing the gain on the amplifier or using a variable gain amplifier to fine-tune the signal strength.
Interference from other devices, such as microwaves or cordless phones, can disrupt the signal received by the amplifier. Moving the amplifier away from such devices or using shielded cables can help minimize interference and improve reception.
Improper installation or positioning of the amplifier can significantly affect its performance. Ensuring the amplifier is placed in an optimal location, preferably closer to the antenna and away from obstructions, can lead to better signal quality.
Power supply issues can arise if the amplifier is not receiving adequate power, which can cause it to function intermittently or not at all. Checking the power supply and ensuring it is connected properly or replacing it if faulty can resolve these issues.
Weather conditions such as heavy rain, snow, or strong winds can affect the performance of outdoor antennas and amplifiers. Regular maintenance and ensuring that the antenna is securely mounted can help mitigate the impact of weather on signal quality.
Related Post: