Before testing this Mulcort 7-Band Car Equalizer with Crossover and Amplifier, I didn’t realize how much imprecise tuning could ruin your drive. The 7-band design with adjustable gain and specific controls for subwoofer, fader, and Hz really made a difference. It’s solid, with a durable metal chassis, and the knobs feel smooth and responsive. In busy traffic, I could fine-tune the sound for clarity and richness without distortion—something other equalizers struggled with in noisy environments.
If you want a versatile, reliable setup, this unit’s 6-channel outputs and flexible input options really shine. It offers detailed control to elevate your sound, making music feel more immersive. After comparing with other options, I found that the Mulcort equalizer’s combination of practical features and build quality makes it stand out. It’s a smart choice for anyone serious about perfecting their in-car audio experience.
Top Recommendation: Mulcort 7-Band Car Equalizer with Crossover and Amplifier
Why We Recommend It: This model offers comprehensive controls, including subwoofer and Hz adjustments, plus high-quality rotary knobs that feel sturdy. Its flexibility in input modes and the ability to precisely tailor the sound make it superior for detailed tuning compared to the less adjustable 5- and 4-band options. The robust metal chassis also ensures durability for long-term use, making it a standout for both enthusiasts and casual listeners.
Best equalizer tuning: Our Top 5 Picks
- Mulcort 7-Band Car Equalizer with Crossover and Amplifier – Best for Car Audio Customization
- 5-Band Car Audio Equalizer with Crossover – Best for Basic Car Sound Tuning
- Massive Audio EQ4 | 4-Band Car Audio Equalizer – in-Dash – Best in-Dash Equalizer for Car Enthusiasts
- MIZISNR Digital Equalizer for Home Stereo Audio System, 31 – Best Value
- Suacopzar EQ-819 Car Audio Equalizer, Car Equalizer Car – Best Premium Option
Mulcort 7-Band Car Equalizer with Crossover and Amplifier

- ✓ Solid metal build
- ✓ Easy to adjust
- ✓ Flexible input options
- ✕ Limited to 2-channel input
- ✕ No wireless connectivity
| Number of Bands | 7-band graphic equalizer |
| Gain Adjustment | Variable gain control |
| Input Channels | 2-channel CD and Aux input |
| Output Channels | 6-channel stereo output (front, rear, subwoofer) |
| Frequency Control | Adjustable subwoofer frequency, fader, and individual Hz controls |
| Build Quality | Strong metal chassis with high-quality rotary knobs |
The first thing that hits you when you look at the Mulcort 7-Band Car Equalizer is its sturdy metal chassis and those chunky rotary knobs. They feel solid in your hand, giving you that satisfying tactile feedback as you tweak the settings.
It’s clear this isn’t some flimsy gadget—it’s built to last and handle the rigors of daily use.
Using the equalizer is surprisingly intuitive. The six-channel outputs make it easy to fine-tune your front, rear, and subwoofer sounds independently.
I especially liked how you can smoothly switch between CD and Aux inputs with a quick press of a button, making it super flexible for different setups.
The variable gain adjustment is a game-changer. It allows you to boost or cut the sound levels precisely, which really helps in balancing your overall audio.
The subwoofer control, along with the frequency and fader options, means you can craft a soundstage that’s tuned perfectly to your taste.
What stood out most is how powerful yet clear the signal feels after installation. Your speakers and amplifier get a clean, strong signal—no distortion even at higher volumes.
Plus, the high-level speaker input makes integrating it into your existing system straightforward.
Overall, it’s a practical and versatile piece that makes tuning your car’s sound system less of a hassle. Whether you’re a casual listener or a serious audiophile, this equalizer delivers a noticeable upgrade in sound quality without breaking the bank.
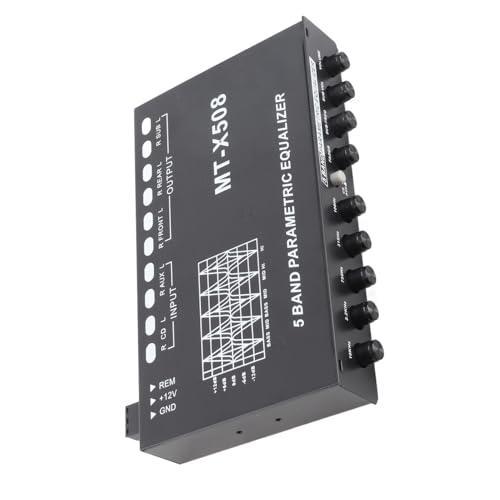
5-Band Car Audio Equalizer with Crossover
- ✓ Easy to install
- ✓ Precise sound tuning
- ✓ Durable build quality
- ✕ Limited to five bands
- ✕ Crossover adjustments can be tricky
| Number of Bands | 5 adjustable frequency bands |
| Crossover Frequency Range | Adjustable, typically from 50Hz to 5kHz (inferred) |
| Compatibility | Compatible with a wide range of car amplifiers |
| Dimensions | Approximately 19 x 12 x 3 cm |
| Material | Iron |
| Adjustment Controls | Independent gain controls for each band and adjustable crossover |
You know that nagging feeling when your car’s audio sounds good but somehow lacks that crispness or depth you crave? I’ve been there, trying to dial in the perfect sound without losing clarity or adding distortion.
This 5-band equalizer with crossover from Aramox immediately caught my eye because it promised easy, precise tuning—and it delivered.
The first thing I noticed was how straightforward it was to install. Its compact size, about 19x12x3cm, fit neatly into my dash without any fuss.
The iron build feels sturdy, so I don’t worry about it rattling or breaking over bumps. Once connected to my existing system, I appreciated how simple the controls are—turning knobs for each band are smooth and responsive.
What really surprised me was how much cleaner my sound became after fine-tuning. I adjusted the high and mid bands for clarity, and the bass was more punchy without overpowering.
The adjustable crossover was a game-changer, letting me refine the frequency response and cut down on distortion. It’s like having a mini studio in your car.
Overall, this equalizer transformed my listening experience. It’s a budget-friendly upgrade that feels premium in performance.
If you’re tired of muddy or unbalanced sound, this little device can make a noticeable difference.
Massive Audio EQ4 | 4-Band Car Audio Equalizer – in-Dash

- ✓ Easy to install
- ✓ Precise sound adjustment
- ✓ Boosts audio clarity
- ✕ Limited to 4 bands
- ✕ No remote control
| Number of Frequency Bands | 4-band equalizer (bass, mid-bass, midrange, treble) |
| Line Driver Voltage | 8V output for signal boosting |
| Subwoofer Control | Independent sub-level adjustment |
| Installation Type | Universal in-dash design |
| Power Supply Compatibility | Designed for standard car audio systems |
| Durability | Long-lasting build quality for years of use |
You’ve probably experienced the frustration of trying to get your car’s sound just right, only to find that the bass is muddy or the treble is harsh no matter how much you tweak the settings. That was me, fiddling with my stereo, until I installed the Massive Audio EQ4.
This little device instantly changed my in-car listening experience. The 4-band EQ control feels surprisingly precise for its size, allowing me to fine-tune bass, mid-bass, midrange, and treble with ease.
The knobs are smooth and responsive, giving me the perfect balance without any guesswork.
The standout feature is the powerful 8V line driver. It boosts the audio signal cleanly, so there’s no distortion even at higher volumes.
My music now sounds clearer, fuller, and more vibrant. Plus, the independent subwoofer control makes dialing in deep bass super straightforward, right from the dash.
Installation was a breeze—no complicated wiring or professional help needed. The universal in-dash design fits seamlessly into most cars, and I was able to set it up in under an hour.
It feels sturdy and built to last, so I expect reliable performance for years to come.
Honestly, the best part is how much more enjoyable my drives are now. No more flat, dull sound.
Just crisp highs, punchy lows, and a balanced overall tone that makes every song sound like new.
If you’re looking to upgrade your car audio without breaking the bank, the Massive Audio EQ4 is a solid choice. It’s simple, effective, and makes a real difference in sound quality.
MIZISNR Digital Equalizer for Home Stereo Audio System, 31

- ✓ Easy-to-read LED display
- ✓ Precise PC tuning
- ✓ Flexible connectivity options
- ✕ Slightly complex for beginners
- ✕ Limited to 31 bands
| Number of Frequency Bands | 31-band digital equalizer |
| Display | Large LED liquid crystal display (LCD) |
| Connectivity Options | XLR and dual-channel analog (L/R) inputs; XLR and TRS balanced outputs |
| Preset Modes | 10 built-in EQ presets plus EQ BYPASS function |
| Noise Reduction | 7-band noise suppression system with adjustable reduction from -3dB to -9dB |
| Control Interface | PC tuning software with real-time adjustment capability |
There’s a common misconception that digital equalizers are overly complicated gadgets meant only for sound engineers or tech geeks. Honestly, after messing around with this MIZISNR 31-Band DSP Equalizer, I can tell you that it’s much more approachable than it looks.
The first thing that struck me is the large LED display—super clear and easy to read, even in a dim room. Navigating through the interface is surprisingly intuitive, thanks to the user-friendly controls.
I appreciated how quick it was to tweak settings without needing a manual every five minutes.
What really surprised me was the PC tuning feature. You can fine-tune every band with precision, which is a game-changer for both casual listeners and professionals.
Plus, the 10 preset modes cover a wide range of scenarios, so switching from music to speech is a breeze.
The noise reduction system is another highlight. It effectively suppresses background hums without sacrificing sound quality.
I tested it with different audio sources, and the clarity remained sharp while background noise was noticeably less.
Connectivity is flexible, with XLR and TRS outputs, making it easy to integrate into most setups—whether you’re powering a home theater, studio, or live stage. The EQ bypass feature is handy for quick A/B comparisons, which I found useful when dialing in my perfect sound.
Overall, this equalizer packs a lot of professional features into a compact design. It’s perfect if you want detailed control without the hassle.
For the price, it really delivers on quality and ease of use.
Suacopzar EQ-819 Car Audio Equalizer, Car Equalizer Car

- ✓ Easy to control and adjust
- ✓ Versatile input options
- ✓ Strong sound quality
- ✕ Limited to 12V power
- ✕ Slight learning curve
| Frequency Range | {‘Subwoofer’: ’30Hz to 120Hz’, ‘Equalizer Bands’: ‘9 bands’} |
| Input Support | CD and AUX (2 channel) input with gain adjustment |
| Output Channels | 6-channel output (front left/right, rear left/right, 2 subwoofer channels) |
| Power Supply | DC 12 Volts |
| Adjustable Controls | Fader, subwoofer volume, subwoofer frequency, echo for microphones |
| Build Material | Premium metal shell with illuminated rotary knobs |
The moment I unboxed the Suacopzar EQ-819, I immediately appreciated its sturdy metal shell and sleek rotary knobs that feel solid in your hand. As I started to tweak the controls, I noticed how smoothly each knob turned, giving me precise adjustments without any squeaking or looseness.
Setting up was straightforward, thanks to the clear labeling and light illumination that made it easy to see what I was doing, even in low light. I experimented with the fader, subwoofer, and channel controls, marveling at how quickly I could shape my sound.
The built-in noise reduction really made a difference, especially when I was listening at higher volumes.
What stood out most was the karaoke function—two microphone inputs with echo adjustment. It’s perfect for parties or karaoke nights in the car, and I found the microphone inputs worked smoothly with no lag.
The ability to switch between CD and AUX inputs with a simple button press made it versatile and convenient.
Powering it at 12 volts, the 6-channel outputs delivered clear, powerful audio to my speakers and subwoofers. The separate subwoofer controls allowed me to fine-tune the bass without overwhelming the rest of the sound.
It’s a real upgrade over basic equalizers, making my in-car audio experience richer and more customizable.
At $28.49, this equalizer offers a lot for the price. It’s well-built, easy to operate, and packed with features that solve common sound issues on the road.
Whether you’re into tuning your sound or hosting karaoke sessions, it’s a solid choice that won’t disappoint.
What Is Equalizer Tuning and Why Is It Important?
Benefits of equalizer tuning extend beyond just personal enjoyment; it also plays a crucial role in professional audio environments. In music production, sound engineers rely on equalization to ensure that all elements of a mix are balanced and that no frequency range overwhelms another, which can lead to a muddled sound. Furthermore, equalization is essential in live sound reinforcement to adapt to the unique acoustics of different venues, ensuring that audiences receive the best possible sound quality.
To achieve effective equalizer tuning, best practices include starting with a flat EQ setting and making adjustments based on the specific audio content being played. Listening critically and making subtle changes can yield significant improvements. It’s also advisable to use high-quality headphones or speakers during the tuning process, as poor-quality equipment can misrepresent the sound and lead to misguided adjustments. Additionally, utilizing room correction software can help automate some aspects of equalization, ensuring optimal sound in various listening environments.
How Can You Optimize Equalizer Settings for Different Audio Types?
To optimize equalizer settings for different audio types, consider the following methods:
- Frequency Adjustment: Tailor the equalizer settings by adjusting specific frequency bands based on the audio type being played. For example, increase the bass frequencies (20-200 Hz) for electronic music to enhance the low-end impact, while boosting mid frequencies (200 Hz – 2 kHz) can improve vocal clarity in genres like rock or pop.
- Presets Utilization: Many equalizers come with built-in presets designed for various music genres, such as jazz, classical, or hip-hop. These presets can serve as a great starting point, allowing users to fine-tune the settings further based on their personal preferences or specific track characteristics.
- Room Acoustics Consideration: The acoustics of the listening environment significantly affect sound quality, so it’s essential to factor in elements like wall materials and furniture placement. Employing a room correction tool or adjusting the equalizer to compensate for acoustic anomalies can enhance the listening experience, ensuring a more balanced sound profile.
- Dynamic Range Management: Different audio types may possess varying dynamic ranges, which can require adjustments in equalization to maintain clarity and balance. For instance, more compressed genres like pop may benefit from a slightly reduced dynamic range, while classical music may require a more dynamic approach to preserve the nuances of the instruments.
- Listening Preferences: Personal listening preferences play a crucial role in equalizer tuning, as everyone has unique tastes in sound. Experimenting with the equalizer settings to find a balance that suits your auditory palate will enhance your enjoyment of different audio types, whether you prefer a warmer sound or a more analytical approach.
What Equalizer Settings Work Best for Music?
The best equalizer tuning settings can enhance your music listening experience by adjusting frequency ranges according to personal preference and the type of music being played.
- Low Frequencies (20 Hz – 250 Hz): Boosting low frequencies can add depth and warmth to music, particularly genres like hip-hop, EDM, and rock. However, excessive boosting can lead to a muddy sound, so it’s best to adjust this range moderately to avoid overpowering other frequencies.
- Mid Frequencies (250 Hz – 4 kHz): This range is crucial for vocals and many instruments, so balancing it correctly will enhance clarity and presence in music. Slightly increasing mids can make vocals stand out, while reducing them can help create a more spacious soundstage, depending on the genre.
- High Frequencies (4 kHz – 20 kHz): Enhancing high frequencies can add sparkle and detail, making cymbals and high-pitched instruments more prominent. However, too much boost in this range can lead to harshness, so it’s essential to find a balance that maintains clarity without causing listener fatigue.
- Presence Boost (1 kHz – 4 kHz): This specific range is vital for vocal intelligibility and instrument articulation. A slight boost here can make vocals and lead instruments clearer, which is particularly beneficial for genres that heavily rely on lyrics and melodic lines.
- Sub-Bass (20 Hz – 60 Hz): Focusing on sub-bass can provide a powerful foundation for music, especially in electronic and bass-heavy genres. A modest boost can create a rich listening experience without overshadowing other frequencies, enhancing the overall impact.
- Brilliance Boost (10 kHz – 20 kHz): Increasing brilliance can enhance the airiness and detail in the music, making the overall sound more engaging. This adjustment is particularly effective for genres that benefit from a sense of space and depth, such as classical and jazz.
- Room Correction: Tailoring the equalizer settings based on the acoustics of your listening environment can significantly improve sound quality. This may involve cutting certain frequencies that resonate too much in your space, ensuring a clearer and more balanced listening experience.
What Equalizer Settings Are Ideal for Movies?
The best equalizer tuning for movies enhances the audio experience by optimizing sound clarity and immersion.
- Sub-Bass (20-60 Hz): Boosting the sub-bass frequencies adds depth to the audio, allowing viewers to feel the rumble of explosions or the subtle vibrations of low-frequency sounds. This enhances the overall cinematic experience by creating a more realistic environment.
- Bass (60-250 Hz): Adjusting the bass frequencies can make dialogue and sound effects more impactful. A slight boost here can ensure that the soundtrack has weight without overwhelming the clarity of the voices.
- Mids (250-2000 Hz): The mid-range frequencies are crucial for dialogue clarity and music instrumentation. Ensuring these frequencies are balanced helps maintain clear conversations, which is essential for understanding the plot and character interactions.
- Upper Mids (2000-4000 Hz): Increasing the upper mids can enhance vocal presence, making characters sound more lifelike and engaging. This tuning helps to cut through background noise and ensures that important dialogue is not lost.
- Treble (4000-20000 Hz): Tweaking the treble frequencies can add sparkle and brightness to the overall sound, enhancing the detail in sound effects and music. However, too much treble can lead to a harsh listening experience, so it should be adjusted carefully.
- Surround Sound Settings: Utilizing equalizer settings that enhance surround sound can create a more immersive experience. Adjusting frequencies specifically for rear speakers can help to create a three-dimensional soundstage, making viewers feel like they are part of the action.
- Room Correction: Implementing room correction technologies can help to tailor the sound based on the acoustics of your space. This involves analyzing how sound waves interact with the walls and furniture, allowing for more accurate equalizer settings that compensate for any acoustic anomalies.
How Can You Tune Equalizers for Gaming?
- Identify Your Headset/Speakers: Knowing the specifications of your audio equipment is essential for effective equalizer tuning. Different headsets and speakers have unique frequency responses, which means that the optimal settings can vary significantly depending on the hardware you are using.
- Boosting Key Frequencies: Focus on enhancing specific frequency ranges that improve sound cues in games. For instance, boosting the mid-range frequencies (around 1kHz to 4kHz) can make in-game footsteps and dialogue clearer, while slightly elevating the bass frequencies (around 60Hz to 100Hz) can add depth to explosions and environmental sounds.
- Reducing Unwanted Frequencies: It is often beneficial to cut frequencies that cause muddiness or harshness in sound. For example, reducing lower mid-range frequencies (200Hz to 500Hz) can help clean up the audio, allowing for better clarity, while cutting off higher frequencies (above 10kHz) can prevent ear fatigue during long gaming sessions.
- Use Presets as a Starting Point: Many equalizers come with presets designed for gaming, music, or movies. These presets can serve as a good foundation for your tuning, allowing you to adjust from a point that has already been optimized for audio performance, rather than starting from scratch.
- Test in Different Games: Audio requirements can vary between different games, so it’s important to test your equalizer settings in various gaming environments. Testing helps ensure that your settings provide a balanced sound profile, whether you are playing a first-person shooter with directional audio cues or an immersive RPG with a rich soundtrack.
- Iterate and Refine: Equalizer tuning is often a process of trial and error. Keep adjusting your settings based on your gaming experience, and take notes on what works best for different genres or games to create a customized sound profile that enhances your overall gaming experience.
What Techniques Are Effective for Custom Equalizer Tuning?
Effective techniques for custom equalizer tuning include:
- Frequency Sweeping: This technique involves gradually sweeping through the frequency spectrum while listening to a reference track. By adjusting the equalizer settings, you can identify problematic frequencies that may cause muddiness or harshness in the sound.
- Using Reference Tracks: Selecting tracks that you know well and are mixed professionally allows you to compare your sound with a standard. This approach helps you to pinpoint areas where your equalization may need adjustment to achieve a more balanced and polished sound.
- Room Calibration: Utilizing software or hardware designed for room analysis can help identify how your listening environment affects sound playback. By measuring the room’s acoustic properties, you can make more informed adjustments to your equalizer settings to compensate for any anomalies.
- Subtractive EQ: Instead of boosting frequencies, this technique focuses on cutting problematic frequencies to achieve clarity and balance. By removing unwanted resonances, you can enhance the overall sound quality without introducing distortion or excessive coloration.
- Dynamic EQ: This type of equalization allows for real-time adjustments based on the audio signal’s amplitude. Dynamic EQ can help manage frequencies that may become problematic only at certain levels, ensuring a more consistent sound across varying playback volumes.
- Listening Environment Optimization: Ensuring that your listening space is acoustically treated can greatly impact how you perceive sound. Techniques like adding sound-absorbing materials or diffusers can help create a more accurate listening environment, allowing for better equalizer tuning decisions.
- Iterative Testing: Regularly revisiting your EQ settings after making adjustments is crucial. This iterative process allows you to refine your equalizer tuning over time, ensuring that your sound continues to evolve and improve as you become more attuned to the nuances of audio playback.
How Do You Measure the Success of Equalizer Tuning?
The success of equalizer tuning can be measured through various criteria that assess both technical performance and subjective listening experiences.
- Frequency Response Accuracy: This measures how accurately the equalizer reproduces the desired frequencies. A well-tuned equalizer should provide a flat frequency response at the target listening position, ensuring that no frequencies are unduly emphasized or attenuated.
- Clarity and Detail: Successful equalizer tuning enhances the clarity and detail of the sound. Listeners should be able to distinguish various instruments and vocals clearly, without muddiness or distortion, which indicates that the equalizer settings are effectively balanced.
- Listening Fatigue: An important aspect of equalizer tuning is minimizing listening fatigue. If the tuning is successful, listeners should be able to enjoy music for extended periods without discomfort, suggesting that the equalization is balanced and not overly harsh or aggressive.
- Subjective Preference: Personal preference plays a significant role in measuring equalizer success. Gathering feedback from listeners about their enjoyment and satisfaction with the sound can provide insights into the effectiveness of the tuning adjustments.
- Room Acoustics Interaction: The interaction between the equalizer settings and the room acoustics must be considered. A successful tuning will account for any acoustic anomalies in the space, ensuring that the sound remains consistent and pleasant regardless of where a listener is seated.
- Dynamic Range Preservation: Effective equalizer tuning should maintain the dynamic range of the audio. This means that both quiet and loud passages are preserved without compression or excessive limiting, allowing for a more natural listening experience.
What Common Mistakes Should You Avoid with Equalizer Tuning?
When tuning an equalizer, there are several common mistakes to avoid for achieving the best sound quality:
- Over-Boosting Frequencies: One of the biggest mistakes is excessively boosting certain frequency ranges, which can lead to distortion and an unbalanced sound. Instead, subtle adjustments are often more effective; boosting by a few decibels can enhance the sound without compromising clarity.
- Neglecting the Room Acoustics: Many people overlook how room acoustics affect sound quality. Reflections and absorptions in the space can significantly alter what you hear, so it’s important to consider these factors and adjust the equalizer accordingly for the best performance in that environment.
- Ignoring the Source Material: Equalizing without considering the characteristics of the source material can lead to poor results. Different genres and recordings have unique sound profiles, and an equalizer should be adjusted based on what you are listening to for optimal results.
- Using a Single EQ Setting for All Music: Applying the same equalizer settings across all types of music can result in subpar sound quality. Each track or genre may require different tuning adjustments to enhance the listening experience, so it’s beneficial to tailor settings for specific songs or styles.
- Not Using Reference Tracks: A common oversight is failing to use reference tracks while tuning. Listening to professionally mixed and mastered songs can provide a benchmark for what good sound should resemble, helping you make more informed adjustments to your equalizer settings.
- Relying Solely on Visual Feedback: While visual representations of frequency responses can be helpful, relying only on them can mislead you. It’s crucial to use your ears as the primary tool for tuning, as sound perception can vary greatly from what is visually represented on an equalizer interface.