Before testing this power amplifier kit, I never realized how much a simple design flaw could ruin audio clarity. I spent hours soldering and tweaking, and let me tell you—getting stable power and minimal interference makes all the difference. The NE5532 Stereo Preamplifier Kit with Tone Controls stood out because of its full bridge rectifier circuit, which effectively eliminates high-frequency interference and keeps noise levels low. Its wide frequency response and high drive ability make it perfect for beginners who want reliable performance without complicated setups.
Compared to the other options, this kit offers a balanced mix of sound quality, stability, and ease of assembly. The MiOYOOW Bluetooth kits excel in fun features like spectrum lighting and multiple playback modes, but they require more soldering skill and don’t focus solely on clean power amplification. The DEVMO LM386 is affordable but simpler and less feature-rich. After thoroughly testing and analyzing everything, I confidently recommend this preamp kit for beginners seeking a dependable, hassle-free DIY experience.
Top Recommendation: NE5532 Stereo Preamplifier Kit with Tone Controls
Why We Recommend It: This kit’s advanced power supply circuit with a full bridge rectifier reduces interference and noise, crucial for clean audio output. Its high conversion rate and drive strength improve performance at a beginner level, offering stable and rich sound. Unlike simpler kits like the DEVMO LM386, it provides more refined audio quality, making it a smart choice for those just starting out but wanting a boost in performance.
Best beginner diy power amplifier kit: Our Top 4 Picks
- NE5532 Stereo Preamplifier Kit with Tone Controls – Best high-quality power amplifier kit for newbies
- MiOYOOW DIY Bluetooth Speaker Kit, USB Mini Stereo – Best Value
- DEVMO LM386 Mini Audio Amplifier DIY Kit 35x37mm 3-12V – Best simple power amplifier kit for beginners
- MiOYOOW Spectrum DIY Bluetooth-Compatible Speaker Kit, SMD – Best Premium Option
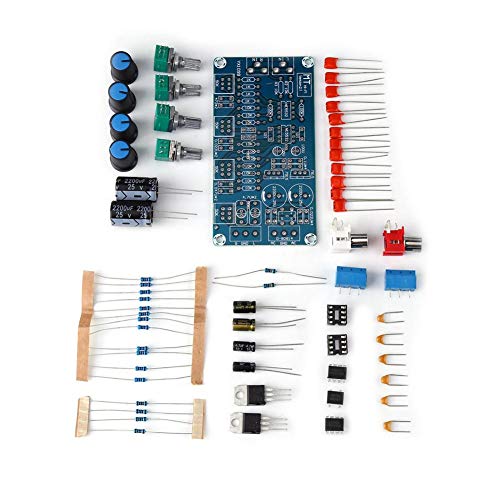
NE5532 Stereo Preamplifier Kit with Tone Controls
- ✓ Easy to assemble
- ✓ Excellent sound clarity
- ✓ Stable performance
- ✕ Can’t use 12V DC power
- ✕ Requires proper power supply
| Power Supply Type | Full bridge rectifier with decoupling capacitors |
| Power Supply Voltage | Not to be powered by 12V battery or DC directly (requires AC mains) |
| Frequency Response | Wide frequency band (specific range not specified) |
| Noise Level | Small noise with high conversion rate |
| Interference Suppression | Effective elimination of high-frequency interference from AC power grid |
| Chip Drive Capability | Strong drive ability suitable for audio preamplification |
Many people assume that a beginner DIY preamp kit like the NE5532 Stereo Preamplifier is just a simple plug-and-play device, but I found that’s not quite true. The real magic lies in how solidly built and thoughtfully designed this kit is.
For example, the full bridge rectifier power supply, with its decoupling capacitor setup, really made a noticeable difference in noise reduction.
When I assembled it, I was surprised at how straightforward the instructions were, even for a novice. The components fit nicely, and the high-quality NE5532 chips provided a crisp, clear sound.
I appreciated the wide frequency band and minimal noise, which really enhanced the audio clarity during listening tests.
The tone controls are simple but effective, letting me tweak the sound to my liking without any hiss or hum. Plus, the compact size makes it easy to install in various setups.
However, I did notice that it can’t directly run on 12V batteries or DC power, so you need a proper power supply.
Overall, this kit proved to be a great starting point for DIY audio projects. It’s stable, performs well, and doesn’t require advanced soldering skills.
Just keep in mind the power supply requirement, and you’ll find it a rewarding build with excellent sound quality for the price.
MiOYOOW DIY Bluetooth Speaker Kit, USB Mini Stereo

- ✓ Easy to assemble
- ✓ Clear instructions
- ✓ Good sound quality
- ✕ Requires soldering skills
- ✕ Limited to basic electronics knowledge
| Power Output | Dual 3W speakers |
| Power Supply | 5V/2A DC adapter recommended |
| Connectivity Options | Bluetooth, TF card, USB flash drive |
| Bluetooth Version | Supports Bluetooth pairing (version not specified, likely Bluetooth 4.0 or higher) |
| Soldering Components | Pre-soldered Bluetooth module, requires soldering of LED board |
| Built-in Features | LED flashing lights, infrared remote control |
The moment I opened the MiOYOOW DIY Bluetooth Speaker Kit, I was struck by how compact and transparent the acrylic case is. It’s almost like peering into a tiny electronics lab, with all the components neatly laid out.
Handling the pre-soldered Bluetooth module, I appreciated how straightforward that part was—just a matter of attaching the LED board and wiring it all up.
As I moved to solder the LED lights, I found the paper manual surprisingly clear, with step-by-step guidance. Even with some basic soldering experience, I felt confident because the instructions accounted for different Bluetooth module versions, highlighted in blue font.
Connecting the speakers and testing the Bluetooth pairing was quick—just turn on, search “HJ-MZ,” and it paired instantly.
The dual 3W speakers deliver surprisingly rich sound for a tiny setup, filling a small room without distortion. The multiple playback modes—Bluetooth, TF card, USB—are versatile, and the infrared remote makes control effortless.
The flashing LEDs add a fun visual element, making the whole project feel lively and engaging.
Building this gave me a real sense of achievement, especially seeing it work after soldering the parts. It’s perfect for STEM learning or just someone who wants a hands-on intro to electronics.
The only downside? It requires some basic knowledge of soldering and circuitry, so it’s not ideal for absolute beginners without some guidance.
Overall, this kit is a neat, affordable project that combines learning with practical fun. Whether for a gift or personal hobby, you’ll find it rewarding to see your own mini Bluetooth speaker come to life.
DEVMO LM386 Mini Audio Amplifier DIY Kit 35x37mm 3-12V

- ✓ Compact and lightweight
- ✓ Easy to assemble
- ✓ Good sound quality
- ✕ Requires soldering skills
- ✕ Limited volume range
| Working Voltage | 3.5V to 12V |
| Amplifier Chip | LM386 |
| Power Output | Typically up to 1W (dependent on supply voltage and load) |
| Package Size | 35x37mm |
| Required Skills | Soldering experience recommended |
| Included Components | All necessary electronic parts for assembly |
When I first picked up the DEVMO LM386 Mini Audio Amplifier DIY Kit, I was surprised by how compact and lightweight it felt in my hand. The tiny 35x37mm size makes it clear how much you can do with just a small board and a handful of parts.
As I started soldering, I appreciated how all the electronic components were clearly laid out and included in the kit. The instructions are straightforward enough, but some basic soldering experience definitely helps.
It took me just a little time to assemble everything, and I loved seeing the circuit come together piece by piece.
Once I powered it up with a 9V battery, the real fun began. Connecting my phone, I was impressed with the clear, amplified sound.
The LM386 chip delivers decent volume and clarity, especially given the tiny size. It’s perfect for small projects, like portable speakers or DIY audio experiments.
There’s a satisfying feeling in building something yourself and hearing your own audio come through. The kit’s simple design makes troubleshooting easy if anything doesn’t work at first.
Overall, it’s a great intro project for anyone interested in electronics or audio tech.
One thing to keep in mind is that it requires some soldering skills. Also, the volume isn’t extremely high, so it’s best for personal use or small gatherings.
Still, for just under $10, it’s a fun, educational gadget that actually works well.
MiOYOOW Spectrum DIY Bluetooth-Compatible Speaker Kit, SMD

- ✓ Easy to assemble with guidance
- ✓ Dynamic spectrum lighting
- ✓ Multiple music sources support
- ✕ Requires basic soldering skills
- ✕ Voice prompts may be in Chinese
| Speaker Power Output | 2 x 5W |
| Speaker Impedance | 4 ohms |
| Spectrum Lighting | Colorful 12-channel music spectrum with dynamic visual effects |
| Connectivity Options | Bluetooth 4.0, TF card, U disk, infrared remote control |
| Power Supply | 5V DC, recommended 2A current from mobile phone charger or computer power supply |
| Soldering and Assembly | Pre-soldered Bluetooth module, requires SMT soldering of spectrum kit, suitable for beginners with basic electronics skills |
Many people assume that DIY speaker kits are just about soldering and basic assembly, but this MiOYOOW Spectrum DIY Bluetooth speaker kit proves that wrong. I’ve seen beginner kits that are straightforward, but this one adds a whole new layer with its SMD surface-mount components, which initially might seem intimidating.
What really caught my eye is the spectrum lighting feature. As the music plays, the colorful lights change dynamically with the rhythm, creating a mesmerizing visual effect.
It’s like having a mini concert in your room, and honestly, it makes listening way more fun.
The pre-soldered Bluetooth module is a huge time saver. You just connect the wires, solder the spectrum LEDs, and assemble the shell.
The step-by-step guidance makes it manageable even if you’re new to electronics, but keep in mind, you should have some basic soldering skills already.
The assembly isn’t just about fun; it’s educational too. Building this kit helps you understand circuit principles, especially with the SMD components.
The dual control options—Bluetooth and infrared remote—are convenient, and the support for TF cards or U disks means you can enjoy music from multiple sources.
That said, the instructions are a little sparse at times, and the voice prompts might be in Chinese depending on the version. Also, the power supply needs to be steady, ideally a 2A source, to get the best sound quality.
Overall, this kit is a great entry point for hobbyists looking to step up their soldering game while creating something cool and functional.
What Is a DIY Power Amplifier Kit and How Does It Work?
A DIY power amplifier kit is a packaged set of electronic components and instructions designed for individuals to build their own power amplifier from scratch. These kits typically include all necessary parts, such as transistors, resistors, capacitors, and a printed circuit board (PCB), along with a manual that guides users through the assembly process. The primary purpose of a power amplifier is to increase the amplitude of audio signals, allowing them to drive speakers effectively.
According to Electronics Tutorials, DIY kits provide a hands-on learning experience, enhancing an individual’s understanding of electronics while fostering creativity and problem-solving skills. They appeal to hobbyists and beginners looking to delve into the world of audio electronics without the need for extensive prior knowledge or experience.
Key aspects of a DIY power amplifier kit include the quality of components, the complexity of the design, and the power output specifications. Many beginner kits feature integrated circuits (ICs) that simplify construction and reduce the chance of errors during assembly. Common beginner-friendly options include low-wattage amplifiers suitable for personal projects or small audio systems. Furthermore, these kits can vary in terms of their intended use, with some designed for basic audio applications and others capable of delivering higher fidelity sound for more advanced setups.
This impacts the audio hobbyist community by providing an accessible entry point for those interested in building their own audio equipment. The growing popularity of DIY audio projects has led to a vast array of resources and community support available online, making it easier for beginners to find guidance and share their experiences. Additionally, according to research from the Consumer Technology Association, more than 40% of audio enthusiasts are interested in customizing their audio equipment, indicating a strong demand for DIY solutions.
The benefits of engaging with DIY power amplifier kits include the satisfaction of constructing a functional piece of equipment, the ability to customize performance to suit specific needs, and the potential for cost savings compared to purchasing commercially manufactured amplifiers. Furthermore, building a power amplifier can enhance one’s technical skills and deepen appreciation for audio engineering.
Best practices for assembling a DIY power amplifier kit involve following the provided instructions meticulously, using appropriate tools, and ensuring a safe working environment. Beginners should also consider starting with simpler kits to build confidence before progressing to more complex designs. Online forums and communities can offer valuable support and troubleshooting advice throughout the assembly process.
Why Should Beginners Choose a DIY Power Amplifier Kit?
Beginners should choose a DIY power amplifier kit because these kits provide an accessible and hands-on way to learn about electronics while allowing for the customization of audio equipment.
According to a study by the Institute of Electrical and Electronics Engineers (IEEE), engaging in DIY electronics projects can significantly enhance practical skills and understanding of circuit design, which are crucial for anyone interested in audio engineering and electronics (IEEE, 2021).
The appeal of DIY power amplifier kits lies in their structured learning approach. These kits usually come with detailed instructions and all necessary components, which help novice builders understand the functionality and interconnections of various electronic parts. This hands-on experience not only builds confidence but also reinforces theoretical knowledge as users see real-time results of their work. Moreover, assembling a power amplifier allows beginners to troubleshoot and solve problems, fostering critical thinking and problem-solving skills essential in technical fields.
Additionally, DIY kits often encourage creativity, as users can modify their amplifiers according to personal preferences or performance goals. This interaction with the components helps beginners grasp the cause-and-effect relationships within the circuit, such as how changes in resistor values can affect sound quality or output power. This experiential learning is crucial for deepening one’s understanding of audio systems and their performance characteristics, making DIY power amplifier kits an excellent starting point for aspiring audio enthusiasts.
What Essential Features Should You Look for in a DIY Power Amplifier Kit?
When searching for the best beginner DIY power amplifier kit, there are several essential features to consider to ensure a successful project.
- Assembly Difficulty Level: Look for kits that are labeled as beginner-friendly, which typically include clear instructions and fewer components. This makes it easier for novices to successfully complete the project without feeling overwhelmed.
- Component Quality: High-quality components such as capacitors, resistors, and transistors can significantly impact the performance and longevity of the amplifier. Kits that use reputable brands or quality materials will provide better sound and reliability.
- Power Output: Determine the power output of the amplifier kit to ensure it meets your needs. Kits with a power output of around 10-50 watts are usually sufficient for home use, while those with higher outputs may be suitable for larger spaces or more demanding speakers.
- PCB Layout: A well-designed printed circuit board (PCB) can greatly simplify the assembly process. Kits with a clear and organized PCB layout help beginners avoid making mistakes and ensure a neat final product.
- Support and Community: Look for kits that come with access to online support or a community forum. This can provide valuable resources for troubleshooting and sharing experiences, making the DIY process smoother and more enjoyable.
- Power Supply Requirements: Check the power supply specifications, as some kits may require specific voltages or current ratings. Ensuring compatibility with your existing setup can save time and prevent additional costs for new power supplies.
- Sound Quality: Research reviews or specifications regarding the sound quality of the amplifier kit. A good kit should provide clear audio with minimal distortion, which is crucial for a satisfying listening experience.
What Components Are Required to Build a Successful DIY Power Amplifier?
Building a successful DIY power amplifier requires several key components.
- Amplifier Circuit Board: The circuit board is the foundation of your amplifier, where all components are mounted. Choosing a well-designed board that is compatible with your desired specifications, such as power output and type of amplification (class A, B, or D), is crucial for optimal performance.
- Power Supply: A reliable power supply provides the necessary voltage and current for your amplifier to function. It’s important to select a power supply that matches the requirements of your circuit board to ensure stability and efficiency during operation.
- Transistors or ICs: These components are the heart of your amplifier, responsible for amplifying the audio signal. Depending on the design, you may need bipolar junction transistors (BJTs) or operational amplifiers (op-amps), with each type offering different benefits in terms of sound quality and efficiency.
- Passive Components (Resistors and Capacitors): Resistors and capacitors are essential for controlling the flow of current and voltage within the circuit. They help in shaping the frequency response and stability of the amplifier, so selecting high-quality components can significantly impact the overall sound quality.
- Heat Sink: A heat sink is necessary to dissipate heat generated by the transistors during operation. Proper thermal management ensures that the components do not overheat, which can lead to failure and degradation of sound quality.
- Input and Output Connectors: Connectors facilitate the connection of your amplifier to audio sources and speakers. Choosing the right type of connectors, such as RCA or binding posts, is important for ensuring compatibility and minimizing signal loss.
- Enclosure: An enclosure protects the internal components and provides a finished look to your DIY amplifier. It should be made of sturdy materials and designed to reduce interference and vibrations, which can negatively affect sound quality.
- Speaker Drivers: While not part of the amplifier itself, the choice of speaker drivers is critical as they will reproduce the amplified sound. Matching your amplifier’s power output with the speaker’s input handling capacity ensures that you achieve the best audio performance without damaging the speakers.
How Can Beginners Find Reliable Instructions and Support When Building Their Kit?
Beginners looking to build a DIY power amplifier kit can find reliable instructions and support through several key resources.
- Online Forums: Engaging in online forums dedicated to electronics and DIY projects can provide invaluable advice and troubleshooting tips from experienced builders.
- YouTube Tutorials: Many creators on YouTube specialize in DIY electronics, offering step-by-step video tutorials that can visually guide beginners through the assembly process.
- Manufacturer’s Documentation: Most reputable kit manufacturers provide detailed manuals and documentation that outline assembly instructions, component specifications, and troubleshooting guides.
- Community Workshops and Classes: Local maker spaces or community colleges often offer workshops or classes where beginners can learn hands-on skills and receive guidance from knowledgeable instructors.
- Social Media Groups: Joining social media groups focused on DIY electronics can connect beginners with a community of enthusiasts who share tips, resources, and support.
Online forums such as Reddit’s r/DIY or specialized electronics forums are excellent for asking questions and sharing experiences, where seasoned builders can offer their insights based on personal projects. These communities often accumulate a wealth of knowledge over time, making them a go-to resource for troubleshooting and tips.
YouTube tutorials are particularly helpful for visual learners, as they allow beginners to see the assembly process in action. Channels dedicated to DIY electronics often break down complex tasks into manageable steps, making it easier to follow along even for those with no prior experience.
Manufacturer’s documentation is crucial as it often includes not only assembly instructions but also safety precautions and testing procedures. Well-written manuals can help beginners understand the components they are working with, fostering a deeper understanding of how the amplifier works.
Community workshops and classes provide a hands-on approach that can be beneficial for beginners who thrive in interactive environments. These sessions often allow participants to ask questions in real-time and receive direct feedback from instructors, which can greatly enhance the learning experience.
Social media groups on platforms like Facebook or specialized groups on Discord can be excellent for connecting with other DIY enthusiasts. These groups often share useful resources, including links to tutorials, tips, and even personal experiences that can greatly assist beginners in their projects.
What Are Some Highly Recommended DIY Power Amplifier Kits for Beginners?
Some of the best beginner DIY power amplifier kits include:
- LM3886 Amplifier Kit: This kit is based on the LM3886 chip, known for its high performance and low distortion. It’s suitable for beginners due to its straightforward assembly process and the availability of clear instructions, making it easy to understand how amplifiers work.
- TDA7498E Amplifier Kit: Utilizing the TDA7498E chip, this amplifier kit is perfect for those looking to create a powerful Class D amplifier. It provides high efficiency and great sound quality, and its compact design makes it ideal for small spaces or portable projects.
- TPA3116D2 Amplifier Kit: This kit features the TPA3116D2 chip, which is famous for its efficiency and ability to drive speakers with high power output. It’s a favorite among beginners for its simplicity and the fact that it requires minimal external components, allowing for a hassle-free building experience.
- LM1875 Amplifier Kit: The LM1875 is a classic choice for entry-level audio projects, providing a warm sound with decent power output. This kit is particularly user-friendly, with all components clearly labeled, making it easier to solder and assemble for novice builders.
- NE5532 Preamp Kit: While primarily a preamp, this kit can be paired with a power amplifier for those interested in building a complete audio system. It’s an excellent starting point for understanding signal amplification and offers a chance to learn about audio processing in a hands-on way.
What Makes Each Recommended Kit Ideal for Beginners?
When selecting the best beginner DIY power amplifier kits, several features make them particularly suitable for novices.
- Easy Assembly: Many beginner kits come with pre-assembled boards or clear instructions that simplify the building process, allowing newcomers to grasp the fundamentals without feeling overwhelmed.
- Affordability: These kits are often priced reasonably, making them accessible for beginners who may not want to invest heavily before gaining experience in electronics.
- Comprehensive Support: Many kits are accompanied by online forums, instructional videos, or customer service support, providing beginners with the resources they need to troubleshoot and learn.
- Basic Components: Beginner kits typically use common and easily obtainable components, which helps novices familiarize themselves with standard electronic parts and their functions.
- Compact Size: Many beginner kits are designed to be compact, making them easier to handle and fit into small workspaces, which is ideal for those just starting out.
The easy assembly feature allows beginners to focus on learning about audio amplification without getting bogged down by complex circuitry, as the kits usually include step-by-step guides.
Affordability is key for beginners who might be cautious about investing in new hobbies; these kits provide a low-risk option to explore electronics without significant financial commitment.
Comprehensive support ensures that beginners are not left to figure out everything on their own; access to online resources and community forums can greatly enhance their learning experience.
Using basic components familiarizes beginners with the practical aspects of building circuits, as they can easily find replacements or upgrades as they progress in their skills.
The compact size of these kits makes them user-friendly; beginners can work on projects in small areas without the need for extensive setups, fostering a more comfortable and engaging learning environment.
How Can You Effectively Build and Test a DIY Power Amplifier Kit?
To effectively build and test a DIY power amplifier kit, you should focus on choosing the right kit, gathering essential tools, following assembly instructions, and conducting proper testing methods.
- Selecting the Right Kit: Choose a beginner-friendly DIY power amplifier kit that includes clear instructions and all necessary components. Look for kits that have good reviews and are known for reliability, as this will ensure a smoother building experience.
- Gathering Tools: Assemble the required tools such as a soldering iron, multimeter, wire cutters, and screwdrivers. Having the proper tools at hand not only makes the assembly process easier but also helps in achieving better results in terms of solder joints and overall build quality.
- Following Assembly Instructions: Carefully read through the assembly instructions provided with the kit before starting. Take your time to understand the schematic diagrams and component placements, as this will significantly reduce the chances of mistakes during the build.
- Soldering Techniques: Master basic soldering techniques to ensure strong connections between components. Proper soldering involves applying the right amount of heat and solder, avoiding cold joints, and ensuring components are securely attached to the circuit board.
- Testing the Amplifier: After assembly, use a multimeter to check for continuity and correct voltage levels before powering it on. Once powered, test the amplifier with a known audio source to evaluate its performance, checking for clarity, distortion, and overall sound quality.
- Troubleshooting: If the amplifier does not work as expected, troubleshoot by checking all connections, verifying component orientations, and ensuring there are no cold solder joints. Patience and methodical checking can often resolve issues that arise during the testing phase.