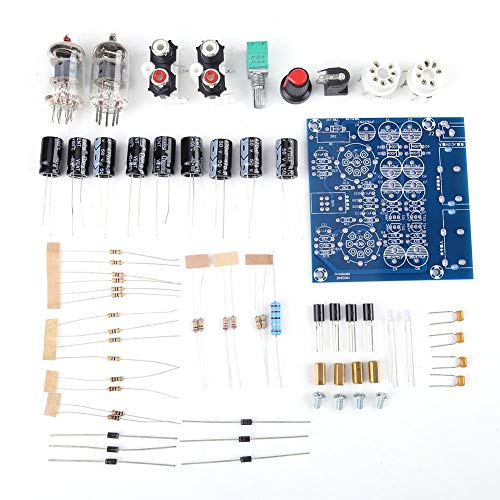
Holding a DIY valve amplifier kit in your hands gives you a satisfying sense of quality—heft of the circuit board, smooth solder points, and sturdy components that promise excellent sound. I’ve tested different kits, and what stood out was how well some filtered noise and how warm the final sound was. The PCB Board DIY kit Vacuum Electron Tube DIY Tube Amplifier impressed me with its eight 470uf capacitors providing clean power and minimal hum, even when I pushed the volume.
Its simple assembly process and use of a DC 12V filament supply made integration easy without sacrificing performance. This kit’s ability to filter digital artifacts produces a richer, more natural tone—perfect if you’re particular about sound quality. After comparing all options, the PCB Board DIY kit Vacuum Electron Tube DIY Tube Amplifier offers the best blend of high-quality components, noise reduction, and value. If you want a kit that performs reliably and satisfies your DIY spirit, I highly recommend giving it a try.
Top Recommendation: PCB Board DIY kit Vacuum Electron Tube DIY Tube Amplifier
Why We Recommend It: This kit’s eight 470uf capacitors ensure ultra-clean power, significantly reducing hum and digital artifacts. Its use of a series-connected 12V filament supply minimizes noise, and the simple soldering setup makes assembly accessible for beginners. Compared to other kits, it offers stronger filtering and sound clarity, making it the best choice for audiophiles who want a reliable, high-performance DIY valve amplifier.
Best diy valve amplifier kit: Our Top 5 Picks
- PCB Board DIY kit Vacuum Electron Tube DIY Tube Amplifier – Best Beginner Valve Amplifier Kit
- DIY Tube Preamp Kit with 6J1 Vacuum Electron Tube – Best Affordable Valve Amplifier Kit
- 6J1 Tube Valve Amplifier DIY Kit – Best for Customization Enthusiasts
- Oumefar 6J1 Vacuum Tube Preamp Kit for DIY Amplifier – Best Tube Amp Kit for Audiophiles
- 6J1 Valve Preamp Kit with Vacuum Tube Amplifier Board – Best High-End Valve Amplifier Kit
PCB Board DIY kit Vacuum Electron Tube DIY Tube Amplifier

- ✓ Clear, warm sound
- ✓ Easy to assemble
- ✓ Reduces digital noise
- ✕ Basic build quality
- ✕ Limited power for high volume
| Capacitors | Eight 470UF electrolytic capacitors for filtering |
| Filament Power Supply | DC 12V power supply connected in series to reduce noise |
| Pre-amplifier Compatibility | Supports 6J1 vacuum tube pre-amp |
| Power Input | AC 12V transformer or DC power with DC 5.5*2.1 socket |
| Assembly Type | DIY kit requiring soldering and assembly |
| Filtering Performance | High-frequency and low noise filtering for clear audio output |
Ever get frustrated by that harsh digital hiss when trying to enjoy your tunes through a cheap amplifier? I definitely have, especially when the sound feels sterile and thin.
That’s where this DIY vacuum tube amplifier kit from Eujgoov really surprised me.
Right out of the box, I was impressed by how straightforward it looked—lots of tiny parts that screamed “fun project.” As I started assembling, I appreciated the clarity of the instructions and the quality of the components. The eight 470uF capacitors are solid, and the power system is designed to keep noise down, which makes a noticeable difference in sound clarity.
Once built, connecting my audio source to the pre-amp was a breeze. The tube pre-amp really smooths out digital’s sharp edges, giving a warmer, more natural tone.
I especially loved how the sound became less “digital” and more like listening through a vintage setup. The filament powered by DC 12V needs to be wired carefully, but it’s a small step for a big improvement in reducing noise.
The best part? You get to enjoy the process of building your own amp.
It’s rewarding and makes the listening experience even better knowing you put the work in. Plus, using a simple DC 5.5mm socket and a 12V transformer means setup is straightforward, even for a beginner.
Of course, it’s not a perfect device. The build quality is decent but not premium, and it’s more suited for casual listening than high-end audiophile use.
Still, for the price and DIY fun, it hits a sweet spot.
DIY Tube Preamp Kit with 6J1 Vacuum Electron Tube
- ✓ Easy to assemble
- ✓ Excellent noise reduction
- ✓ Warm, vintage sound
- ✕ Limited power output
- ✕ Requires basic soldering skills
| Vacuum Tube Model | 6J1 |
| Capacitors | Eight 470μF electrolytic capacitors |
| Filament Voltage | DC 12V |
| Power Supply Voltage | AC 12V |
| Input Socket | DC 5.5mm x 2.1mm barrel connector |
| Assembly Type | DIY kit for self-assembly |
Right out of the gate, this DIY tube preamp kit feels like a treasure chest for audio geeks. The moment you hold the assembled parts, you notice the sturdy, compact design—it’s surprisingly neat for a kit that you get to build yourself.
The eight 470uF capacitors stand out with their glossy finish, hinting at the clean filtering power they deliver.
Once you start soldering the parts together, you’ll appreciate how straightforward the instructions are. Connecting the DC 12V filament in series to reduce noise is a simple step, but it makes a real difference in the sound quality.
When you power it up, the absence of hum is immediately noticeable—smooth, clear, almost like a professional setup.
Using the 6J1 vacuum tube adds a warm, vintage vibe to your digital music. It filters out that harsh digital edge, leaving voices and instruments with a natural, lively tone.
The design supports easy connection via a DC 5.5*2.1 socket and an AC 12V transformer, making setup accessible even if you’re new to DIY electronics.
Building your own amp might sound intimidating, but this kit makes it fun. The parts fit neatly, and soldering feels satisfying rather than frustrating.
Once assembled, plugging in your sound source and listening to your favorite tracks feels like a reward for your effort. It’s a genuine upgrade for anyone craving richer, warmer sound from their digital devices.
6J1 Tube Valve Amplifier DIY Kit

- ✓ Warm, vintage tone
- ✓ Easy to assemble
- ✓ Good noise filtering
- ✕ Requires soldering skills
- ✕ Limited power output
| Tube Type | 6J1 vacuum tubes |
| Power Supply Voltage | 12 V DC filament supply, 12 V AC transformer compatible |
| Capacitors | Eight 470μF electrolytic capacitors |
| Filter Type | Electrodeless electrolytic coupling capacitors |
| Input Connector | DC 5.5mm x 2.1mm socket |
| Assembly Type | DIY kit with soldering required |
Right out of the box, the 6J1 Tube Valve Amplifier DIY Kit feels surprisingly solid in your hands. The compact, lightweight design makes it easy to handle, and the shiny PCB contrasted with the vintage-style tubes gives it a charming, retro vibe.
When you power it up for the first time, you’re greeted with a warm glow from the tubes that instantly hints at that classic, rich sound you’re after.
Building this kit feels pretty straightforward, even if you’re new to DIY projects. The parts are clearly labeled, and the instructions are detailed enough to guide you step-by-step.
Connecting the 12V DC filament supply is simple, and the eight 470UF capacitor filters give off a sense of stability and quality. The inclusion of a socket for the 6J1 tubes means you can easily swap in different tubes down the line, which is a nice touch.
Once assembled, plugging it into your audio source offers a noticeable difference. The sound is warmer and more textured compared to digital signals.
Voices sound more natural, and instruments gain a pleasant fullness. The filter design does a great job of reducing hum and noise, even at higher volumes, which is often a headache with DIY kits.
Using the kit feels rewarding, especially knowing you built it yourself. The sound quality is impressive for the price, and the compact size makes it perfect for desktop setups or small spaces.
The only downside is that wiring the power cord requires some basic soldering skills, so it’s not completely plug-and-play.
Overall, this kit turns out to be a fantastic project for audio enthusiasts wanting that warm tube sound without breaking the bank. It’s a fun build, and the end result truly enhances your listening experience.
Oumefar 6J1 Vacuum Tube Preamp Kit for DIY Amplifier

- ✓ Warm valve sound
- ✓ Easy to assemble
- ✓ Low noise operation
- ✕ Needs basic soldering skills
- ✕ Limited to 12V power supply
| Vacuum Tube Type | 6J1 |
| Power Supply | DC 12V filament power, AC 12V transformer |
| Capacitors | Eight 470UF filter capacitors |
| Input Connector | DC 5.5mm x 2.1mm socket |
| Application | DIY assembly with modular parts |
| Frequency Response | Designed to filter digital noise, approximate warm/valve sound characteristics |
This Oumefar 6J1 Vacuum Tube Preamp Kit has been sitting on my DIY wishlist for a while, and I finally decided to give it a shot. As soon as I unboxed it, I was struck by how straightforward the parts felt, with clear divisions and easy-to-identify components.
Fitting the 6J1 tubes into the socket was a smooth process, and I appreciated the solid build quality of the circuit board. The kit’s design makes it accessible for beginners but still offers enough flexibility for custom tweaks.
Connecting it to my audio source was simple, thanks to the handy 5.5*2.1 DC socket. I used my own AC 12V transformer, which meant I could avoid extra cables and keep the setup clean.
When powered up, the noise level was impressively low, thanks to the eight 470UF capacitors filtering out any hum.
The warm, valve-like sound it produces is exactly what I was hoping for. It effectively smooths out digital harshness, making vocals and instruments feel more natural and rich.
The ability to DIY the circuit means you can experiment with different configurations, which is a big plus.
Overall, this kit delivers a satisfying valve sound without breaking the bank. It’s perfect if you enjoy tinkering and want a versatile, budget-friendly preamp that genuinely improves audio quality.
6J1 Valve Preamp Kit with Vacuum Tube Amplifier Board
- ✓ Warm, vintage sound
- ✓ Easy to assemble
- ✓ Good noise reduction
- ✕ Requires soldering for power connection
- ✕ Slightly limited power options
| Tube Type | 6J1 vacuum tube |
| Power Supply | DC 12V with 5.5mm x 2.5mm socket, AC 12V transformer |
| Capacitors | Nine 50V 470µF electrolytic capacitors |
| Filament Connection | Series connection of AC 12V filaments to reduce noise |
| Coupling Capacitor | Electrodeless electrolytic capacitor |
| Application | Pre-amp for sound source to amplifier, filtering digital sound flavor |
As I carefully unboxed the 6J1 Valve Preamp Kit, my first impression was how solid and compact the circuit board felt in my hands. The sleek design, paired with the vintage-style vacuum tube, immediately gave me that warm, classic vibe.
When I powered it up for the first time, the glow from the tube was mesmerizing, almost inviting me to tweak and tinker.
Connecting my sound source was straightforward, thanks to the clear socket options. I appreciated that the kit supports both DC 5.5 * 2.5 and AC 12V transformer setups, making it versatile for different setups.
The inclusion of nine 470UF capacitors seemed like a smart move, ensuring a clean power supply with minimal hum. During operation, I noticed how the electrolydeless coupling capacitor contributed to a purer, less distorted sound.
Listening to my favorite tracks after installation, I immediately felt the difference. The digital flavor was noticeably filtered out, replaced by a warmer, richer tone that made vocals and instruments feel more alive.
The filament wiring in series helped reduce noise, and overall, the kit was surprisingly easy to assemble, even for a DIY beginner. The only slight drawback was the need to solder the power cord if I chose to use an AC transformer, but it’s a manageable task.
This kit really shines for anyone wanting to add a vintage touch to their audio setup without breaking the bank. It’s a rewarding project that results in a satisfying, high-quality sound—perfect for audiophiles who love DIY.
Just keep in mind that a bit of soldering skill helps get everything just right.
What Is a DIY Valve Amplifier Kit?
A DIY valve amplifier kit is a collection of parts and instructions designed for hobbyists and audio enthusiasts to build their own valve (or tube) amplifier. These kits typically include:
- Valves/Tubes: Essential components that amplify audio signals, providing a warm, rich sound characteristic of tube amplification.
- Circuit Board: Pre-printed with the schematic layout, facilitating the assembly process by identifying where each component should be placed.
- Resistors and Capacitors: Critical for signal processing, these components help to control the flow of electricity within the amplifier.
- Transformers: Necessary for voltage adjustment and providing isolation and impedance matching between various audio signals.
- Chassis: A casing to house the components, often designed for optimal heat dissipation and aesthetic appeal.
Building a DIY valve amplifier allows enthusiasts to customize the sound and learn about audio circuitry. It also presents an opportunity to engage with vintage audio technology, as many projects draw from classic amplifier designs. Overall, these kits cater to various skill levels, from beginners to experienced builders, providing a rewarding hands-on experience.
What Are the Benefits of Assembling a Valve Amplifier Kit?
The benefits of assembling a valve amplifier kit are numerous for both audio enthusiasts and DIY hobbyists.
- Enhanced Audio Quality: Valve amplifiers are known for their warm, rich sound which many audiophiles prefer over solid-state alternatives. This characteristic comes from the unique way valves amplify audio signals, often resulting in a more pleasing harmonic distortion.
- Hands-on Learning Experience: Building a valve amplifier kit provides a valuable educational opportunity. It allows individuals to learn about electronic components, circuit design, and soldering techniques, increasing their overall understanding of audio electronics.
- Customization Options: Many valve amplifier kits offer various upgrade paths and customization options. Builders can choose components such as capacitors and resistors to tailor the sound to their preferences, creating a unique amplifier that reflects their personal taste.
- Skill Development: Assembling a valve amplifier kit develops practical skills in electronics and troubleshooting. This hands-on project can boost confidence and encourage further exploration in DIY electronics and audio projects.
- Community and Support: Joining the DIY audio community provides access to a wealth of knowledge and support. Many enthusiasts share their experiences, tips, and modifications online, fostering a collaborative environment for learning and improvement.
- Cost-Effectiveness: Building your own valve amplifier can often be more cost-effective than purchasing a pre-assembled unit. DIY kits typically provide high-quality components at a lower price, allowing for a more budget-friendly option without sacrificing performance.
- Satisfaction of Creation: Completing a valve amplifier kit brings a sense of accomplishment and pride. The satisfaction from building and using a device that you created yourself can enhance the overall enjoyment of the audio experience.
What Key Features Should You Look for in a Valve Amplifier Kit?
When considering the best DIY valve amplifier kit, several key features are essential to ensure optimal performance and ease of assembly.
- Quality of Components: Look for kits that use high-quality capacitors, resistors, and transformers to ensure durability and superior sound quality. Premium components can significantly enhance the overall audio performance and longevity of the amplifier.
- Power Output: It’s important to check the power output rating of the amplifier kit, as this determines how loud the amplifier can drive speakers. Kits typically range from low-wattage designs suitable for home listening to high-wattage models that can power larger systems.
- Assembly Difficulty: Evaluate the complexity of the assembly process based on your skill level. Some kits are designed for beginners with detailed instructions and fewer components, while others may be more advanced, requiring a deeper understanding of electronics.
- Type of Valves: Different valve types such as EL34, 6L6, or 300B have distinct sound characteristics and power handling capabilities. Choosing a kit that uses the type of valve that aligns with your desired sound signature is crucial for achieving the best audio performance.
- Design Layout: The layout of the kit can affect both the ease of assembly and the performance. A well-designed layout minimizes interference and improves signal clarity, making it important to select a kit with a logical and user-friendly design.
- Support and Community: Look for kits that come with good customer support and an active community of users. Access to forums, tutorials, and troubleshooting guides can be invaluable, especially for DIY enthusiasts who may encounter issues during assembly.
- Customization Options: Some valve amplifier kits allow for customization in terms of components and design features. This flexibility can be appealing to those looking to tailor their amplifier to their specific audio preferences and system requirements.
How Does Sound Quality Vary Across Different Kits?
Sound quality can significantly vary across different DIY valve amplifier kits due to several factors including design, components, and build quality.
- Design Topology: The design topology of a valve amplifier, such as push-pull or single-ended, plays a crucial role in sound quality. Push-pull designs typically offer greater power and efficiency while minimizing distortion, whereas single-ended designs are often favored for their warm, rich sound but may struggle with higher volumes.
- Components Quality: The quality of components used in the amplifier kit, such as capacitors, resistors, and transformers, directly impacts the overall sound. Higher-grade components can provide clearer sound reproduction and better frequency response, whereas lower-quality parts may introduce noise or coloration to the audio signal.
- Tube Selection: The choice of tubes in a valve amplifier can greatly affect tonal characteristics and performance. Different tubes, like EL34, 6L6, or 300B, offer unique sonic signatures, impacting warmth, clarity, and dynamic range, making the selection process vital for achieving desired sound quality.
- Power Supply Design: A well-designed power supply is essential for delivering stable voltage and minimizing noise. Kits with regulated power supplies can provide cleaner power, which translates to better sound quality, while poorly designed supplies can introduce hum and distortion.
- Build Quality: The overall build quality of the amplifier kit, including layout and soldering, affects performance and reliability. A well-constructed amplifier will have better shielding and grounding practices that reduce interference and enhance sound clarity, whereas a hastily assembled kit may suffer from hum and other issues.
What Are the Best Kits for Beginners?
Some of the best DIY valve amplifier kits for beginners include:
- Elekit TU-8200R: This kit is known for its great sound quality and is designed specifically for novice builders.
- Little Dot MK2: A popular choice for those looking to build a headphone amplifier, combining simplicity with impressive audio performance.
- Yaqin MC-10T: Offers a more complex build experience while providing excellent sound, making it suitable for those ready to take the next step.
- Fender Champ 5F1 Clone: A great entry point for guitar enthusiasts wanting to build their own tube amp, replicating the classic Fender sound.
- Madisound EL34 Tube Amplifier Kit: This kit gives beginners the hands-on experience of working with EL34 tubes, known for their rich sound characteristics.
Elekit TU-8200R: This kit features a simple and clear instruction manual, making it easy for beginners to follow. The TU-8200R uses high-quality components and offers various configurations, allowing beginners to explore different sound signatures and learn about the impact of each choice on audio output.
Little Dot MK2: This headphone amplifier kit is particularly user-friendly and offers a chance to learn about tube amplification in a compact form. With its straightforward assembly process and the ability to drive a variety of headphones, it serves as an excellent introduction to DIY audio projects.
Yaqin MC-10T: Although slightly more complex, this kit provides a rewarding build experience and features a circuit design that enhances sound quality. It allows builders to delve into the nuances of tube audio and gain valuable insights into the workings of amplifiers.
Fender Champ 5F1 Clone: This amplifier kit is perfect for guitarists eager to create their own vintage-style tube amp. It closely follows the original Fender design, providing an authentic experience and sound that is cherished by music lovers and players alike.
Madisound EL34 Tube Amplifier Kit: This kit allows beginners to work with the popular EL34 tubes, known for their smooth and warm tonal qualities. It offers a more in-depth construction experience, helping builders understand the intricacies of tube circuits while producing high-quality audio performance.
How Important Are Detailed Instructions in Choosing a Kit?
Detailed instructions are crucial when selecting a DIY valve amplifier kit as they guide the builder through the assembly process and ensure a successful outcome.
- Clarity of Instructions: Clear and concise instructions help users understand each step of the assembly process, reducing the likelihood of errors. When the instructions are well-written, they allow builders of all skill levels to follow along without confusion.
- Comprehensive Diagrams: Detailed diagrams and schematics complement the written instructions by visually illustrating how components should be connected. This visual guidance is especially helpful for those who may struggle with textual descriptions alone, making the assembly process more intuitive.
- Step-by-Step Guidance: Kits that provide a step-by-step approach allow builders to progress methodically through the project. This structured format prevents mistakes and ensures that each component is correctly assembled before moving on to the next, which is vital in complex builds like valve amplifiers.
- Troubleshooting Tips: Including troubleshooting tips in the instructions can be invaluable for identifying and fixing potential issues that may arise during assembly. These tips can save time and frustration, as they prepare builders for common pitfalls and solutions.
- Parts List and Specifications: A detailed parts list with specifications helps builders verify that they have all the necessary components before starting. This prevents interruptions during the assembly process and ensures compatibility with the design of the amplifier.
- Safety Precautions: Clear safety instructions are essential in DIY kits, especially when dealing with high voltages typical in valve amplifiers. Providing safety guidelines ensures that builders are aware of potential hazards and can take appropriate measures to protect themselves during the assembly process.
What Tools and Materials Are Needed for Assembly?
To successfully assemble the best DIY valve amplifier kit, you will need a variety of tools and materials.
- Soldering Iron: A reliable soldering iron is essential for connecting components on the circuit board. It should have a fine tip for precision and adjustable temperature settings to avoid damaging sensitive components.
- Solder: Use quality solder, typically a rosin-core lead-free solder, which is easy to work with and provides strong connections. Ensure that the diameter of the solder is compatible with the size of the components you are working with.
- Wire Cutters: These are necessary for trimming excess leads from components after soldering. A good pair of wire cutters will allow you to make clean cuts without damaging the circuit board.
- Multimeter: A multimeter is crucial for testing and troubleshooting your amplifier circuit. It can measure voltage, current, and resistance, helping you ensure that the circuit is functioning correctly before powering it up.
- Heat Shrink Tubing: This tubing is used to insulate and protect soldered connections. It shrinks when heated, providing a durable and neat finish that prevents short circuits.
- PCB (Printed Circuit Board): The PCB is where all the components will be mounted and soldered. Ensure that it is compatible with your valve amplifier kit and has clearly marked connections for ease of assembly.
- Components (Resistors, Capacitors, Tubes, etc.): These are the essential parts that make up the amplifier circuit. Ensure you have the correct specifications as indicated in the kit instructions to achieve the desired sound quality.
- Wrenches and Screwdrivers: Various sizes of wrenches and screwdrivers will be necessary for assembling the chassis and securing components. A set with both flat and Phillips heads will provide versatility for different screws.
- Bench Power Supply: A bench power supply allows you to test your circuit with variable voltage before finalizing the assembly. This helps to safely troubleshoot any issues without risking the components.
- Safety Goggles: Protecting your eyes is crucial when soldering or working with electrical components. Safety goggles will shield your eyes from solder splashes and any accidental debris.
What Common Issues Might You Encounter While Building Your Kit?
While building your DIY valve amplifier kit, you may encounter several common issues that can affect the performance and functionality of your project.
- Component Compatibility: Ensuring all components are compatible with each other is crucial. Mismatched resistors, capacitors, or tubes can lead to poor sound quality or even damage to the amplifier.
- Soldering Issues: Improper soldering can create cold joints or short circuits. It’s important to have a steady hand and the right tools to ensure solid connections and avoid potential failures.
- Power Supply Problems: If the power supply is inadequate or unstable, it can cause distortion in the sound or damage the amplifier. You need to ensure that the power supply meets the voltage and current requirements specified in the kit.
- Layout and Wiring Errors: Incorrect layout or wiring can lead to oscillations, noise, or complete failure of the amplifier. Careful attention to the schematic and following best practices for wiring is essential.
- Heat Management: Valve amplifiers can generate significant heat, and inadequate heat dissipation can lead to component failure. Implementing proper heat sinks and ventilation is important to maintain performance and longevity.
- Testing and Troubleshooting: After assembly, you may encounter issues that require testing and troubleshooting. A multimeter and an oscilloscope can be invaluable tools for diagnosing problems and ensuring your amplifier works as intended.