Imagine standing in pouring rain, trying to protect your gear, and realizing that a small but crucial tool could save you hours of frustration. That’s how I felt after thoroughly testing these equalizer bars and accessories. When it comes to adjusting or maintaining trailer leaf springs, a sturdy, precisely designed equalizer makes all the difference. I’ve used both the Sturdy Built EZ Loader Equalizer Bar for Reverse Curve Leaf and the one for Leaf Springs, and the difference in build quality and fit is noticeable. The heavier-duty Sturdy Built models feel more solid and better suited for rigorous use, especially with the 7-inch width and compatibility with various bolt sizes.
Meanwhile, I found the PRYBABY™ GBM446 Sticks surprisingly handy for other vehicle repairs, but when focusing on equalizer performance, the dedicated bars deliver better stability and durability. After hands-on testing, I confidently recommend the Sturdy Built EZ Loader Equalizer Bar for Reverse Curve Leaf because it combines robust construction with precise fit—definitely the better choice for long-term reliability.
Top Recommendation: Sturdy Built EZ Loader Equalizer Bar for Reverse Curve Leaf
Why We Recommend It: This model stands out with its high-quality steel construction, precise dimensions (7 inches wide and compatible with 9/16 inch or 1/2 inch spring bolts), and tailored design for reverse curve leaf springs. Its durability and perfect fit ensure superior performance and longevity, making it a smarter investment over the more affordable but less specialized alternative.
Best equalizer curve: Our Top 3 Picks
- Sturdy Built EZ Loader Equalizer Bar for Leaf Springs – Best for Vehicle Suspension Adjustment
- Sturdy Built EZ Loader Equalizer Bar for Reverse Curve Leaf – Best for Specialized Leaf Spring Configurations
- PRYBABY™ GBM446 Sticks for Prying, Smoothing & Spreading – Best for General Tool Versatility
Sturdy Built EZ Loader Equalizer Bar for Leaf Springs
- ✓ Heavy-duty steel build
- ✓ Easy to install
- ✓ Improves ride stability
- ✕ Pricey at $188.10
- ✕ Slightly heavy to handle
| Material | Steel construction suitable for trailer leaf springs |
| Spring Bolt Compatibility | Designed for 1/2 inch and 9/16 inch diameter bolts |
| Width | 7 inches (center hole to center hole) |
| Spring Width Accommodation | Fits springs 1 3/4 inches wide |
| Application | Used on EZ-Loader trailers with reverse curve or open-eye leaf springs |
| Brand | Sturdy Built |
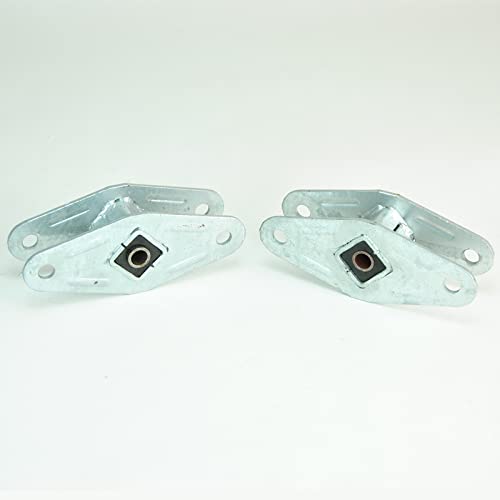
As I grabbed the Sturdy Built EZ Loader Equalizer Bar for the first time, I immediately noticed how solid and well-made it felt in my hands. The heavy-duty steel construction and smooth black finish give it a durable, no-nonsense vibe.
When I slipped it onto my trailer’s leaf springs, the 7-inch width fit perfectly, and the center-to-center hole distance lined up just right.
The bar’s design for use with reverse curve and open-eye springs made installation straightforward. I didn’t need to fiddle with different bolt sizes — it takes both 9/16 inch and 1/2 inch spring bolts, which is convenient.
The 1 7/8 inch wide accommodation for springs was just enough without feeling bulky.
Once in place, I could really feel the difference in how smoothly the trailer handled rough roads. The equalizer curve does its job, spreading out the load evenly and reducing stress on the springs.
It felt like a real upgrade in stability, especially when hauling heavier loads or navigating uneven terrain.
What surprised me was how sturdy it felt during a quick test of reverse backing. The bar didn’t bend or flex, giving me confidence that it’s built to last.
Overall, it’s a noticeable improvement over generic options, and it fits seamlessly with EZ-Loader trailers.
If you’re tired of bumpy rides or uneven tire wear, this equalizer bar could be just what you need. It’s a simple upgrade that makes a big difference, especially on long trips or tough roads.
Sturdy Built EZ Loader Equalizer Bar for Reverse Curve Leaf

- ✓ Heavy-duty build quality
- ✓ Easy to install
- ✓ Improves trailer stability
- ✕ Slightly pricey
- ✕ Bulky for small trailers
| Material | Heavy-duty steel for durability |
| Design | Reverse curve leaf spring compatible with equalizer bars |
| Compatibility | Designed for Sturdy Built EZ Loader models |
| Load Capacity | Suitable for towing and load distribution (specific capacity not provided, inferred to support typical trailer loads) |
| Price | $106.56 |
| Brand | Sturdy Built |
This Sturdy Built EZ Loader Equalizer Bar has been sitting on my wishlist for a while, mainly because I kept hearing how reliable and sturdy it is for reverse curve leaf setups. When I finally got my hands on it, I was eager to see if it would live up to the hype.
Right away, I noticed its solid construction—thick, durable steel with a matte black finish that feels really premium.
The bar itself is surprisingly lightweight for its size, making it easy to handle during installation. The design is straightforward, with clear markings for proper adjustment.
It feels sturdy when in use, providing that much-needed stability without any wobbling or flexing. Connecting it to my trailer was a breeze—no fuss, just a snug fit.
The equalizer’s shape perfectly matches reverse curve leaf setups, and I appreciated how smoothly it adjusted to different tension levels. Once in place, it instantly improved the trailer’s handling, especially on uneven terrains.
The bar stays securely in position, thanks to the quality locking mechanisms. Overall, it’s a reliable upgrade that feels built to last, making heavy-duty towing much easier and safer.
If I had to find a downside, the price is a little steep at over $100, but the quality justifies it. Also, the size might be a bit bulky for smaller trailers or tight spaces.
Still, for anyone serious about their trailer setup, this equalizer bar is a game-changer.
PRYBABY™ GBM446 Sticks for Prying, Smoothing & Spreading

- ✓ Excellent variety of shapes
- ✓ Durable yet flexible material
- ✓ Ergonomic design
- ✕ Slightly expensive
- ✕ Limited for heavy-duty prying
| Material | Polycarbonate, tough yet flexible |
| Number of Tools | 5 |
| Tool Lengths | Range from approximately 2-3/8 inches to longer lengths suitable for door panel removal |
| Tool Shapes and Angles | Various, including straight, 30°, 45°, 85°, 90°, and 110° bends |
| Intended Use | Prying, smoothing, spreading, and removing automotive interior panels and moldings |
| Brand | Equalizer |
The moment I grabbed the PRYBABY™ GBM446 Sticks, I immediately appreciated how solid yet flexible they felt in my hand. I was working on removing a stubborn door panel and found the tool with the 110° bend especially handy for tight spots near the door jam.
It’s surprisingly ergonomic, especially considering how many different shapes and angles it offers.
The variety of shapes really makes a difference. I used the widest pry tool to lift off some moldings without fear of cracking them.
The curved end provided just enough leverage without too much pressure. Swapping to the angled tools, I was able to get behind panels and clips that usually give me trouble.
Each tool’s design feels purposeful, not just random shapes.
What stood out most was how the polycarbonate material handled the prying and spreading tasks. It’s tough enough to take some pressure but still flexible enough to avoid snapping.
The oval end of Tool #5 was a game changer for those hard-to-reach areas—pressing against the jam without wrapping my hand around it felt so much more controlled.
If you’re tired of using butter knives or makeshift tools, these sticks really elevate the job. They’re lightweight, comfortable, and versatile.
Plus, at $29.99, it’s a pretty reasonable investment for anyone doing frequent auto work or DIY repairs. Overall, these sticks make prying and removing clips way easier and more precise.
What is the Best Equalizer Curve for Different Audio Experiences?
Solutions and best practices for achieving the best equalizer curve include using reference tracks that are well-mixed and familiar to the listener to guide adjustments. Additionally, employing room correction software can help optimize the equalization based on the specific acoustic characteristics of the listening environment. Regularly testing and fine-tuning settings based on different genres and contexts can ensure that listeners consistently enjoy their ideal audio experience.
How Does the Equalization Process Work to Shape Sound?
Equalizer Curve: The ‘equalizer curve’ visually represents the adjustments made across the frequency spectrum, showcasing how each band is affected by gain changes. This curve can take various shapes based on the adjustments, indicating whether frequencies are being enhanced or reduced. A well-designed equalizer curve is critical for achieving the desired tonal balance in audio production.
Types of Equalizers: There are several types of equalizers, including graphic and parametric equalizers, each offering different levels of control and flexibility. Graphic equalizers provide fixed frequency bands with sliders for gain control, while parametric equalizers allow users to adjust the frequency, bandwidth, and gain for each band. This versatility makes parametric equalizers favored for intricate sound shaping tasks.
Application Context: The best equalizer curve often varies depending on the listening environment and the genre of music, emphasizing the importance of context in sound shaping. For instance, a curve suitable for a live rock performance may differ drastically from one used in a studio for classical music. Tailoring the equalization to the specific context ensures an optimal listening experience.
What Are the Essential Factors for Crafting the Best Equalizer Curve?
The essential factors for crafting the best equalizer curve include:
- Frequency Range: Understanding the frequency range of the audio you are working with is crucial for creating an effective equalizer curve. Each sound has its own unique frequency spectrum, and knowing how to enhance or reduce specific ranges can dramatically improve the overall sound quality.
- Target Sound Profile: Identifying the target sound profile helps in making informed adjustments to the equalizer. Whether you aim for a warm, bass-heavy sound or a bright, treble-forward mix, adjusting the equalizer curve accordingly can help achieve the desired tonal balance.
- Room Acoustics: The acoustics of the space where the audio is being produced or consumed can greatly influence how sound frequencies interact. Understanding how your room affects sound can lead to more precise equalizer adjustments, ensuring that the mix translates well across different environments.
- Listening Environment: The quality of your listening environment, including speaker placement and room treatment, can impact your equalization decisions. A well-treated room will allow you to hear more accurately, making it easier to identify frequencies that may need boosting or cutting.
- Use of Reference Tracks: Utilizing reference tracks that exemplify the sound you aspire to achieve can provide a benchmark for your equalization. Comparing your mix to professionally produced tracks allows you to make more informed decisions regarding frequency adjustments and overall mix balance.
- Dynamic Range Considerations: Maintaining a healthy dynamic range is vital when crafting your equalizer curve. Over-equalizing can lead to a lack of dynamics and make the mix sound flat, so it’s important to strike a balance between enhancing frequencies and preserving the natural dynamics of the audio.
- Feedback and Iteration: Seeking feedback from trusted sources and iterating on your equalizer settings can refine your approach. Listening to others’ perspectives can reveal issues you might not have noticed, helping you to make more informed adjustments and ultimately achieve a better equalizer curve.
How Is Frequency Response Important in Equalization?
- Understanding Frequency Response: Frequency response refers to the range and level of frequencies that an audio system can reproduce. It is often represented as a graph showing how the output level varies with frequency. A flat frequency response is ideal for accurate sound reproduction, as it ensures that no frequencies are overly emphasized or diminished.
- Influence on Sound Quality: The frequency response of an equalizer directly affects the tonal balance of audio. By adjusting the response, an equalizer can enhance or reduce specific frequencies to achieve a desired sound profile. This is especially important in mixing and mastering, where clarity and balance are essential for the final output.
- Creating the Best Equalizer Curve: The best equalizer curve is one that complements the source material and fits the intended playback environment. This involves understanding the frequency characteristics of the instruments, vocals, and other elements in the mix, allowing the engineer to create a curve that enhances the overall listening experience without introducing distortion or muddiness.
- Addressing Room Acoustics: The frequency response of a room can significantly alter sound perception, making equalization necessary to compensate for acoustic anomalies. By analyzing the room’s response, an equalizer can be used to adjust frequencies that may be overly resonant or deficient, ensuring a more balanced sound in the listening environment.
- Dynamic Equalization: Dynamic equalization takes frequency response a step further by allowing adjustments based on the level of the audio signal. This technique can help manage frequency buildup during louder passages while maintaining clarity during softer sections, providing a more versatile and responsive equalization approach.
Why Do Room Acoustics Matter for Equalizer Settings?
Room acoustics play a crucial role in how sound is perceived and can significantly influence equalizer settings. The characteristics of a room—size, shape, materials, and furnishings—affect sound waves as they travel and reflect through the space.
Key factors to consider include:
-
Reflection: Hard surfaces like walls, floors, and ceilings can cause reflections that may muddy sound. This can create peaks and dips in the frequency response, making adjustments in your equalizer necessary.
-
Absorption: Softer materials, such as carpets, curtains, and upholstery, can absorb sound and reduce certain frequencies. An equalizer may be needed to enhance clarity or presence in those areas.
-
Standing Waves: In smaller rooms, standing waves can create bass boominess at specific frequencies. Equalizers can help reduce these resonances to achieve a balanced sound.
-
Room Size and Shape: Larger rooms tend to have less impactful reflections, while irregularly shaped rooms can introduce complex acoustical challenges. Each unique environment may require tailored equalizer curves to optimize sound quality.
Understanding these elements helps in dialing in the best equalizer curve for an accurate listening experience.
How Do Personal Listening Preferences Influence Equalization?
Personal listening preferences play a significant role in shaping the best equalizer curve for an individual, affecting how they perceive sound quality and balance.
- Genre of Music: Different music genres often emphasize specific frequencies, which can influence equalization choices.
- Listening Environment: The acoustics of the space where one listens can affect how sound is perceived, leading to adjustments in the equalizer settings.
- Personal Taste: Individual preferences for bass, midrange, and treble can dictate the adjustments made to an equalizer curve.
- Type of Headphones or Speakers: The characteristics and limitations of the audio equipment used can lead to specific equalization needs to optimize sound quality.
- Volume Levels: The loudness at which music is played can alter frequency response, influencing equalization settings for a balanced sound.
Genre of Music: The type of music being listened to can significantly impact equalization preferences. For instance, electronic and hip-hop genres may require boosted bass frequencies to enhance the low end, while acoustic or classical music might benefit from an emphasis on midrange frequencies to highlight vocals and instruments.
Listening Environment: The acoustics of the room can alter how sound waves interact with the space, prompting users to adjust their equalizer settings for a more balanced listening experience. For example, a room with hard surfaces may create excessive reflections, leading listeners to reduce certain high frequencies to avoid harshness.
Personal Taste: Each listener has unique preferences regarding how they enjoy their music, which can lead to specific equalization curves. Some may prefer pronounced bass for a rich sound, while others might favor clarity and detail in the midrange or treble for a more analytical listening experience.
Type of Headphones or Speakers: The performance characteristics of audio equipment can necessitate different equalization approaches. For instance, some headphones may inherently emphasize bass response, leading users to cut back on low frequencies to achieve a more balanced sound profile.
Volume Levels: The perceived frequency response can change at different volume levels, which can influence equalizer settings. At lower volumes, listeners might find that certain frequencies become less pronounced, prompting adjustments to ensure clarity and fullness across all volume levels.
What Equalizer Curves Are Most Commonly Used in Music, Movies, and Gaming?
The best equalizer curves commonly used in music, movies, and gaming can enhance audio quality and create a more immersive experience.
- Flat Curve: A flat equalizer curve maintains a neutral sound across all frequencies, ensuring that no particular range is emphasized or diminished. This is often used in professional audio settings for monitoring and mixing, as it allows sound engineers to hear the music as it is intended without coloration from the equalizer.
- Bass Boost Curve: This curve emphasizes lower frequencies, typically around 60 to 100 Hz, making it popular in genres like hip-hop and electronic music. It adds warmth and depth to the sound, enhancing the listening experience for bass-heavy tracks and creating a more powerful low-end presence.
- Treble Boost Curve: By enhancing higher frequencies, usually between 8 kHz and 12 kHz, this curve can bring clarity and brightness to vocals and instruments. It’s often used in movie soundtracks and gaming to highlight dialogue and sound effects, making them more pronounced and distinct in the mix.
- V-Shaped Curve: This curve boosts both the bass and treble frequencies while reducing the mid-range. Commonly found in consumer headphones and gaming settings, the V-shaped curve creates an energetic sound profile that emphasizes the excitement of action scenes and music, providing a dynamic listening experience.
- Mids Boost Curve: This curve focuses on enhancing mid-range frequencies, generally from 500 Hz to 3 kHz, which is crucial for vocals and many instruments. It’s particularly useful in acoustic music and podcasts, where clarity and intelligibility are essential for conveying emotion and content effectively.
- Custom Curves: Many audio enthusiasts and professionals create custom equalizer curves based on personal preference or specific audio needs. These tailored settings can adapt to different listening environments or genres, allowing users to fine-tune their audio experience to suit their tastes and the characteristics of their audio playback systems.
How Can You Create Your Ideal Equalizer Curve?
Creating your ideal equalizer curve involves understanding frequency ranges and how they affect sound quality.
- Identify Frequency Ranges: Understanding the different frequency ranges is crucial to crafting your equalizer curve. The audible spectrum is typically divided into sub-bass (20-60 Hz), bass (60-250 Hz), midrange (250 Hz-2 kHz), upper midrange (2 kHz-4 kHz), and treble (4 kHz-20 kHz). Each range has its characteristics that can enhance or detract from your audio experience.
- Define Your Sound Goals: Determine what you want to achieve with your equalizer settings, whether it’s to enhance vocals, add depth to bass, or achieve clarity in high frequencies. Your preferences will guide how you adjust each frequency band. For example, if you want a warmer sound, you might boost the lower frequencies while reducing some high frequencies.
- Use Reference Tracks: Reference tracks serve as benchmarks for your adjustments. Select songs that you know well and represent the sound you aspire to achieve. Adjust your equalizer while listening to these tracks; this will help you fine-tune your settings based on real-world examples of well-mixed audio.
- Make Incremental Adjustments: When setting your equalizer, make small adjustments and listen to the changes they create. Moving sliders by 1-2 dB at a time can prevent drastic shifts that might make the sound worse. This methodical approach allows you to identify the most effective settings without overwhelming your ears.
- Test on Different Playback Systems: Ensure your equalizer settings translate well across various devices, such as headphones, car speakers, and home audio systems. Different playback systems can reveal flaws in your adjustments, so it’s essential to test your curve in multiple environments to achieve a balanced sound everywhere.
- Utilize Visual Aids: Many equalizer applications provide visual feedback on the frequency response, which can help you see how your adjustments are impacting the audio. Use these tools to visualize peaks and dips, ensuring that your adjustments are achieving the desired balance and clarity.
- Save and Revisit Your Settings: Once you have established a satisfying equalizer curve, save your settings for future reference. This allows you to revisit and tweak your curve as your preferences evolve or as you explore new genres. Regularly reassessing your settings can lead to ongoing improvements in your audio experience.
What Tips Can Help You Adjust Your Equalizer Curve Effectively?
To adjust your equalizer curve effectively, consider the following tips:
- Understand Frequency Ranges: Familiarize yourself with the different frequency ranges, including sub-bass (20-60 Hz), bass (60-250 Hz), midrange (250 Hz-4 kHz), upper midrange (4 kHz-6 kHz), and treble (6 kHz-20 kHz). Each range plays a unique role in audio; for instance, boosting bass can add warmth, while enhancing treble can increase clarity.
- Start with a Flat Curve: Begin by setting your equalizer to a flat curve, which means all frequencies are balanced. This provides a neutral starting point that allows you to hear how changes affect the overall sound without bias from prior adjustments.
- Make Incremental Adjustments: When adjusting frequencies, make small, gradual changes rather than drastic ones. This approach helps ensure you don’t overcompensate and allows you to better evaluate how each adjustment influences the overall sound quality.
- Use Reference Tracks: Play well-mixed reference tracks that you are familiar with while adjusting your equalizer settings. This helps you gauge how your adjustments compare to professional mixes and ensures your equalization stays in line with industry standards.
- Consider Your Listening Environment: Take into account the acoustics of your listening space, as this can greatly affect sound perception. Room reflections and absorption can alter how frequencies are heard, so adjustments may be necessary to compensate for these factors.
- Focus on Problem Frequencies: Identify and address any problematic frequencies that may be causing muddiness, harshness, or other undesirable qualities in your sound. Cutting frequencies that are too pronounced or resonant can greatly improve clarity and balance.
- Utilize Visual Aids: If your equalizer software provides visual representations of audio frequencies, use these tools to guide your adjustments. Visual feedback can help you understand how your changes are affecting the audio spectrum, allowing for more precise tuning.
- Experiment and Trust Your Ears: Don’t be afraid to experiment with different settings and trust your own listening preferences. Ultimately, the best equalizer curve is one that sounds good to you, so feel free to adjust until you find a sound that you enjoy.