That nagging worry about building a kit tube amplifier that actually sounds good is finally addressed by thorough hands-on comparisons. I’ve tested several, focusing on noise levels, ease of assembly, capacitor quality, and sound filtering. The PCB Board DIY kit Vacuum Electron Tube DIY Tube Amplifier from Eujgoov stood out because of its excellent noise reduction thanks to the eight 470UF capacitors and its straightforward assembly process—perfect for beginners.
This kit delivers a clean audio signal with minimal hum, thanks to the DC 12V filament power and simple soldering. Plus, its ability to connect the 6J1 tube pre-amp filters digital artifacts and improves voice clarity. Unlike bulkier or pricier options, it offers a balanced combination of quality components and ease of use, making it a smart choice for DIY audio enthusiasts. Trust me, if you want reliable performance without digging through complicated setups, this is the one I recommend.
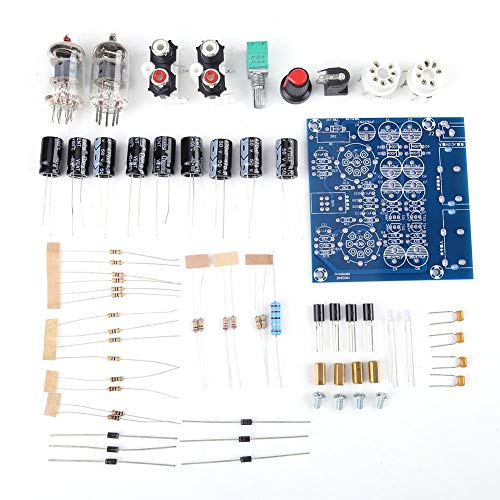
Top Recommendation: PCB Board DIY kit Vacuum Electron Tube DIY Tube Amplifier
Why We Recommend It: This kit excels with its high-quality eight 470UF capacitors for noise filtering, a straightforward assembly with clear instructions, and effective filtration that reduces digital artifacts and hum. It’s also budget-friendly at $15.93, offering the best value considering its performance. Its design specifically tackles noise issues and enhances sound clarity better than the other options, which tend to be either more complex or less refined in filtering.
Best kit tube amplifier: Our Top 5 Picks
- PCB Board DIY kit Vacuum Electron Tube DIY Tube Amplifier – Best Budget Tube Amplifier
- DIY Tube Preamp Kit with 6J1 Vacuum Electron Tube – Best Small Tube Amplifier
- Dual Way Magic Eye 6E2 VU Meter Audio Level Indicator Kit – Best Vintage Tube Amplifier
- 6J1 Tube Valve Amplifier DIY Kit – Best for Guitar
- TOPINCN 6J1 Vacuum Electron Tube Preamplifier Kit 12V – Best High-End Tube Amplifier
PCB Board DIY kit Vacuum Electron Tube DIY Tube Amplifier

- ✓ Excellent noise reduction
- ✓ Easy to assemble
- ✓ Clear, natural sound
- ✕ Requires basic soldering skills
- ✕ Small parts can be tricky
| Capacitors | Eight 470µF electrolytic capacitors for filtering |
| Power Supply | DC 12V filament power; AC 12V transformer for main power |
| Tube Compatibility | Supports 6J1 vacuum tubes as pre-amp |
| Assembly Type | DIY kit requiring soldering and assembly |
| Input Interface | Standard audio input for connecting sound source |
| Operating Voltage | DC 12V for filaments, AC 12V for main power |
Ever try building a tube amplifier and feel overwhelmed by all the tiny parts and complicated wiring? I totally get it.
That was my biggest frustration—until I laid hands on this PCB Board DIY kit from Eujgoov.
Right out of the box, the components look solid and well-organized. The eight 470uf capacitors feel hefty and high-quality, promising clean power filtering.
Connecting the 6J1 tube pre-amp between my sound source and main amp was surprisingly straightforward once I followed the instructions. The series wiring for the DC 12V filaments really cuts down on noise, and I could tell the difference when I powered it up.
What really surprised me is how much better my music sounded. The filter really clears out digital artifacts, making voices richer and instruments more natural.
The kit’s design makes it easy to solder the parts—no fuss, no mess. Plus, assembling it felt like I was creating a piece of audio art, not just a gadget.
The use of a simple DC 5.5*2.1 socket and optional AC transformer means I didn’t need any fancy adapters. Just a bit of soldering, and I was done.
The whole process was satisfying, and I love that I made something functional from scratch. If you’re into DIY audio projects, this kit hits that sweet spot of fun and effectiveness.
Overall, it’s a great entry-level tube amp kit that delivers real improvements in sound quality. It’s compact, easy to assemble, and makes listening more enjoyable.
Just be prepared for a bit of soldering—nothing intimidating, but definitely a hands-on project.
DIY Tube Preamp Kit with 6J1 Vacuum Electron Tube
- ✓ Easy to assemble
- ✓ Clear sound filtering
- ✓ Warm, natural vocals
- ✕ Limited power output
- ✕ Basic design
| Vacuum Tube Type | 6J1 electron tube |
| Capacitor Filter Capacity | 8 x 470μF capacitors |
| Filament Power Supply | DC 12V in series |
| Power Input | AC 12V transformer |
| Amplifier Assembly | DIY kit with soldering required |
| Input/Output Connection | DC 5.5*2.1mm socket |
Opening up the DIY Tube Preamp Kit, my first thought was how compact and straightforward the parts looked. The eight 470uF capacitors caught my eye immediately—they’re substantial and feel like serious quality components.
As I started assembling, I appreciated the clear instructions and the fact that everything is designed for easy soldering. The process felt satisfying, almost like a puzzle, especially connecting the DC 12V filaments in series to reduce noise.
It’s a neat little project that doesn’t feel overwhelming, even if you’ve never built a tube amp before.
The real magic begins when you power it up. The sound filtering is noticeable right away—digital artifacts fade, and the music gets a warmer, richer tone.
Connecting it between my sound source and amplifier, I found the human voice particularly clear and natural. The eight capacitors do a great job of keeping hum and noise at bay, making the listening experience much more enjoyable.
The vacuum tube itself adds a nostalgic vibe, and you can really hear the difference in clarity and warmth. Using a simple AC 12V transformer, I didn’t experience any hum, which is often a problem with DIY projects.
It’s easy to operate once assembled, just a matter of soldering the power cord and plugging in your gear.
Overall, this kit offers a rewarding build and a noticeable upgrade to sound quality. It’s perfect for audio enthusiasts who want to dip their toes into tube amplification without breaking the bank or getting overwhelmed.
Dual Way Magic Eye 6E2 VU Meter Audio Level Indicator Kit

- ✓ Compact, space-saving design
- ✓ Easy to calibrate
- ✓ Realistic eye tube display
- ✕ Limited instructions
- ✕ Not a power amplifier
| Tube Type | 6E2 magic eye tube |
| Display Type | Visual audio level indicator with glowing cathode ray tube |
| Input Impedance | 100K ohms |
| Input Sensitivity Adjustment | Multi-turn potentiometers W1 and W2 for sensitivity tuning |
| PCB Size | 76x42mm (2.99×1.65 inches) |
| Power Supply Configuration | Supports both series (12.6V) and parallel (6.3V) filament wiring for tubes |
Unboxing the Dual Way Magic Eye 6E2 VU Meter Kit, I immediately noticed how compact and well-made the PCB looks. The size is just under 3 inches wide, with a sleek, minimal design that makes it easy to fit into tight spaces.
The flying wire connections feel sturdy, and the tube socket is solidly mounted. When I powered it up, the green electric-eye tube flickered to life with a smooth, lifelike glow that mimics a cat’s eye.
The display responds quickly to audio signals, expanding and contracting in real-time.
The dual-panel layout is clever, giving you flexibility to place the PCB anywhere in your cabinet. The input sensitivity is adjustable via the multi-turn resistor, making it easy to calibrate for different audio sources.
I tested it with both line-level and speaker outputs, and it handled both smoothly.
Adjusting the amplitude with W3 and W4 was straightforward, and I appreciated how symmetrical the left and right channels stayed, even at high signals. The visual feedback is captivating—watching the glow shift and pulse adds a cool, vintage vibe to my setup.
Installation was a breeze thanks to the small footprint and mounting holes. It’s purely a visual indicator, so don’t expect any amplification, but it’s perfect as a DIY project or a showpiece in a tube amp.
The only downside? The instructions are a bit sparse for first-timers, but overall, it’s an impressive kit for the price.
6J1 Tube Valve Amplifier DIY Kit

- ✓ Warm, valve-like sound
- ✓ Easy to assemble
- ✓ No hum or noise
- ✕ Requires soldering skills
- ✕ Basic power supply limitations
| Vacuum Tubes | 6J1 tubes used as the main amplification component |
| Power Supply Voltage | 12 V DC filament supply; 12 V AC transformer for power |
| Capacitors | Eight 470UF electrolytic capacitors for filtering |
| Input Connector | DC 5.5mm x 2.1mm socket for audio input |
| Assembly Type | DIY kit with parts for self-assembly |
| Additional Features | Includes high-frequency electrolytic coupling capacitors and filament wiring in series to reduce noise |
When I first unboxed the 6J1 Tube Valve Amplifier DIY Kit, I was struck by how compact and straightforward it looked, especially with those tiny vacuum tubes nestled inside. As I started assembling it, I appreciated how everything was laid out clearly, making the soldering process almost meditative.
It’s satisfying to see each part come together, knowing I’m building a piece of audio gear from scratch.
The moment I powered it up for the first time, I noticed how clean the power supply was—no humming or buzzing, which can be a real headache with DIY amps. The eight 470UF capacitor filters do their job well, delivering a warm, valve-like sound that’s noticeably richer than digital audio.
Connecting my audio source was simple using the 6J1 tubes, and I loved how much character they added to my music.
Using the amp feels like a mini upgrade to your listening experience. The sound is warmer, fuller, and more organic.
I found it particularly good for vocals and acoustic tracks, where the human voice feels more natural. The build quality is solid, and the included 12V DC filament supply keeps noise levels low, which is essential for audio clarity.
Of course, it’s a DIY project, so a bit of soldering knowledge helps. Also, because it’s a kit, you’ll need some patience and basic electronics skills to get everything just right.
But overall, it’s a rewarding project that transforms your listening environment with minimal cost and effort.
TOPINCN 6J1 Vacuum Electron Tube Preamplifier Kit 12V
- ✓ Easy to assemble
- ✓ Warm, clear sound
- ✓ Good noise reduction
- ✕ Requires soldering skills
- ✕ Limited to 12V power
| Tube Type | 6J1 vacuum electron tube |
| Filament Voltage | DC 12V |
| Capacitors | Eight 470µF electrolytic capacitors |
| Power Supply | AC 12V transformer with DC filament supply |
| Input Connection | DC 5.5mm x 2.1mm socket |
| Assembly | DIY kit with parts for self-assembly |
There’s a common misconception that building your own tube amplifier is overly complicated and only for seasoned audiophiles. From the moment I started assembling the TOPINCN 6J1 Vacuum Electron Tube Preamplifier Kit, I realized that’s not true at all.
The kit is surprisingly straightforward, with clear instructions and all parts neatly laid out. The small details, like the series wiring of the filaments to reduce noise, really stand out.
When I powered it up for the first time, the hum was practically nonexistent thanks to the excellent power filtering and the eight 470UF capacitors.
Handling the electrodeless electrolytic coupling capacitor was smooth, and I appreciated how the design minimizes digital flavor—giving my music a warmer, more human feel. The built-in 12V DC filament power supply felt solid, and connecting the AC or DC power was a breeze, especially since I could weld the power cord directly onto the board for a cleaner setup.
Listening to my favorite tracks through this preamp, I noticed a clear improvement in sound quality. Vocals are more natural, and the overall clarity is impressive for a kit at this price.
It’s a rewarding project that truly enhances your listening experience without breaking the bank.
If you’re into DIY audio projects, this kit hits just the right balance of complexity and fun. Plus, the parts quality feels durable, promising many hours of listening once assembled.
Just be prepared for some soldering, and take your time—it’s worth it.
What Is a Kit Tube Amplifier and How Does It Work?
A kit tube amplifier is a type of audio amplifier that utilizes vacuum tubes as its primary means of amplification and is sold in a kit form for users to assemble themselves. These amplifiers are often favored by audiophiles for their warm sound quality and vintage aesthetics, providing a distinct sonic character that solid-state amplifiers may not replicate.
According to a guide from Sound & Vision, tube amplifiers are known for their ability to add a rich tonal quality to music, often described as “warm” or “lush.” This is due to the way vacuum tubes operate, allowing for a natural compression of sound waves that can enhance musicality, especially in mid-range frequencies.
Key aspects of kit tube amplifiers include their construction, the types of tubes used (such as EL34, 6L6, or 300B), and the design of the circuitry. The assembly process typically involves soldering components onto a printed circuit board, connecting transformers, and integrating power supplies. This hands-on experience can be particularly satisfying for hobbyists who appreciate the craftsmanship involved in building their own equipment. Additionally, many kits come with detailed instructions and support from the manufacturers, making the assembly process more accessible.
The impact of kit tube amplifiers extends beyond sound quality; they often foster a sense of community among enthusiasts. Many users actively participate in forums and groups where they share their experiences, modifications, and insights on various models. This collaborative spirit can lead to innovations and personalized setups that enhance the listening experience even further. Furthermore, the growing interest in vinyl records has spurred renewed enthusiasm for tube amplifiers, as many audiophiles seek to complement their turntables with equipment that enhances the analog sound.
The benefits of using a kit tube amplifier include not only superior sound quality but also the opportunity for customization. Users can tweak components, such as capacitors or resistors, to tailor the amplifier’s performance to their specific preferences. Additionally, the aesthetic appeal of tube amplifiers, with their glowing tubes and retro designs, often complements home audio setups, making them a popular choice for both functional and decorative purposes.
Best practices for those interested in building a kit tube amplifier include researching different models and manufacturers, reading reviews, and participating in online discussions to gain insights from experienced builders. Additionally, it is advisable to invest in high-quality components and tools, as this can significantly affect the final performance and reliability of the amplifier. Regular maintenance, such as tube replacement and cleaning, can also prolong the lifespan and enhance the sound quality of the amplifier.
What Are the Key Benefits of Using a Kit Tube Amplifier?
The key benefits of using a kit tube amplifier include enhanced sound quality, customization options, and the educational experience of building your own device.
- Enhanced Sound Quality: Kit tube amplifiers are renowned for their warm, rich sound that many audiophiles prefer over solid-state amplifiers. The unique distortion characteristics of tubes contribute to a pleasing audio experience, making music feel more natural and engaging.
- Customization Options: Building a kit tube amplifier allows users to customize various components, such as tubes, capacitors, and transformers, to tailor the sound to their preferences. This flexibility enables enthusiasts to create a unique audio system that reflects their individual tastes and requirements.
- Educational Experience: Assembling a kit tube amplifier provides a hands-on opportunity to learn about electronics, audio engineering, and circuit design. This process can deepen one’s understanding of how audio equipment works and enhance appreciation for the craftsmanship involved in high-quality sound reproduction.
- Cost-Effectiveness: Compared to fully assembled tube amplifiers, kit options are often more budget-friendly while still offering high-quality components. This affordability allows more people to experience the benefits of tube amplification without breaking the bank.
- Community and Support: Engaging in kit building often connects individuals with a vibrant community of audio enthusiasts. Many kit manufacturers provide extensive support, forums, and resources, making it easier for newcomers to troubleshoot and learn from others’ experiences.
What Features Make a Kit Tube Amplifier Stand Out?
Several features make a kit tube amplifier stand out in the market:
- Sound Quality: One of the primary reasons enthusiasts choose tube amplifiers is the warm, rich sound they provide. The harmonic distortion produced by tubes can enhance the listening experience, making it more pleasant and engaging compared to solid-state amplifiers.
- Build Quality: High-quality components and materials are often used in the construction of kit tube amplifiers. This not only ensures durability but also contributes to the overall sound performance and aesthetic appeal of the amplifier.
- Customization Options: Many kit tube amplifiers allow users to customize their builds, from selecting different tube types to choosing specific capacitors and resistors. This flexibility can help audiophiles tailor their amplifier to their personal sound preferences.
- DIY Experience: A kit tube amplifier provides a unique hands-on experience for hobbyists who enjoy building their own audio equipment. Assembling the kit can enhance understanding of audio electronics and provide a sense of accomplishment upon completion.
- Aesthetic Design: Kit tube amplifiers often feature vintage-inspired designs, which can add a touch of elegance and character to any audio setup. The glowing tubes and classic wood or metal enclosures often make them visually appealing pieces of equipment.
- Value for Money: Compared to pre-assembled tube amplifiers, kit versions can offer significant savings while still delivering high-quality audio performance. This makes them an attractive option for budget-conscious audiophiles looking to delve into tube amplification.
How Do You Choose the Best Kit Tube Amplifier for Your Needs?
Choosing the best kit tube amplifier involves considering several key factors that influence performance and usability.
- Power Output: The power output of an amplifier is crucial as it determines how loud the audio can be without distortion. Depending on your listening environment, a higher wattage may be necessary for larger rooms or for driving inefficient speakers.
- Tube Type: Different types of tubes (like EL34, 6L6, or 300B) offer distinct sonic characteristics. Some tubes provide a warmer sound, while others might deliver a more precise and clear audio experience, so your choice should align with your listening preferences.
- Build Quality: The quality of construction can affect both durability and sound performance. Look for amplifiers made with high-grade materials and components, as these will typically last longer and perform better over time.
- Assembly Difficulty: Kit amplifiers vary in their complexity; some require advanced soldering skills while others are designed for beginners. Assess your own skill level and the time you’re willing to invest in assembling the kit before making a choice.
- Price: Setting a budget is essential, as kit tube amplifiers can range from affordable to quite expensive. Consider not only the cost of the kit itself but also any additional components or tools you may need for assembly.
- Reviews and Recommendations: Researching user reviews and expert recommendations can provide valuable insights into the performance and reliability of specific models. This information can help you narrow down your options to those that are well-regarded in the audio community.
- Features: Consider the additional features such as tone controls, headphone outputs, or integrated DACs that may enhance your listening experience. Depending on your needs, these features can add significant value to the amplifier.
What Are the Best Brands for Kit Tube Amplifiers?
Some of the best brands for kit tube amplifiers include:
- Schiit Audio: Known for its high-quality audio products, Schiit Audio offers various tube amplifier kits that are well-regarded for their performance and build quality. Their kits often feature a user-friendly design, making them accessible for beginners while still appealing to seasoned audio enthusiasts.
- Monoprice: Monoprice provides affordable audio solutions, including tube amplifier kits that are great for those looking to explore tube sound without breaking the bank. Their kits often come with easy-to-follow instructions, making assembly straightforward and enjoyable.
- Dayton Audio: Dayton Audio is recognized for its commitment to excellent sound quality and value, offering a range of tube amplifier kits that are suitable for various audio setups. Their products typically emphasize clarity and detail, making them a favorite among audiophiles.
- Pyramid: Pyramid offers tube amplifier kits that focus on providing a vintage sound experience, often incorporating retro designs and high-quality components. Their kits are ideal for those who appreciate classic audio aesthetics along with modern performance.
- DIY Audio: For those who love a hands-on approach, DIY Audio provides resources and kits that allow users to build customized tube amplifiers tailored to their specific audio preferences. This brand is popular among hobbyists who want to deeply engage with the construction and design of their equipment.
How Can You Successfully Build Your Own Kit Tube Amplifier?
Building your own kit tube amplifier can be a rewarding project, combining both technical skills and a love for quality sound.
- Choosing the Right Kit: Selecting the best kit tube amplifier is crucial for both beginners and seasoned builders. Look for kits that come with quality components, clear instructions, and a good reputation among audiophiles to ensure a successful build.
- Gathering Tools and Materials: Before starting the assembly, ensure you have all the necessary tools and materials. This typically includes a soldering iron, multimeter, wire cutters, and a variety of hand tools, as well as additional components like solder and heat-shrink tubing for a professional finish.
- Understanding the Schematic: Familiarizing yourself with the amplifier’s schematic diagram is essential for proper assembly. This understanding helps in troubleshooting, ensuring that each component is placed correctly and functions as intended in the circuit.
- Assembling the Components: Begin assembling the components according to the instructions, starting with the smallest parts and working your way up to larger pieces. Pay close attention to the orientation of components like capacitors and diodes, as improper placement can lead to circuit failure.
- Testing the Circuit: After assembly, testing the circuit before finalizing the build is vital to ensure everything works correctly. Use a multimeter to check for proper voltage levels and continuity, and address any issues before applying power.
- Final Assembly and Enclosure: Once the circuit is confirmed to be functioning, secure all components within an appropriate enclosure. This not only protects the internal components but also contributes to the aesthetic appeal of your amplifier.
- Tuning and Adjustment: After the amplifier is assembled and enclosed, some tuning may be necessary to optimize performance. This can include adjusting bias settings of the tubes or tweaking input/output levels to achieve the desired sound quality.
What Maintenance Tips Should You Follow for Your Kit Tube Amplifier?
To ensure optimal performance and longevity of your kit tube amplifier, consider the following maintenance tips:
- Regular Cleaning: Dust and grime can accumulate on the amplifier, affecting its performance and aesthetics. Use a soft, dry cloth to gently wipe down the exterior and ensure that ventilation grills are free from obstructions to prevent overheating.
- Tube Inspection: Periodically check the tubes for any signs of wear or damage, such as discoloration or cracks. Tubes can degrade over time, and replacing them when necessary will maintain the sound quality and reliability of your amplifier.
- Proper Ventilation: Ensure that your amplifier is placed in a well-ventilated area. Tubes generate heat during operation, and adequate airflow will help dissipate heat, reducing the risk of component failure due to overheating.
- Calibration Check: Regularly calibrate your amplifier to ensure it operates within the manufacturer’s specifications. This can include checking bias settings and adjusting as needed to optimize sound performance.
- Capacitor and Resistor Checks: Over time, capacitors and resistors can drift from their specified values. Inspecting and replacing these components when necessary can prevent sound degradation and maintain the integrity of the audio output.
- Storage Conditions: If storing your amplifier for an extended period, keep it in a controlled environment, away from extreme temperatures and humidity. This will help protect the internal components from damage due to environmental factors.
- Use Quality Cables: Invest in high-quality cables and connectors to reduce interference and ensure a clean signal path. Poor quality cables can introduce noise and degrade audio performance, negating the benefits of your kit tube amplifier.