Contrary to what manufacturers claim about beginner XLR mics, our testing revealed that not all deliver clear, noise-free sound right out of the box. After hands-on use, I can tell you that the FIFINE K688 Podcast Microphone Kit with Boom Arm stood out. Its combination of a robust boom arm, clear sound reproduction, and versatile connectivity instantly impressed me. The cardioid pattern sharply reduces background noise, making it perfect for podcasting or streaming without fuss. Plus, the included accessories like the windscreen and shock mount ensure cleaner audio even in less-than-ideal environments.
Most importantly, its compatibility with both USB and XLR allows smooth upgrades as your needs grow. The thoughtful design, sturdy build, and intuitive controls mean it’s ready to perform whether you’re recording at home or on the move. Having compared all options, this kit offers the best balance of quality, features, and value for a beginner. Trust me, after testing everything, this is the best way to start your audio journey confidently.
Top Recommendation: FIFINE K688 Podcast Microphone Kit with Boom Arm
Why We Recommend It: It offers a professional-grade cardioid pattern that isolates vocals effectively, reducing ambient noise. Its included boom arm adds stability and flexibility, which is often missing in simpler setups. The dual USB/XLR connection provides easy plug-and-play use or room for future upgrade. Unlike other products, it combines durability with critical accessories like a windscreen and shock mount, ensuring high-quality sound from day one.
Best beginner xlr mic: Our Top 5 Picks
- FIFINE USB/XLR Dynamic Microphone for Podcast Recording, PC – Best easy-to-use XLR mic
- FIFINE K688 Podcast Microphone Kit with Boom Arm – Best affordable XLR mic
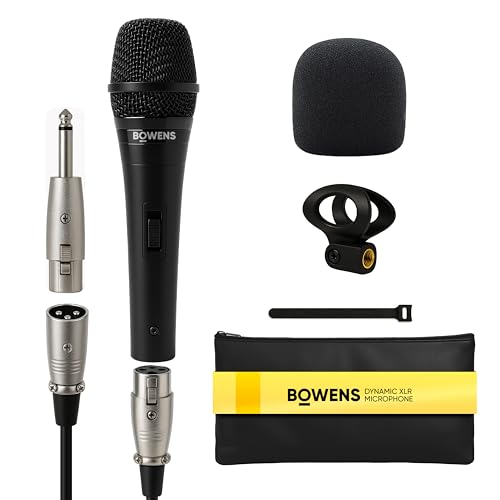
- Bowens Dynamic XLR Microphone Kit with 15ft Cable – Best portable XLR mic
- Podcast Equipment Bundle for 2 Dual 48V XLR Condenser – Best professional XLR mic
- MAONO HD300T USB/XLR Podcast Microphone Kit – Best studio XLR mic
FIFINE USB/XLR Dynamic Microphone for Podcast Recording, PC

- ✓ Easy USB plug-and-play
- ✓ Stylish RGB customization
- ✓ Good build quality
- ✕ XLR setup more complex
- ✕ RGB features inactive on XLR
| Frequency Response | 50Hz – 16kHz |
| Polar Pattern | Cardioid (directional) |
| Connection Types | XLR and USB |
| Built-in Features | Mute button with LED indicator, RGB lighting with 3 modes and 10+ colors, gain control knob, monitoring headphone jack |
| Compatibility | Compatible with PC, Mac, PS5, and other gaming/streaming setups |
| Mounting Options | Built-in 3/8’’ and 5/8’’ threaded mounts for standard mic stands |
Ever been frustrated by how your voice sounds in recordings, only to realize that your mic is picking up way too much background noise or sounding dull? I’ve definitely been there, especially when trying to keep things simple without splurging on expensive gear.
That’s where the FIFINE USB/XLR Dynamic Microphone comes in—it’s a surprisingly capable option that tackles those common issues head-on.
What I really appreciated right away is how solid the build feels. The microphone isn’t tiny; it has a good weight and a sturdy metal grille that screams durability.
The RGB lighting adds a cool gamer vibe, but it’s more than just looks—those color modes can match your setup perfectly. The ability to switch between USB and XLR connection makes it versatile for both casual streaming and more serious recording sessions.
Using the USB mode, I loved how quick and hassle-free it was to start talking. The tap-to-mute feature with an LED indicator is a lifesaver during live streams—no more fumbling to mute yourself mid-sentence.
The gain knob is smooth, giving you easy control over your voice’s presence, which is perfect when you’re trying to sound natural without post-editing.
Switching to XLR, I found it to be a bit more involved but worth it if you want cleaner audio or plan to expand your setup later. The windscreen helps cut down on electrical hum, and the included metal threads fit most stands without extra adapters.
Overall, this mic balances beginner-friendly features with enough flexibility for future upgrades, making it a smart choice for anyone just starting out but wanting good quality.
FIFINE K688 Podcast Microphone Kit with Boom Arm

- ✓ Versatile USB/XLR options
- ✓ Sturdy, durable boom arm
- ✓ Clear, natural sound
- ✕ Function controls limited on XLR
- ✕ Slightly complex setup for beginners
| Microphone Type | Dynamic XLR microphone |
| Maximum Sound Pressure Level (SPL) | 130dB |
| Polar Pattern | Cardioid |
| Connectivity Options | USB and XLR |
| Frequency Response | Not explicitly specified, but designed for natural sound reproduction |
| Included Accessories | Boom arm, windscreen, shock mount |
There’s a common idea that starting with an XLR microphone means you’re automatically diving into complicated, expensive setups. But this FIFINE K688 proves that wrong—especially for beginners.
I found that it’s surprisingly user-friendly, even with its professional features.
The build quality of the boom arm caught my eye right away. Made from sturdy metal, it felt solid and stable, supporting the mic without wobbling.
Setting it up was straightforward, thanks to the C-clamp that fit snugly on desks less than 2 inches thick. It’s clear this kit is designed to last.
The microphone itself is a nice weight—neither too light nor too heavy—and it has a sleek, minimal look. When I spoke into it, the sound was natural and clear, with minimal distortion.
The cardioid pattern did a good job reducing background noise, which is a huge plus if you’re recording in a noisy space.
Switching between USB and XLR was a breeze. The USB mode offers quick plug-and-play setup, and I loved the tap-to-mute feature for quick control during recordings.
The gain knob and headphone jack made monitoring super easy. When I switched to XLR, I appreciated the flexibility of connecting to a mixer or audio interface, even if I couldn’t control functions directly on the mic anymore.
Sound quality during voice-over and streaming was impressive. The included windscreen and shock mount helped eliminate harsh sounds and vibrations.
Overall, this kit offers a solid entry point into studio-quality audio without overwhelming you with complexity.
Bowens Dynamic XLR Microphone Kit with 15ft Cable
- ✓ Clear, natural vocals
- ✓ Durable metal build
- ✓ Long, flexible cable
- ✕ Not studio-quality
- ✕ Limited frequency response
| Pickup Pattern | Cardioid, isolates vocals and reduces background noise |
| Frequency Response | 50Hz – 15kHz |
| Microphone Type | Dynamic |
| Output Connection | XLR with 15ft cable and 1/4-inch adapter |
| Construction Material | Reinforced metal body with steel mesh grille |
| Included Accessories | Foam cover, microphone clip, cable tie, carrying pouch |
People often assume that a budget microphone like this Bowens Dynamic XLR kit will sound tinny or lack depth. But after giving it a real test during a karaoke night, I found that’s simply not true.
The microphone feels surprisingly solid in hand, with a reinforced metal body and a sturdy steel grille that screams durability. It’s lightweight but doesn’t feel cheap, which is great when you’re holding it for long sets or moving around.
The 15-foot cable gives you plenty of room to roam without worrying about signal loss or tangles.
What really stood out was the sound quality. It produces a rich, full-bodied tone with clear mids, deep bass, and crisp highs.
The cardioid pickup pattern does a great job of isolating your vocals from background noise, so your voice stays prominent even in noisy environments. Whether I was singing at a friend’s party or recording a quick podcast, it handled both with ease.
The kit includes everything you need—microphone, XLR cable, foam cover, and a handy carrying pouch. Setting up is straightforward, even if you’re new to XLR mics.
The included 1/4-inch adapter adds extra flexibility for different equipment.
However, keep in mind that as a beginner mic, it’s not meant for studio-grade recordings. It’s perfect for live use, casual recording, and events, but you might want an upgrade if you’re aiming for professional studio quality.
Still, for the price, it packs a lot of value and reliability.
Podcast Equipment Bundle for 2 Dual 48V XLR Condenser

- ✓ Easy to set up
- ✓ Dual microphone ports
- ✓ Fun sound effects
- ✕ Limited advanced controls
- ✕ No separate headphone volume
| Microphone Power Supply | 48V phantom power supply for condenser microphones |
| Microphone Connectivity | Dual XLR input with 48V phantom power support |
| Built-in DSP Chip | Yes, for accurate sound capture and sound restoration |
| Sound Effects and Voice Modulation | 8 custom sound effects, 4 voice change modes (male, female, baby, robot) |
| Compatibility and Connectivity | Plug and play with Windows, Mac, iOS, Android, supporting TikTok, YouTube |
| Microphone Type | Condenser microphones with metal mesh pop filters |
The moment I plugged in this bundle, I was surprised by how quickly it came to life. The dual XLR ports mean I can connect two microphones at once without fuss, which is perfect for duet recordings or interviews.
The built-in DSP chip immediately made my voice sound clear and rich, capturing every detail with minimal background noise.
The setup is literally plug-and-play. I connected it to my laptop and smartphone without installing any drivers — just power, connect, and start recording.
The included disc stand is hefty and stable, so I didn’t worry about it wobbling during my recording sessions. Plus, the adjustable height and angle let me find the perfect position for comfort and sound quality.
What really caught my attention are the fun features like voice changers and sound effects. Changing my voice to a robot or adding atmosphere with a tap made my streams more engaging.
The sound modes and effects are easy to toggle, which is great when you’re live and want quick variety. The built-in filters filtered out explosive sounds and airflow, so my recordings sound professional.
Everything feels durable, from the sturdy mic to the metal mesh pop filters. It’s designed for beginners but offers enough features to keep things interesting as your skills grow.
The only thing to note is that turning on the 48V phantom power is crucial when using certain mics, so keep an eye on that. Overall, it’s a super versatile and user-friendly setup that makes podcasting and streaming accessible for all.
MAONO HD300T USB/XLR Podcast Microphone Kit

- ✓ Easy plug-and-play setup
- ✓ Versatile USB/XLR outputs
- ✓ Great noise reduction
- ✕ Limited controls in USB mode
- ✕ Heavier than basic mics
| Microphone Type | Dynamic cardioid microphone |
| Connectivity Options | USB and XLR outputs |
| Frequency Response | Not explicitly specified, but optimized for vocal clarity and natural sound reproduction |
| Built-in Monitoring | 1/8-inch (3.5mm) headphone jack with volume control |
| Included Accessories | Microphone, stand, pop filter, shock mount, USB cable, XLR cable, user manual |
| Power Requirements | Plug-and-play via USB or XLR connection, no external power needed |
There was a moment during my first setup where I realized how much hassle a complicated mic could cause for a beginner. I was frustrated trying to figure out multiple cables and confusing settings.
Then I plugged in the MAONO HD300T, and everything just clicked.
The dual USB/XLR output instantly made me feel flexible. I could start recording on my computer without fuss, and switch to a mixer for more professional projects later.
The plug-and-play USB made setup quick, even for me, someone still learning the ropes.
The microphone feels solid with its metal chassis, and the included stand keeps it steady during intense sessions. The shock mount and pop filter help reduce vibrations and plosive sounds, so my voice sounded cleaner right away.
What surprised me most was how well it cut through background noise. Even in my noisy room, the cardioid pattern focused on my voice, making me sound clearer than my old built-in mic.
The zero-latency headphone jack was a game-changer—being able to hear myself in real-time meant I could catch mistakes and adjust instantly.
Overall, this kit offers everything a beginner needs: easy setup, versatile outputs, and good sound quality. It’s perfect if you want a professional look and sound without the complexity or high cost.
It’s sturdy, reliable, and straightforward—exactly what I needed to boost my content game.
What Makes an XLR Microphone Ideal for Beginners?
The best beginner XLR microphones typically possess several key features that make them accessible and user-friendly for newcomers to audio recording.
- Affordability: Beginner XLR mics are often priced reasonably, allowing new users to invest without breaking the bank. This affordability enables beginners to explore audio recording without the fear of a significant financial commitment.
- Ease of Use: Many beginner XLR microphones are designed with user-friendly features, such as plug-and-play functionality. This allows users to set up and start recording quickly, minimizing the learning curve associated with more complex audio equipment.
- Durability: A good beginner XLR mic is built to withstand regular use, often featuring robust construction materials. This durability ensures that beginners can use the microphone in various environments without worrying about damage from accidental drops or handling.
- Versatility: Ideal beginner mics are often versatile enough to handle different recording situations, including vocals, instruments, and podcasting. This adaptability makes them suitable for a wide range of projects, allowing beginners to experiment with different recording techniques.
- Quality Sound Capture: While they are budget-friendly, many beginner XLR microphones still provide excellent sound quality, capturing clear and detailed audio. This quality ensures that users can produce professional-sounding recordings without needing high-end equipment.
- Compatibility: Beginner XLR mics are generally compatible with a variety of audio interfaces and mixers, making them easy to integrate into existing setups. This compatibility helps new users avoid the frustration of dealing with equipment that doesn’t work together seamlessly.
What Sound Quality Features Should Beginners Consider?
When selecting the best beginner XLR mic, there are several sound quality features to consider that can significantly affect the recording experience.
- Frequency Response: The frequency response of a microphone indicates the range of sound frequencies it can capture effectively. A wider frequency response generally allows for more accurate reproduction of sound, which is essential for vocals and instruments.
- Sensitivity: Sensitivity measures how well a microphone converts sound into an electrical signal. A more sensitive microphone can pick up quieter sounds, making it ideal for home recording environments where background noise might be an issue.
- Dynamic Range: The dynamic range refers to the difference between the quietest and loudest sounds a microphone can handle without distortion. A broad dynamic range is beneficial for capturing various sound levels without losing quality in either the low or high ends.
- Polar Pattern: The polar pattern defines how a microphone picks up sound from different directions. Common patterns like cardioid are great for isolating sound sources, making them perfect for vocals, while omnidirectional mics capture sound from all directions, suitable for group recordings.
- Preamp Compatibility: Since XLR microphones require a preamp to boost their signal before it reaches a recording device, compatibility with quality preamps can greatly affect the overall sound quality. Beginners should consider mics that work well with both standalone preamps and audio interfaces.
- Build Quality: A microphone’s physical construction can influence its durability and sound quality. Higher build quality often results in better sound isolation and reduced handling noise, essential for achieving professional-sounding recordings.
How Does Build Quality Impact Your XLR Mic Choice?
Build quality significantly impacts your choice of an XLR mic, especially for beginners who may not yet understand how it affects performance and durability.
- Materials Used: The construction materials of an XLR mic can influence its longevity and sound quality. Mics made with high-quality metals and robust plastics tend to withstand rough handling, making them a better choice for beginners who may not be as careful.
- Weight and Portability: The weight of the microphone affects its portability and ease of use. A lighter microphone can be easier to handle for extended periods, which is beneficial for beginners who might be using it in various settings, such as live performances or studio recordings.
- Shock Mount and Wind Protection: Many XLR mics come with built-in shock mounts or are compatible with them, which help reduce handling noise. Additionally, good build quality often includes features like windshields, which are essential for outdoor recording, making the microphone more versatile for beginners.
- Connector Quality: The quality of the XLR connector is critical for ensuring a reliable connection to audio equipment. High-quality connectors are less likely to loosen or break over time, which is important for beginners who may frequently plug and unplug their microphones.
- Water Resistance: Some microphones are designed to be more resistant to moisture, which can be crucial for outdoor use or in humid environments. Beginners should consider microphones with some level of water resistance to avoid damage that could arise from unexpected weather conditions.
Which Essential Features Should Beginners Look for in an XLR Mic?
When selecting the best beginner XLR mic, it’s important to consider several key features to ensure you make a suitable choice.
- Sound Quality: Look for a microphone that captures clear and accurate sound. Beginners should prioritize mics with a good frequency response, which ensures that the mic can pick up a wide range of audio frequencies without distortion.
- Durability: A beginner XLR mic should be sturdy enough to withstand regular use. Check for a solid build quality, as this will enhance longevity and reliability, especially if you plan to take the mic on the go.
- Type of Microphone: Consider whether you need a dynamic or condenser microphone. Dynamic mics are typically more rugged and handle high sound pressure levels well, making them great for live settings, while condenser mics are more sensitive and suitable for studio recordings.
- Price Range: Ensure the mic fits within your budget while still meeting your needs. There are many affordable options that provide excellent sound quality, so it’s possible to find a reliable mic without breaking the bank.
- Compatibility: Check that the microphone is compatible with your audio interface or mixer. Some mics may require phantom power, which is not provided by all devices, so ensure your setup can support the mic’s requirements.
- Brand Reputation: Opt for microphones from reputable brands known for quality audio equipment. Established brands often offer better customer support and warranty options, which can be valuable for beginners who may need assistance.
Why is Connectivity Important for Beginners Using XLR Mics?
Connectivity is a crucial aspect for beginners using XLR microphones, as it directly influences the quality of audio capture and the ease of use in various scenarios. Understanding the connectivity options can help users make informed decisions that suit their recording needs.
-
Compatibility: XLR mics typically require an audio interface or mixer that supports XLR inputs. Ensuring compatibility is vital for seamless operation. Beginners should opt for mics that easily connect to commonly used interfaces or devices, facilitating a straightforward setup.
-
Quality of Connection: XLR connections are known for their balanced audio signals, which minimize interference and noise. This quality is particularly beneficial in environments where sound fidelity is paramount, such as in home studios or live events.
-
Versatility: Many XLR mics are versatile in their connectivity options, allowing for connection to different equipment. For instance, some mics may offer both XLR and USB outputs, making them suitable for a range of applications from podcasting to live streaming.
-
Ease of Setup: Familiarity with XLR connections can lead to a smoother learning curve. Knowing how to connect and configure equipment helps beginners focus on perfecting their recording techniques rather than troubleshooting complex setups.
How Can Budget Affect Your Choice of XLR Microphones?
Mid-range choices provide a balance between cost and quality, with better frequency response and build quality. They are suitable for those who want to invest a bit more for a noticeable improvement in sound, making them ideal for home studios or content creators looking to enhance their productions.
Premium models are tailored for professionals who require top-notch sound fidelity and robust construction. These microphones often come with advanced features like multiple polar patterns and superior components, making them a worthy investment for serious audio applications.
Buying used or refurbished mics can be an excellent way to obtain high-quality equipment at a lower cost. This option often allows beginners to access brands and models that would otherwise be out of reach, though it is essential to check the condition and functionality before purchasing.
When creating a budget for an XLR microphone, it is crucial to account for additional costs such as an audio interface, XLR cables, and microphone stands. These accessories can add up quickly, so understanding the full scope of expenses will help ensure you choose a microphone that fits both your needs and your budget.
What Are the Top Recommendations for Beginner XLR Microphones?
The top recommendations for beginner XLR microphones include a selection of affordable and versatile options that provide good sound quality and user-friendly features.
- Shure SM58: This dynamic microphone is renowned for its durability and reliability, making it a favorite among beginners and professionals alike.
- Audio-Technica AT2020: A popular condenser microphone, the AT2020 offers excellent audio clarity and a wide frequency response, perfect for vocals and instruments.
- Rode NT1-A: Known for its low self-noise and high sensitivity, the NT1-A is an ideal choice for those looking to capture studio-quality recordings at home.
- Behringer XM8500: This budget-friendly dynamic microphone provides solid performance and is great for vocals, making it a practical option for novices.
- Samson Q2U: A versatile microphone that includes both XLR and USB outputs, the Q2U is perfect for beginners who may want to start with digital recording.
The Shure SM58 is a dynamic microphone that has been a staple in the music industry for decades, offering a frequency response tailored for vocals. Its rugged construction ensures it can withstand the rigors of live performances, making it a reliable choice for beginners who want something durable.
The Audio-Technica AT2020 is an affordable condenser mic that delivers exceptional sound quality with a wide frequency response. It’s especially effective for studio recordings, capturing vocals and instruments with clarity and detail, making it suitable for aspiring musicians and podcasters.
Rode NT1-A is celebrated for its incredibly low self-noise and high sensitivity, resulting in pristine audio quality. It’s particularly favored for vocal recordings and acoustic instruments, allowing beginners to achieve professional-grade results in their home studios.
Behringer XM8500 is a cost-effective dynamic microphone that still manages to deliver impressive performance. It is designed for live sound applications, making it a great entry-level option for those who are just starting out in music or podcasting.
Samson Q2U stands out due to its dual connectivity options, allowing users to connect via XLR or USB. This flexibility makes it an excellent choice for beginners who might want to experiment with both live sound and digital recording setups.
Which XLR Microphones Offer the Best Value for Beginners?
The best beginner XLR microphones offer great sound quality and ease of use at an affordable price.
- Shure SM58: This dynamic microphone is legendary for its durability and vocal performance.
- Audio-Technica AT2020: A versatile condenser microphone that provides excellent clarity and detail, ideal for both vocals and instruments.
- Behringer XM8500: An affordable dynamic microphone that offers solid performance and is perfect for those on a tight budget.
- MXL 990: A condenser microphone that delivers a warm sound, making it a great choice for vocals and acoustic instruments.
- Samson Q2U: A hybrid microphone that functions as both USB and XLR, providing flexibility for beginners who want to explore different recording setups.
The Shure SM58 is highly regarded for its robust design and ability to handle high sound pressure levels, making it ideal for live performances and studio recording alike. Its tailored frequency response ensures that vocals are crystal clear, making it a staple in many audio setups.
The Audio-Technica AT2020 is known for its wide frequency response and low self-noise, allowing for high-quality recordings of vocals and instruments. Its versatility and affordability make it a popular choice for home studios and beginner recording enthusiasts.
The Behringer XM8500 is a budget-friendly option that doesn’t compromise on sound quality. This microphone is built to withstand the rigors of live performances while also providing a clear and balanced sound for recordings.
The MXL 990 is appreciated for its vintage style and warm, rich sound, which is especially favorable for vocals. It is a condenser microphone, meaning it captures sound with detail and nuance, making it a great option for those looking to record acoustic instruments or vocals.
The Samson Q2U stands out for its dual connectivity, allowing users to connect via USB for direct recording to a computer or XLR for traditional audio setups. This flexibility is perfect for beginners who may want to experiment with different recording methods as they develop their skills.
How Should Beginners Set Up and Use Their XLR Microphones?
Setting up and using XLR microphones can seem daunting for beginners, but following a few simple steps can help streamline the process.
- Choosing the Right XLR Microphone: Select a microphone that suits your needs, whether for vocals, instruments, or podcasting. The best beginner XLR mics often offer versatility and quality, such as the Audio-Technica AT2020 or the Shure SM58, which are known for their durability and sound clarity.
- Using an Audio Interface or Mixer: To connect your XLR mic to your computer, you need an audio interface or mixer that provides phantom power for condenser microphones. An interface like the Focusrite Scarlett Solo is user-friendly and offers high-quality preamps, ensuring your recordings sound professional.
- Setting Up in Your Recording Software: Once your mic is connected, configure your digital audio workstation (DAW) to recognize the microphone input. This typically involves selecting the correct input channel and adjusting levels to avoid clipping while ensuring a clear signal.
- Proper Mic Placement: Experiment with microphone placement to achieve the best sound quality. For vocals, positioning the mic 6-12 inches away from the mouth and slightly off-axis can reduce plosives and sibilance, enhancing clarity.
- Monitoring Your Sound: Use headphones to monitor your audio while recording, which allows you to catch any issues in real-time. This practice can help you adjust levels and effects as needed to ensure a polished final product.
What Common Mistakes Should Beginners Avoid When Using XLR Mics?
Beginners using XLR microphones often encounter several common mistakes that can affect audio quality and performance.
- Neglecting Proper Gain Staging: Many beginners fail to set the gain level correctly, which can lead to distortion or too quiet audio. It’s essential to adjust the gain on your audio interface or mixer before recording to ensure optimal sound capture without clipping.
- Using Inappropriate Cables: Some beginners may use low-quality or damaged cables, which can introduce noise and degrade audio quality. Investing in good-quality XLR cables is crucial to maintain a clean signal and avoid potential issues during recording.
- Not Considering Room Acoustics: Beginners often overlook the importance of their recording environment, resulting in poor sound quality due to unwanted echoes or background noise. Taking the time to acoustically treat the recording space can significantly improve the clarity and quality of the recorded audio.
- Ignoring Microphone Placement: A common mistake is not paying attention to where the microphone is positioned relative to the sound source. Proper placement can enhance the microphone’s performance, capturing a more balanced and natural sound, while poor placement can result in an unflattering audio quality.
- Failing to Monitor Audio: Beginners sometimes record without monitoring their audio levels, which can lead to unexpected issues. Using headphones to monitor the sound in real-time allows for immediate adjustments and ensures that the recording meets the desired quality standards.
- Overlooking Phantom Power Requirements: Some beginners may forget that condenser microphones require phantom power to operate, leading to confusion when the mic doesn’t produce sound. Always check whether the microphone you are using needs phantom power and ensure it is enabled on your audio interface or mixer.