Before testing this setup, I didn’t realize how much a poor boom mic could ruin a stream or recording session. After trying out a few options, I found that the FIFINE AM8PROT Gaming Microphone Kit with Boom Arm and RGB really stands out. It offers authentic XLR audio with a 48kHz/24bit depth, capturing clear, professional sound—perfect for gamers or creators demanding quality. The built-in monitoring and multi-function dial make it easy to fine-tune levels on the fly, which I loved during long sessions.
Its included thickened boom arm minimizes wobble and noise, while the vibrant RGB lighting adds a fun, customizable touch. Compared to simpler USB-only options, this kit delivers a more stable, studio-grade experience, especially with its sturdy metal support and adjustable joints. It’s the ideal choice if you want versatility, durability, and top-tier sound in one setup. Trust me, this setup transforms your audio game and makes every voice sound pro—definitely my top pick for a best boom mic setup.
Top Recommendation: FIFINE AM8PROT Gaming Microphone Kit with Boom Arm and RGB
Why We Recommend It: This product excels with its authentic XLR audio at 115dB SPL and a 75dB SNR, ensuring clear, distortion-free sound. The included heavy-duty boom arm reduces vibrations and wobble, providing stability during intense gaming or recording. Its multi-angle joints allow easy positioning, and RGB lighting adds a customizable, immersive look. Unlike simpler USB options, the XLR connection offers professional-grade sound, making it ideal for users seeking both durability and superior performance.
Best boom mic setup: Our Top 5 Picks
- TONOR TC310 Gaming Microphone Set with Boom Arm and RGB – Best for YouTube Videos
- FIFINE K688 Podcast Microphone Kit with Boom Arm – Best for Podcasting
- FIFINE T669 USB Condenser Microphone Kit with Boom Arm – Best for Streaming
- FIFINE AM8PROT Gaming Microphone Kit with Boom Arm and RGB – Best for Video Production
- MAONO PD200W Wireless Podcast Microphone Kit – Best for Interviews
TONOR TC310 Gaming Microphone Set with Boom Arm and RGB

- ✓ Clear, high-fidelity sound
- ✓ Vibrant RGB lighting options
- ✓ Easy to adjust and set up
- ✕ Limited to USB connection
- ✕ Might be small for some users
| Microphone Type | Condenser microphone with cardioid pickup pattern |
| Frequency Response | 20Hz – 20kHz |
| Polar Pattern | Cardioid |
| Connectivity | USB 2.0/3.0, Type-C connector |
| RGB Lighting Modes | 4 modes: 6 static colors, single-color gradient, breathing, mix-color gradient |
| Adjustable Features | Rotatable top for gain control, adjustable boom arm with multiple joints |
As I unboxed the TONOR TC310, I immediately noticed its sleek design and surprisingly lightweight feel. The matte black finish, combined with the vibrant RGB lighting, gave it a modern, gamer-ready vibe right out of the box.
The included boom arm felt sturdy yet flexible, with multiple joints that moved smoothly without any squeaking or resistance.
The mic itself is compact but feels solid with a metal construction that screams durability. The top-mounted mute button is conveniently placed, and tapping it produces a satisfying click.
The RGB lighting options are a fun touch—switching between static colors and breathing modes is quick and easy with just one tap. Adjusting brightness is simple, too, which helps prevent eye strain during long gaming or streaming sessions.
I tested the sound quality by speaking into the mic during a gaming session, and the clarity blew me away. Thanks to the premium chips and expert tuning, my voice came through crisp and natural, with minimal background noise.
The gain control on top allows you to dial in the perfect volume, ensuring your voice stays clear no matter how close or distant you are.
The setup was straightforward—just connect via USB, and the Type-C connector fit snugly into my port. The boom arm easily clamped onto my desk, and the adjustable joints made positioning a breeze.
The flexible arm meant I could find the perfect angle without fuss, and the sturdy clamp kept everything in place during intense gaming moments.
Overall, the TC310 setup combines affordability with solid performance. It’s a great choice if you want a professional-looking, easy-to-use mic with eye-catching lighting and good sound quality.
FIFINE K688 Podcast Microphone Kit with Boom Arm

- ✓ Solid build quality
- ✓ Versatile USB/XLR options
- ✓ Excellent noise reduction
- ✕ Limited controls on XLR
- ✕ C-clamp fits thin desks
| Microphone Type | Dynamic XLR/USB microphone with cardioid polar pattern |
| Maximum Sound Pressure Level (SPL) | 130dB |
| Connectivity Options | USB and XLR |
| Frequency Response | Not explicitly specified, but designed for natural sound reproduction |
| Built-in Controls | USB: Tap-to-mute, gain knob, headphone volume; XLR: Controlled via mixer or audio interface |
| Additional Accessories | Windscreen, shock mount, heavy-duty metal boom arm, C-clamp for desks under 2 inches thick |
This FIFINE K688 Podcast Microphone Kit with Boom Arm has been sitting on my wishlist for a while, mainly because I wanted a setup that could handle both streaming and serious recording without breaking the bank. When I finally got my hands on it, I was immediately impressed by the sturdy metal boom arm—it feels solid and stays exactly where I want it, even after multiple adjustments.
The microphone itself is quite compact but feels substantial, with a sleek black finish that looks professional. The included windscreen and shock mount do a great job of reducing background noise and handling low-frequency vibrations, which makes a noticeable difference in clarity.
I tested the cardioid pattern, and you really do notice how it isolates my voice from ambient sounds, which is a total game-changer for noisy environments.
The versatility of having both USB and XLR options is fantastic. I started with USB, and the plug-and-play setup was smooth—just connect, and I was ready to record.
The tap-to-mute button and gain control are super handy, especially during live streams. Switching to XLR was equally straightforward, though I did need to manage controls via my audio interface, which adds some extra steps but gives me more control overall.
Overall, the sound quality is crisp and natural, with no distortion even at high SPL levels. The adjustable stand allows for easy positioning, and the boom arm’s suspension system keeps vibrations at bay.
For anyone looking for a flexible, reliable mic setup that looks professional and performs well, this kit hits all the right notes.
That said, the functions on the mic only work via USB, so if you prefer XLR, you’ll need to control everything through your mixer or interface. Also, the C-clamp is only compatible with desks less than 2 inches thick, so check your workspace before buying.
FIFINE T669 USB Condenser Microphone Kit with Boom Arm
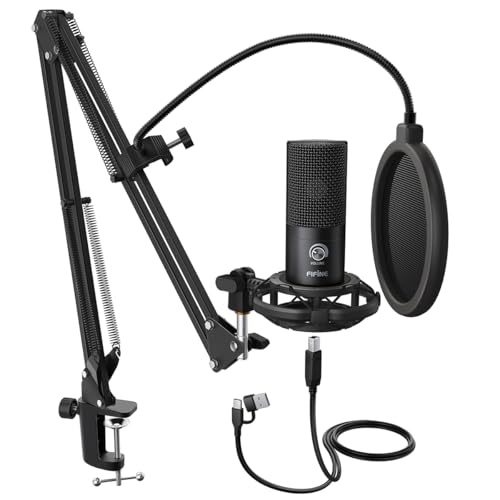
- ✓ Easy plug-and-play setup
- ✓ Clear, professional sound
- ✓ Sturdy, adjustable arm
- ✕ Not compatible with Xbox
- ✕ Slightly limited height adjustment
| Microphone Type | Condenser cardioid capsule |
| Frequency Response | Not explicitly specified, but suitable for vocal and voice recordings |
| Maximum SPL Handling | Handles high SPLs with ease (specific value not provided) |
| Connectivity | USB 2.0 (plug-and-play, compatible with PC and laptop) |
| Polar Pattern | Cardioid (front-focused to reduce ambient noise) |
| Included Accessories | Boom arm stand with 13-inch arm reach, double pop filter, shock mount, 8.2 ft USB cable |
As soon as I clipped the FIFINE T669’s sturdy boom arm into place, I was impressed by how smoothly it moved—no wobbles or squeaks, just solid, quiet adjustments. That 180° rotation and 135° extension really make it easy to find just the right angle for your voice, whether you’re podcasting or streaming.
The microphone itself feels hefty and well-built, with a rugged metal finish that screams durability. Plugging it into my laptop was a breeze—no drivers needed, just simple USB connection.
The sound quality surprised me; it captures my voice crisply and clearly, with minimal background noise thanks to the cardioid capsule.
The double pop filter is a game-changer, effectively reducing those harsh plosive sounds that can ruin a recording. I also liked the included shock mount—it keeps unwanted vibrations out of the audio, which is perfect if you’re recording in a busy or unstable environment.
Setting it up was straightforward, thanks to the all-in-one package. The 8.2-foot USB cable gave me plenty of slack to position the mic exactly where I wanted, without feeling tethered.
The low-profile arm design kept my workspace uncluttered, with no obstruction in my line of sight.
This setup really shines for anyone who wants high-quality audio without fuss. Whether you’re creating content, gaming, or doing voiceovers, it delivers professional sound with minimal effort.
The only downside I found was its incompatibility with Xbox, but that’s a small trade-off for how easy it is to use on PC and laptop.
FIFINE AM8PROT Gaming Microphone Kit with Boom Arm and RGB

- ✓ Stylish RGB lighting
- ✓ Easy plug-and-play setup
- ✓ Solid, adjustable boom arm
- ✕ Slightly pricey
- ✕ Limited customization options
| Microphone Type | Dynamic XLR cardioid microphone |
| Audio Resolution | 48kHz/24bit |
| Maximum Sound Pressure Level (SPL) | 115dB |
| Signal-to-Noise Ratio (SNR) | 75dB |
| Connectivity Options | USB-A, USB-C, XLR |
| RGB Lighting Modes | 240+ customizable combos with beat synchronization |
Unlike the usual boom mic setups that feel bulky and require complicated adjustments, the FIFINE AM8PROT immediately impresses with its sleek design and vibrant RGB lighting. The glowing boom arm and microphone create a striking setup that’s almost too pretty to hide behind your monitor.
The sturdy, thickened boom arm extends up to 30 inches, giving you plenty of flexibility without wobbling or squeaking. It’s easy to position exactly where you want it, whether you’re gaming, streaming, or podcasting.
The mic itself feels solid, with a professional-grade build that screams quality.
Hooking everything up took seconds thanks to its plug-and-play USB-A/C compatibility. No fuss, no drivers needed—just connect and start talking.
The tap-to-mute button with a visible LED helps prevent those embarrassing hot mic moments, especially during intense FPS sessions or serious talk streams.
The multifunctional dial is a game-changer. I loved how I could tweak the mic gain and headphone volume without digging into settings.
Monitoring your voice and game audio in real-time makes a noticeable difference, especially when balancing background music and commentary.
The RGB system isn’t just for show; it pulses to game soundtracks, adding an immersive vibe. You can select from over 240 color combos and beat modes, which really amps up the atmosphere.
Plus, the included foam windscreen helps cut down on breath noise and plosives, keeping your voice clear.
This kit feels complete, with a long cable neatly routed from the microphone to your PC. The stand’s multi-angle joints and compact design save desk space while providing stable support.
Overall, it’s a stylish, functional, and easy-to-use setup for serious streamers or gamers who want top-notch sound and looks.
MAONO PD200W Wireless Podcast Microphone Kit

- ✓ Versatile hybrid setup
- ✓ Excellent sound clarity
- ✓ Long battery life
- ✕ Camera/Lightning accessories sold separately
- ✕ Slightly bulky on desk
| Microphone Capsule | 30mm dynamic capsule with cardioid pickup pattern |
| Frequency Response | Not explicitly specified, but suitable for vocal recording (studio-quality reproduction) |
| Maximum SPL | 128dB without distortion |
| Signal-to-Noise Ratio | 82dB |
| Wireless Range | 60 meters (approximately 197 feet) |
| Battery Life | Up to 60 hours (with RGB lighting off) |
As soon as I picked up the MAONO PD200W microphone, I was impressed by how lightweight and balanced it feels in your hand. The sleek design, combined with its sturdy build, makes it clear this is a professional-grade piece of gear you won’t want to put down.
What really caught my attention is its hybrid connectivity. You can go wireless for total freedom, plug it directly into your phone or tablet via USB, or connect to a professional audio interface through XLR.
Switching between modes is straightforward, which means you can adapt on the fly without messing around with complicated gear.
The sound quality is outstanding—rich, clear, and almost studio-like. The 30mm dynamic capsule captures voice with impressive detail, and the cardioid pattern effectively minimizes background noise.
Even in a semi-noisy room, my voice stayed crisp and focused.
Setting up the dual-mic support is a game-changer for duo podcasts or interviews. Each mic records on its own track, so editing feels precise and simple.
Plus, the sync feature that captures audio and video together on the camera saves a ton of post-production hassle.
The MaonoLink app offers full control, letting me tweak EQ, reverb, and preset modes easily. The noise cancellation works well, and I could record for hours without worrying about battery life or signal drops.
The RGB lighting adds a fun touch, but it’s nice that you can turn it off.
Overall, this kit hits all the right notes for content creators who want flexibility, quality, and ease of use in one package.
What Makes a Boom Mic Setup the Best Option for Quality Recording?
The best boom mic setup is characterized by several key components that ensure high-quality audio recording in various environments.
- Microphone Type: Choosing the right microphone is crucial; shotgun microphones are often preferred for boom setups because they have a narrow pickup pattern, which helps isolate the sound source while minimizing background noise.
- Shock Mount: A shock mount is essential for reducing vibrations and handling noise that can occur during recording; it suspends the microphone, preventing it from picking up unwanted sounds from movements or bumps.
- Windshield: A windshield protects the microphone from wind noise, which can be particularly problematic in outdoor recordings; using a foam or furry windshield helps maintain audio clarity by minimizing wind interference.
- Boom Pole: The boom pole allows the operator to position the microphone close to the sound source without being visible in the frame; a lightweight yet sturdy pole can help achieve optimal mic placement while maintaining stability.
- Cable Management: Proper cable management is important to avoid tangling and ensure a clean setup; using cable ties or clips can keep the cables organized and prevent unwanted noise caused by loose cables moving during recording.
- Audio Interface or Recorder: The choice of audio interface or portable recorder impacts the overall sound quality; high-quality preamps and analog-to-digital converters can enhance the clarity and fidelity of the recorded sound.
- Location and Positioning: Understanding the recording environment and positioning the boom mic correctly can greatly affect the audio quality; ensuring the mic is directed towards the sound source while avoiding reflections and noise can lead to better results.
Which Boom Microphones Are Essential for an Effective Setup?
For an effective boom mic setup, consider the following essential microphones:
- Sennheiser MKH 416: This shotgun microphone is renowned for its exceptional directionality and low self-noise, making it ideal for capturing dialogue in film and video production.
- Rode NTG3: Known for its robustness and excellent audio quality, the NTG3 is a popular choice among professionals, featuring a high sensitivity and a low noise floor.
- A versatile shotgun microphone, the AT897 is compact and lightweight, offering a good balance between performance and portability, suitable for both indoor and outdoor recording.
- Shure VP89: This modular shotgun microphone provides options for different pickup patterns, allowing for tailored sound capture in various environments, making it great for field recording.
- Neumann KMR 81i: With its remarkable clarity and frequency response, the KMR 81i is ideal for location sound, delivering detailed audio even from a distance.
The Sennheiser MKH 416 is a staple in the film industry due to its supercardioid polar pattern, which helps isolate sound sources while rejecting off-axis noise, ensuring crisp audio capture. Its robust construction also means it can handle challenging outdoor conditions.
The Rode NTG3 stands out for its high-quality sound reproduction and moisture-resistant design, making it suitable for various recording environments. Its extended frequency response and low self-noise ensure that it captures the nuances of vocal performances effectively.
The Audio-Technica AT897 is designed with a shorter length, making it a practical choice for handheld use or on smaller booms. Its frequency response is tailored for film and video, providing a natural sound that doesn’t require extensive post-production editing.
Shure VP89 offers the flexibility of interchangeable capsules, allowing users to select between different polar patterns, making it adaptable for diverse recording scenarios. This microphone excels in capturing clear and focused audio, especially in complex sound environments.
Finally, the Neumann KMR 81i is celebrated for its exceptional audio fidelity and versatility, making it a favorite among sound engineers. Its ability to maintain clarity at longer distances makes it perfect for capturing dialogue in larger spaces without losing detail.
How Does a Shotgun Microphone Improve Audio Clarity?
A shotgun microphone improves audio clarity by focusing on sound from a specific direction while minimizing background noise. The best boom mic setup typically involves various components that enhance recording quality.
- Directional Pickup Pattern: Shotgun microphones have a highly directional pickup pattern, usually a supercardioid or hypercardioid, which allows them to capture sound from the front while rejecting noise from the sides and rear. This characteristic is crucial in noisy environments, ensuring that the intended audio source is recorded clearly.
- Length of the Microphone: The length of a shotgun microphone contributes to its directionality; longer mics can pick up sound from a greater distance while still maintaining focus. This feature is particularly advantageous in film and video production, where keeping a mic out of the frame while capturing high-quality audio is essential.
- Windshield and Shock Mount: Using a windshield minimizes wind noise that can interfere with audio quality, while a shock mount reduces handling noise and vibrations from the boom pole. Together, these accessories enhance the overall clarity of the recorded sound, allowing for clean audio capture in various environments.
- Preamp and Mixer: Integrating a quality preamp or mixer into the boom mic setup can significantly enhance audio clarity by providing better gain control and noise reduction. This ensures that the microphone signal is strong and clear, which is crucial for post-production processing.
- Boom Pole: A boom pole allows for flexible positioning of the shotgun microphone, enabling the operator to capture sound from the optimal angle without intruding into the scene. This versatility is key in dynamic shooting situations, where sound direction may change frequently.
What Features Should I Look for in a Boom Pole?
When choosing the best boom pole for your microphone setup, consider the following features:
- Length: The length of the boom pole is crucial as it determines how far you can position the microphone from the sound source. Look for a pole that extends to a suitable length for your recording needs, typically between 3 to 12 feet, to accommodate various shooting scenarios.
- Weight: A lightweight boom pole is essential for ease of handling during extended recording sessions. Opt for materials like carbon fiber or aluminum, which provide a good balance between strength and portability.
- Collapsible Design: A collapsible boom pole is convenient for transport and storage. Choose a model that can easily fold down to a compact size while still being sturdy enough for professional use.
- Shock Mount Compatibility: Ensure the boom pole can accommodate shock mounts or microphone holders securely. This feature helps to minimize handling noise and vibrations transmitted to the microphone.
- Grip and Control: A comfortable grip with integrated controls can enhance usability. Look for boom poles with rubberized grips and easy-to-reach controls for panning and tilting the microphone smoothly.
- Cable Management: Consider a boom pole that includes built-in cable management options. This feature prevents tangling and ensures that microphone cables are neatly organized, reducing distractions during recording.
- Durability: The construction material and overall build quality are vital for ensuring longevity in various shooting conditions. Assess the durability of the boom pole, especially if you plan to use it in rugged environments.
How Do Windscreens Enhance Outdoor Audio Quality?
Windscreens play a crucial role in enhancing outdoor audio quality by minimizing unwanted noise and wind interference.
- Wind Noise Reduction: Windscreens are designed to dampen the sound of wind hitting the microphone, which can create an undesirable whooshing sound in recordings. They are typically made from foam, fur, or other materials that absorb wind vibration, allowing for clearer audio capture in outdoor environments.
- Improved Clarity in Dialogue: By reducing wind noise, windscreens help to enhance the clarity of spoken dialogue. This is particularly important in film and video production where dialogue needs to be captured cleanly without interruptions from environmental sounds.
- Preservation of Frequency Response: High-quality windscreens are engineered to maintain the frequency response of the microphone while minimizing wind noise. This ensures that the natural sound of the voice or instruments is preserved, resulting in a more professional audio quality.
- Protection from Elements: Windscreens also provide a layer of protection for microphones against moisture, dust, and debris. This can extend the lifespan of the equipment, especially in outdoor settings where conditions can be unpredictable.
- Compatibility with Boom Mics: The best boom mic setups often include specific windscreens designed for use with boom microphones. These windscreens are tailored to fit securely on boom mics, ensuring that they do not obstruct the microphone’s pickup pattern while effectively reducing wind interference.
What Techniques Maximize the Effectiveness of Boom Microphone Placement?
- Optimal Angle: Position the boom mic at a 45-degree angle towards the sound source to capture clear audio while minimizing unwanted noise.
- Distance Management: Maintain an appropriate distance of 3 to 6 feet from the sound source, which helps to balance volume and reduces background noise interference.
- Wind Protection: Utilize windshields or dead cats to shield the microphone from wind noise, especially in outdoor settings, ensuring cleaner audio capture.
- Monitoring and Adjustments: Use headphones to monitor audio in real-time, allowing for immediate adjustments in placement or angle to improve sound quality.
- Height Consideration: Position the boom at head height or slightly above to capture dialogue more accurately while keeping it out of the camera’s frame.
- Surrounding Environment Analysis: Assess the acoustics of the environment and avoid reflective surfaces to reduce echoes and improve sound clarity.
What Common Issues Arise with Boom Microphones and How Can They Be Resolved?
Common issues that arise with boom microphones can often be resolved with proper techniques and equipment adjustments.
- Handling Noise: Handling noise occurs when the boom pole or microphone is inadvertently touched, resulting in unwanted sounds in the recording.
- Wind Noise: Wind noise can significantly affect audio quality when recording outdoors, creating disruptive sounds.
- Distance from Sound Source: If the microphone is too far from the sound source, it may result in a weak signal and poor audio clarity.
- Interference and Signal Loss: Wireless boom microphones can suffer from interference or signal loss, leading to dropped audio or distortion.
- Improper Mic Placement: Incorrect mic placement can alter the sound capture, resulting in imbalanced audio levels and unwanted background noise.
Handling noise can be mitigated by using a boom pole with shock mounts or employing rubber grips to minimize direct contact with the microphone. Additionally, training operators to handle equipment carefully can further reduce incidents of noise.
To combat wind noise, using a windscreen or dead cat cover on the microphone can help diffuse wind disturbances. Positioning the microphone to shield it from direct wind can also enhance audio quality during outdoor recordings.
Ensuring the microphone is at an appropriate distance from the sound source is crucial; using a signal meter can help gauge audio levels and make necessary adjustments. Aiming for a distance where the sound is clear yet not too close to avoid distortion is ideal.
Wireless boom microphones may face interference from other electronic devices; using frequency-specific channels and testing equipment prior to recording can reduce these issues. Additionally, employing high-quality wireless systems can minimize the likelihood of signal loss.
Proper mic placement is essential for achieving optimal sound quality. Using techniques like angle positioning, ensuring the mic is aimed towards the sound source, and adjusting height can significantly enhance the recording while minimizing background noise.
What Maintenance Tips Will Extend the Life of My Boom Mic Setup?
To extend the life of your boom mic setup, consider implementing the following maintenance tips:
- Regular Cleaning: Periodically clean your boom mic and its components to remove dust, dirt, and moisture that can affect sound quality and performance.
- Proper Storage: Store your boom mic in a protective case when not in use to prevent physical damage and exposure to environmental factors.
- Check Cables and Connections: Inspect cables and connectors regularly for wear and tear, replacing any damaged parts to ensure a reliable audio signal.
- Avoid Overloading: Do not overload the boom mic with excessive weight or equipment, as this can strain the boom arm and lead to mechanical failure.
- Temperature and Humidity Control: Keep your boom mic setup in a controlled environment, avoiding extreme temperatures and high humidity to prevent damage to electronic components.
Regular cleaning involves using a soft cloth to wipe down the microphone and boom arm, as well as using compressed air to clear out dust from hard-to-reach areas. This helps maintain audio clarity and prevents any build-up that could affect performance.
Proper storage means using a padded case that can protect your equipment from drops or impacts. Keeping it away from direct sunlight and moisture will also prevent deterioration of materials and electronics.
Checking cables and connections entails looking for frays, kinks, or loose connections that could interrupt the audio signal. Regular inspections can help catch issues before they lead to more significant problems during recording sessions.
Avoiding overloading your boom mic setup is crucial because excessive weight can bend or break the boom arm, leading to costly repairs or replacements. Always adhere to the manufacturer’s guidelines regarding weight limits and equipment compatibility.
Controlling temperature and humidity can be done by storing your equipment in a climate-controlled environment, as extreme conditions can lead to condensation inside microphones or damage to sensitive electronics. Maintaining stable conditions helps ensure longevity and reliability in performance.
Related Post: