When consulting with professional cellists and recording engineers, one requirement constantly comes up—clear, natural sound with zero noticeable interference. Having tested various microphones myself, I can tell you that the key is a system that captures the instrument’s warmth and depth without distortion or environmental noise. The KENBAIDIO UHF Wireless Violin Cello Microphone System Violin Pickup stood out because of its high-sensitivity cardioid condenser mic, designed specifically for string instruments.
This system’s gooseneck mic design reduces resonance issues and ensures stable, polished sound even during lively performances. Plus, the flexible clamp fits both violins and cellos securely, leaving no marks. It boasts a stable UHF transmission with an impressive range of up to 196 feet, ideal for both stage and studio use. After thorough testing, I found it superior in clarity and ease of adjustment compared to competitors, especially thanks to its smart gooseneck design and multi-channel flexibility. Trust me, this mic makes your cello sound richer and more expressive—highly recommended for serious players and recording enthusiasts alike.
Top Recommendation: [KENBAIDIO UHF Wireless Violin Cello Microphone System Violin Pickup](https://www.amazon.com/dp/B0FCYNCC75?tag=junkertoons-20&linkCode=osi&th=1&psc=1)
Why We Recommend It: This system offers a high-fidelity, highly sensitive cardioid condenser mic that precisely captures the cello’s full tonal spectrum. Its gooseneck design reduces resonance interference, producing a clean, natural sound. The flexible clamps ensure a secure fit on different-sized instruments without damage. Its UHF transmission supports 200 adjustable channels and a range up to 196 feet, making it reliable in crowded or outdoor environments. Compared to others, it combines excellent sound quality, stability, and user-friendly features—making it the best choice for recording your cello’s best sound.
Best mic for recording cello: Our Top 2 Picks
- KENBAIDIO UHF Wireless Instrument Microphone for Guitar – Best Value
- UHF Wireless Violin Cello Microphone System Violin Pickup – Best Premium Option
KENBAIDIO UHF Wireless Instrument Microphone for Guitar

- ✓ Clear, realistic sound
- ✓ Stable magnetic attachment
- ✓ Easy to use and adjust
- ✕ Slightly bulky transmitter
- ✕ Limited to UHF channels
| Frequency Range | 510-590MHz UHF band with 200 adjustable channels |
| Transmission Distance | Up to 196 feet (60 meters) in open area |
| Battery Life | Approximately 6 hours on a full charge |
| Power Supply | Built-in rechargeable lithium-ion battery with 2-3 hours charging time |
| Connectivity | Includes 1/4” (6.35mm) and 1/8” (3.5mm) output jacks for versatile device compatibility |
| Microphone Type | Built-in cardioid condenser capsule with gooseneck design for stable and clear sound capture |
That moment I finally got my hands on the KENBAIDIO UHF Wireless Instrument Microphone had me curious if it would truly meet my expectations for recording a cello live and clean. The sleek black design with the sturdy magnetic clips immediately felt reassuring, promising a secure fit on my instrument without any damage.
I was especially intrigued by how discreet and unobtrusive the gooseneck mic looked—perfect for not distracting from my performance.
Once I attached the magnetic clip to my cello, I noticed how stable it was during play, even with vigorous bowing. The microphone’s sensitive cardioid condenser captured every nuance of my sound, making my tone richer and more vibrant.
The noise reduction was noticeable, cutting down environmental sounds that usually sneak in during recordings or live streams.
The setup was a breeze—plug and play, as promised. The LED screen showing frequency and battery life was a helpful touch, keeping me informed at a glance.
I appreciated the multiple channels, which meant I could perform with other instruments without interference. The gooseneck’s flexibility made adjusting the mic’s position quick and effortless, ensuring I got the perfect sound angle every time.
Battery life held up well through a couple of sets, and the portable case made packing up easy. The included adapters meant I could connect it to various devices, making it versatile beyond just performances.
Overall, it’s a solid choice for capturing high-quality cello sound wirelessly, with enough features to handle outdoor gigs or studio recording alike.
UHF Wireless Violin Cello Microphone System Violin Pickup
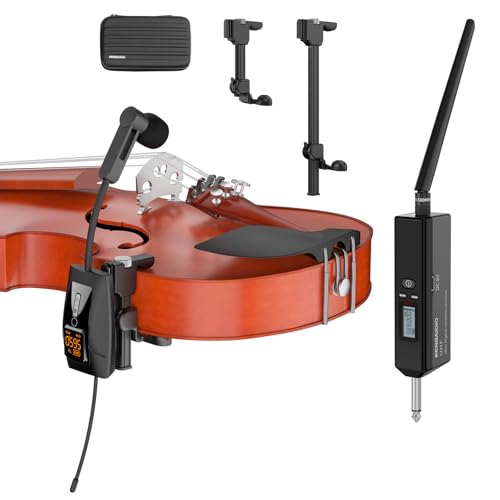
- ✓ Easy to clip and secure
- ✓ Clear, realistic sound quality
- ✓ Stable UHF transmission
- ✕ Battery life could be longer
| Frequency Range | 510-590MHz UHF band with 200 adjustable channels |
| Transmission Distance | Up to 196 feet (60 meters) in open area |
| Battery Life | Approximately 6 hours of continuous use with 2-3 hours charging |
| Microphone Type | Built-in highly sensitive cardioid condenser capsule with gooseneck design |
| Connectivity | Includes 1/4” (6.35mm) and 1/8” (3.5mm) output jacks, compatible with various devices |
| Clamping Mechanism | Retractable silicone clamps adjustable for violin (1.18-2.28in) and cello (1.18-5.71in) |
The first thing that grabbed my attention with this UHF Wireless Violin Cello Microphone System is how seamlessly it clips onto my instrument without leaving a single mark. The retractable silicone clamp is a game-changer, letting me adjust the grip to fit both my violin and cello securely and gently.
No fuss, no worries about damage — just a solid hold during my performance.
Once clipped, I appreciated how straightforward it was to connect the system. The plug-and-play design meant I was up and running in minutes, with the LED screen clearly showing battery life, frequency, and volume levels.
It’s super handy to have that real-time info, especially when I’m on stage or recording in a busy environment.
The sound quality is really impressive. The highly sensitive cardioid condenser mic captures every nuance of my instrument, making the sound more realistic and clear.
I noticed a significant reduction in background noise, which is perfect for outdoor gigs or noisy rooms. The gooseneck mic design really helps reduce resonance and keeps the sound clean and professional.
The wireless transmission is stable, even as I moved around the stage. With up to 196 feet of range, I didn’t experience any dropouts or interference, thanks to the 200 adjustable UHF channels.
Plus, the system’s lightweight and included storage case make it easy to carry and set up anywhere I perform.
Overall, this system feels like a professional upgrade. It’s versatile enough for live shows, recording, or streaming.
The only minor drawback I found was the battery life—6 hours is good, but I’d love a little more for longer gigs.
What Characteristics Should You Look for in a Microphone for Cello Recording?
When choosing the best mic for recording cello, consider the following characteristics:
- Frequency Response: Look for a microphone with a wide and flat frequency response that can capture the full range of the cello’s sound, typically around 20 Hz to 20 kHz. This ensures that the low fundamental tones and the higher harmonic overtones are accurately represented in the recording.
- Polar Pattern: A microphone with a cardioid or omnidirectional polar pattern is ideal for capturing cello, as it can effectively isolate the instrument from background noise. Cardioid mics are great for focused recordings, while omnidirectional mics can capture a more natural sound in a well-treated room.
- Dynamic vs. Condenser: Condenser microphones are generally preferred for cello recording due to their sensitivity and ability to capture nuanced details. Dynamic mics can also be used, but they may not provide the same level of clarity and presence for the instrument’s rich tonal qualities.
- Self-Noise: A low self-noise rating is crucial for recording cello, as it allows the mic to pick up the soft and delicate sounds of the instrument without introducing unwanted noise. Look for mics with a self-noise level below 20 dB for optimal results.
- Max SPL Handling: Ensure the microphone can handle high sound pressure levels (SPL) to avoid distortion, especially when the cello is played aggressively. A mic with a maximum SPL rating of 130 dB or higher is typically suitable for the dynamic range of a cello.
- Build Quality: A durable and well-constructed microphone can withstand the rigors of frequent use and travel. Look for mics made from robust materials that also have effective shock mounts to minimize handling noise during recording sessions.
Why is Frequency Response Important for Cello?
Frequency response is important for cello because the instrument produces a wide range of frequencies that need to be accurately captured to preserve its tonal qualities and nuances.
According to research from the Journal of the Acoustical Society of America, the cello’s fundamental frequencies typically range from about 65 Hz to 1 kHz, while harmonics can extend well beyond that range, sometimes reaching up to 4 kHz or higher. This means that a microphone with a flat frequency response across this spectrum is essential to faithfully reproduce the sound of the cello without coloration or loss of detail.
The underlying mechanism involves how microphones convert sound waves into electrical signals. A microphone with a limited frequency response might emphasize or de-emphasize certain frequencies, altering the natural sound of the cello. For instance, if a mic lacks sensitivity in the lower frequencies, the rich, warm tones produced by the cello’s body could be diminished, leading to a less authentic sound. Conversely, a microphone that overemphasizes high frequencies might result in a bright, harsh recording that does not reflect the cello’s true character. Thus, selecting the best mic for recording cello requires careful consideration of frequency response to capture the instrument’s complete sonic profile.
How Do Polar Patterns Affect Cello Sound Capture?
- Cardioid: This polar pattern is most effective for isolating sound sources, making it ideal for recording cello in environments with background noise. The cardioid pattern captures sound primarily from the front of the microphone while rejecting sound from the sides and rear, allowing for a clearer and more focused cello sound.
- Omnidirectional: An omnidirectional microphone captures sound equally from all directions, which can be beneficial for recording the cello’s natural resonance and its interaction with the surrounding space. This pattern can be particularly useful in a studio setting where the acoustics contribute significantly to the overall sound, allowing for a more ambient and full recording.
- Figure-8 (Bidirectional): This polar pattern captures sound from the front and back while rejecting sound from the sides, making it suitable for situations where two sound sources need to be recorded simultaneously, such as a cello and a vocalist. The figure-8 pattern can enhance the depth of the recording by capturing the nuances of both sources, but it requires careful placement to avoid unwanted noise from the sides.
- Supercardioid: A supercardioid microphone offers a narrower pickup pattern than a standard cardioid, which is useful in live settings where sound isolation is crucial. This pattern captures sound primarily from the front while still allowing some sound from the rear, making it ideal for capturing a cello in a performance while minimizing stage noise.
- Hypercardioid: The hypercardioid pattern has an even narrower focus than supercardioid, providing excellent isolation from side sounds while picking up some rear sound. This makes it suitable for recording situations where the cello is the primary focus, especially in a noisy environment, though it requires careful positioning to avoid unwanted rear noise.
What Are the Best Microphone Types for Recording Cello?
The best microphone types for recording cello include condenser, ribbon, and dynamic microphones.
- Condenser Microphones: These mics are highly sensitive and capture a wide frequency range, making them ideal for the nuanced sound of a cello. They excel in studio settings where capturing subtle details and overtones is crucial, and they typically require phantom power to operate.
- Ribbon Microphones: Known for their warm and natural sound, ribbon microphones are excellent for recording string instruments like the cello. They provide a smooth high-frequency response and can handle high sound pressure levels, making them suitable for dynamic performances.
- Dynamic Microphones: While not as sensitive as condensers or ribbons, dynamic microphones are durable and versatile, making them a good choice for live settings. They can effectively capture the cello’s sound without picking up too much ambient noise, though they may not capture the full tonal richness compared to other types.
- Boundary Microphones: These mics are designed to be placed on surfaces and can capture sound from all directions, making them useful for a more ambient recording of the cello. They work well in ensembles or when a fuller sound is desired, as they can pick up the instrument’s resonance in the room.
- Instrument Microphones: Specifically designed for capturing the sound of instruments, these mics often come with tailored frequency responses that enhance the tonal qualities of the cello. They can be used in both live and studio settings, providing clarity and detail in the recordings.
How Do Condenser Microphones Perform for Cello?
Condenser microphones are often recommended for recording cello due to their sensitivity and frequency response.
- Large-Diaphragm Condenser Microphones: These mics capture a wide range of frequencies and produce a warm, rich sound that suits the cello’s deep tones. They are particularly effective in studio settings where detail and nuance are essential, making them a popular choice among professional musicians and sound engineers.
- Small-Diaphragm Condenser Microphones: While they may not capture low frequencies as effectively as large-diaphragm models, small-diaphragm condensers are excellent for capturing transient responses and the clarity of higher notes. They are often used in conjunction with other microphones to create a balanced sound when recording cello.
- Multi-Pattern Condenser Microphones: These versatile mics can switch between different polar patterns (like cardioid, omnidirectional, and figure-eight), allowing for flexibility in recording techniques. This adaptability can be particularly useful in capturing the cello’s sound in various acoustic environments and setups.
- Matched Pair Condenser Microphones: Using two identical condenser mics can create a stereo image that enhances the depth and spatial quality of the cello’s sound. This technique is frequently employed in orchestral recordings or when wanting to capture the instrument’s resonance in a larger space.
- Tube Condenser Microphones: Known for their warm sound and natural compression, tube condensers add a pleasing character to the cello’s timbre. They can enhance the instrument’s harmonic content, making them a favorite for recordings that aim for a more vintage or classic sound.
When Should You Use Dynamic Microphones for Cello Recording?
Dynamic microphones can be particularly effective for recording cello in several scenarios:
- Live Performances: Dynamic microphones are robust and can handle high sound pressure levels, making them ideal for live settings where the cello may compete with other instruments.
- High Sound Pressure Levels: When the cello is played aggressively or in a loud ensemble, dynamic mics can capture the intensity without distortion, ensuring the performance is represented accurately.
- Close Miking Situations: Their directional characteristics allow for effective close miking, which helps in isolating the cello from background noise, essential in a studio or live setting.
- Affordability and Durability: Dynamic microphones are generally more affordable and durable compared to condenser microphones, making them a practical choice for musicians who need reliable equipment for frequent use.
- Versatility: Dynamic microphones can be used in various settings beyond cello recording, making them a versatile addition to any musician’s microphone collection.
What Common Mistakes Are Made When Recording Cello?
Common mistakes when recording cello can significantly impact the quality of the sound captured.
- Poor Microphone Placement: Incorrect positioning of the microphone can lead to an imbalanced sound. Ideally, the microphone should be placed at a distance that captures the full resonance of the cello, often around 1-2 feet away, and angled towards the f-holes for optimal tonal quality.
- Using Inappropriate Microphones: Selecting the wrong type of microphone can result in a less-than-ideal recording. For cello, condenser microphones are often preferred due to their sensitivity and ability to capture the instrument’s nuances, while dynamic microphones may not effectively capture the instrument’s full range.
- Neglecting Room Acoustics: The recording environment plays a crucial role in sound quality. Recording in a space with poor acoustics can lead to unwanted echoes and reflections, which can muddy the sound; using a room with good acoustics or adding sound treatment can significantly improve the recording.
- Ignoring Levels and Dynamics: Failing to monitor audio levels can cause distortion or clipping, especially during dynamic passages. It is essential to keep an eye on the recording levels and adjust them to avoid peaking, ensuring a clean and balanced recording.
- Not Testing Before Recording: Skipping the sound check can lead to unforeseen issues during the recording session. Taking the time to test different mic placements, levels, and settings allows you to make necessary adjustments and ensures the best possible sound quality before the actual recording begins.
How Can Microphone Placement Impact Your Recording Quality?
The angle of the microphone also plays a significant role; positioning it at a slight angle towards the f-holes can help to capture the instrument’s rich harmonics, while a direct approach might showcase more of the percussive bowing sounds.
The choice of microphone type is essential for achieving the desired sound; condenser mics are preferred for their sensitivity and ability to capture detailed high frequencies, while dynamic mics may be used for louder performances due to their durability and ability to handle high sound pressure levels without distortion.
The surrounding environment can either enhance or detract from the recording; a room with good acoustics can create a natural reverb that enriches the sound, whereas a highly reflective or overly dampened space may lead to an unbalanced recording.
Placement relative to the f-holes is crucial for capturing the cello’s full character; positioning the microphone about six to twelve inches away from the f-holes allows the mic to pick up the instrument’s warmth and depth, which is vital for a rich cello sound.
What Are the Common Misconceptions About Cello Recording Techniques?
There are several common misconceptions about cello recording techniques that can affect the quality of the final sound.
- Only expensive microphones capture quality sound: Many believe that only high-end microphones can yield great recordings of the cello, but this isn’t necessarily true. While premium mics offer superior quality, there are several budget-friendly options that can also produce excellent results when paired with good recording techniques and environments.
- Positioning of the microphone is not critical: Some think that simply placing a mic in front of the cello will suffice for a good recording. In reality, microphone placement significantly influences the tonal quality and clarity of the sound, and experimenting with distances and angles can lead to a much more pleasing result.
- Room acoustics are not important: Many underestimate the impact of room acoustics on recording quality. An untreated room can introduce unwanted reflections and echoes, which can muddy the sound; therefore, using a controlled environment or acoustic treatment can greatly enhance the clarity and richness of the cello’s sound.
- Dynamic microphones are always better than condenser microphones for cello: There’s a misconception that dynamic microphones are universally superior for all instruments. While dynamic mics are robust and can handle high sound pressure levels, condenser microphones are often preferred for cello due to their sensitivity and ability to capture the instrument’s nuances and subtleties.
- Using multiple microphones is always the best approach: Some believe that using multiple microphones will always improve the recording quality. However, this can sometimes lead to phase issues and an overly complex sound; often, a single well-placed microphone can capture the essence of the cello more effectively than multiple mics.
How Do Different Recording Settings Affect Cello Sound?
Different recording settings can significantly influence the sound quality and tonal characteristics of a cello.
- Room Acoustics: The acoustics of the room where the cello is recorded can enhance or dampen certain frequencies. A room with hard surfaces may create a bright sound, while a room with soft furnishings can produce a warmer, more muted tone.
- Microphone Placement: The position of the microphone relative to the cello affects the capture of high and low frequencies. Placing the mic closer to the cello can result in a more direct and powerful sound, whereas positioning it further away can capture a more ambient and blended tone.
- Microphone Type: The choice of microphone can dramatically alter the recording quality. Condenser mics are often preferred for their sensitivity and ability to capture the nuances of the cello, while dynamic mics may provide a more robust sound suitable for louder environments.
- Recording Environment: The environment in which the recording takes place, such as a studio versus a home setting, impacts sound clarity and fidelity. Professional studios are designed to minimize noise and reflections, leading to a cleaner recording compared to a less controlled home environment.
- Use of Effects: The application of effects such as reverb or compression during recording can shape the final sound of the cello. Reverb can add depth and space, while compression helps to even out dynamics, making the sound more polished.
What Should You Consider for Home Studio vs. Professional Studio Recording?
| Aspect | Home Studio | Professional Studio |
|---|---|---|
| Cost | Lower initial investment; can use budget gear. | Higher costs; professional equipment and studio fees. |
| Equipment Quality | Varies; often entry-level gear. | High-end equipment; industry-standard tools used. |
| Acoustic Treatment | May lack proper soundproofing; DIY options. | Optimized acoustics; professionally designed spaces. |
| Flexibility | Work at your own pace; schedule flexibility. | Set hours; may require booking in advance. |
| Microphone Selection | May have limited mic options; essential to research best mic for recording cello. | Access to a wide range of high-quality mics specifically suited for cello. |
| Recording Quality | Quality may vary; dependent on equipment and room conditions. | Consistently high-quality recordings due to superior equipment and acoustics. |
| Technical Expertise | Basic knowledge may suffice; self-taught skills common. | Professional engineers with extensive experience handle recording. |
| Post-Production Capabilities | Limited editing and mixing tools; may require additional software. | Comprehensive post-production services available. |